Making Christmas decorations out of paper: the best ideas for creativity. Paper craft without glue
In modern schools and preschool institutions, much attention is paid to working with paper. Both toddlers and schoolchildren love to create original crafts from paper. Working with her, the child develops his imagination, learns to think creatively, and also develops fine motor skills of fingers.
Simple voluminous gift boxes or voluminous figures can be made by hand by drawing a diagram on a piece of paper. Many crafts are almost impossible to put together without diagrams. Thanks to the templates, you can create complex voluminous fakes from colored paper or cardboard. Beautiful knick-knacks, furniture models and much more - any art lover can do.

To do this, you need to find on the Internet, for example, on the website of the Country of Masters, any template you like. Animals, birds, toys - everything can be created using ready-made templates and schemes.
Each template comes with instructions on how to assemble the craft. The template needs to be downloaded, printed on a printer, cut out a figure along the contour. On each figure on the template, dotted lines will be drawn along which the model should be folded. Glue the finished model with glue.
Easy paper crafts for kids
Children show interest in paper from childhood. To instill a love of creativity, parents should captivate the child with the creation of a variety of paper crafts. You can make a beautiful bright bird craft that a child can play with or use it to decorate a bedroom.
A simple cardboard bird:
- According to the template, cut out the shape of a bird, draw a beak, feathers, a tail.
- Fold an accordion from a square sheet of colored paper.
- Make a hole and fasten the wings in it.

If you cut out a few birds, you can make a Chinese breeze according to Feng Shui. By hanging the birds on a wooden stick, you can steal the entrance to the children's room with such a craft.
All cutting work must be carried out by adults or under their close supervision!
After working with paper, the child should put the entire tool in a box. This is how precision is developed.
Stylish cardboard and paper crafts: three-dimensional paintings
Application is considered the simplest paper craft; it is often studied in primary school. A beautiful three-dimensional picture of bright colors will become original gift from a child to a mother or grandmother. Flowers can be made from white toilet paper or napkins.
If you take toilet paper for crafts, it is better to use expensive white perforated paper, which can then be slightly painted over.
Working with napkins is very simple, but you need to be careful not to accidentally tear it. Therefore, you should be especially careful when creating such crafts.

Progress:
- Fold the napkin in four, fasten with a stapler in the middle. Cut out a circle from a napkin
- Raise each layer of the napkin in turn, forming a lush flower.
- From green paper, cut 6-7 leaves according to the pattern.
- Cut out a basket from brown paper, stick it on a thick red sheet of cardboard. Arrange flowers and leaves in the basket.
The basket can be made from corrugated paper any color, but it is desirable to stick it in a couple of layers. Instead of paper, you can use foil for baking or from chocolate bars.
Interesting paper crafts: weaving
There are a lot of ways to weave paper crafts, it is very interesting and original way creating crafts.
The simplest thing is to plait strips of paper between each other in a checkerboard pattern, creating an object. A more complicated way is weaving from paper twisted into tubes.
Depending on which paper you choose, your craft will have special properties.

There are several options:
- Newspaper;
- Glossy magazine;
- Tape for cash registers;
- Plain paper.
Note that it is easier to work with paper, which is durable - the craft, respectively, will come out more durable. An original drawing will come out of glossy magazines.
Do not intertwine different types of papers. Thick paper may not be intertwined with thin paper, and sometimes it can tear it.
Finished products can be decorated with ribbons, beads, quilling flowers, everything that your imagination is capable of.
How to make paper crafts: preparing paper tubes
Weaving from paper tubes is a very entertaining art. You can make tubes from magazine sheets - the material is quite dense and bright pictures will become an original pattern on the basket.
For manufacturing you will need:
- Paper;
- Scissors;
- Pencil;
- Ruler;
- Glue;
- Knitting needles.

First, let's prepare the tubes. Ribbons with a width of 90 mm of any length are simply wound on a knitting needle. We glue the edge, take out the knitting needle, leaving a couple of centimeters inside the tube, glue the second edge.
It is desirable to wind tightly, the accuracy of the product depends on this. Do not be distracted by extraneous matters, so the progress of work is lost.
By gradually pulling out the needle and building paper on it, you can lengthen your tube to the right sizes. To weave a basket, the length of the tube should be such that it is convenient for you to bend it.
Beautiful basket: paper crafts in stages
So, we made blanks, in addition to this, you will need a piece of durable cardboard, scissors and glue. From the cardboard you need to cut the bottom of the future basket. To do this, according to any template, cut out two cardboard circles.
Now you can start weaving baskets:
- Glue paper tubes around the circle on the first cardboard circle. Glue the second circle onto the tubes.
- We lift the tubes up and fasten with an elastic band.
- Glue the end of one tube to the base, then grab the standing tube from the outside, lead inward and grab the second tube from the inside.
- We alternate "outside-inside" until the tube ends.
- To lengthen the tube, you need to insert a new vine at the end of the previous one.
- In order for the basket to have a certain shape, when weaving it is better to insert a bottle or jar inside.
- Weave all rows to the required height.
- If there is a piece of vine left, do not cut it, it is better to fix it inside the finished basket. For fidelity, you can stick to one of the tubes.
- Frame tubes can be glued to the walls of the basket.
- We paint the finished product with acrylic paint, wait for complete drying and paint over again.
42.jpg)
The decorative basket is ready, you can put a small one there. artificial flower or adapt for hairpins and rubber bands.
Simple paper crafts: an angel on a Christmas tree
On the New Year I so want to decorate the house with beautiful decor. The easiest way is to make beautiful paper crafts yourself with a little effort. Even a child of 4-5 years old can make an angel craft under the supervision of their parents.
How to make a Christmas angel step by step:
- Cut out two squares of 10x10 cm from colored paper. Fold them like an accordion.
- Make a bend on the accordions, stepping back from the end of 3 cm. Bend one accordion to the right, the second to the left.
- Glue the bent fold to the bottom of the fan.
- To make the head, you need to cut 4-5 strips of paper as wide as the edge of the fan. We wind the strips on top of each other, forming a tight circle. Fix the size of the head with glue.
- Place the rest of the paper down.
- Glue the halves together. Angel is ready.
17.jpg)
If you want to decorate a Christmas tree with an angel, you can tie a serpentine to a halo and hang the craft on a branch.
You can also plant it on top of the tree. To keep it, just attach the craft to the branch with a regular clothespin.
White Paper Crafts: Volumetric Snowflake
Volumetric snowflakes look spectacular, besides, they can decorate an apartment before the holiday and decorate a Christmas tree. To create such a craft, you will need paper, scissors, glue.
How to make a three-dimensional snowflake step by step:
- Cut out 6 squares from sheets of paper.
- Fold the square in half to make a triangle. Make cuts from the bottom fold towards the top corner. The cuts should not meet, you need to leave a small gap between them. Thus, make 3 triangular cuts.
- Unfold the sheet and place it in front of you in the form of a diamond.
- Fold the first inner row of strips together, fix with glue.
- Turn the craft over, repeat step 4 with the following strips.
- Turn over and fasten all remaining strips.
- In a similar way, make 6 parts of a snowflake.
- Fasten together in 3 parts with a stapler.
- Glue the two halves together.

When working, it is better to use glue with a brush or a glue stick.
If, when gluing, a loop-ribbon is placed in the center, the finished craft can be hung anywhere.
White and colored paper is suitable for work. A snowflake made of paper will look very unusual, where one side is colored and the other is white.
The easiest children's paper crafts without scissors
Easy and beautiful craft for kids - "The Universe through the eyes of a child." The figure can depict the month, stars and others. celestial bodies. This craft can be done without cutting.
To work, you will need very few materials - glue, confetti (or small pieces of torn paper) and a dark blue sheet of cardboard.
How to do:
- Collect confetti from crackers or cut out a bunch of small circles of multi-colored paper with a hole punch.
- Take a stencil and apply a drawing on a sheet - a crescent, stars and planets.
- Paint over the drawn figures with PVA and, until it is dry, sprinkle with ready-made confetti.
The finished picture can be decorated with a shiny frame, for it you need to finely chop the New Year's rain and stick it along the contour of the picture in the same way.
7.jpg)
Work with such crafts can be carried out even with preschool children - in kindergartens or early development circles.
Applications can also be decorated in this way. Decorating, for example, a Christmas tree cut out of a green leaf, you can make a beautiful New Year's craft.
Fascinating paper crafts for children: mobile toys
Such toys are very interesting for children. You pull the string, and the arms and legs of the animal or doll move. In fact, making such a figure is quite easy.
An entertaining puppet toy can also be made from plywood, but since cardboard is more malleable in manufacturing, we will analyze this option better.
To work, you will need cardboard, a couple of buttons, thin wire, scissors, strong thread and bards.

How to make a puppet dog:
- Moving parts (paws and tail) are drawn on cardboard separately and cut out.
- Subsequently, at these points, we make fastenings with wire or bards. Buttons can be used as a stopper.
- We glue the torso and head with adhesive tape or glue to a bamboo stick.
- We insert into the pre-made holes in the paws along the mount and combine with the body. We tie the paws together with a thread or elastic band. To do this, we make two additional holes in each foot so that they are located closest to each other, and the thread is not visible from the front side.
- In the same way we fasten the tail and connect it to the hind leg.
- After we tie another long thread to the one between the legs, it will set in motion all the moving limbs.
- The final stage of painting, at your discretion.
Having performed a cat, a fox, a hare using a similar technology, you can arrange a puppet theater for kids. Every child will like a play based on their favorite fairy tale with the participation of animals.
Paper crafts without glue: simple origami for kids
The origami technique is quite complicated, but you really want to make your child interesting voluminous toy with your own hands.
This chicken is one of the most interesting and relatively simple crafts. The sheet of paper must be square.
Tip: if you go when tearing off to avoid severely torn edges, fold the sheet in both directions.
For cutting, you can use scissors or a ruler with a sharp clerical knife.
Origami chicken step by step:
- Fold the square sheet diagonally. Unfold, fold in half.
- Having unfolded, we bend the left and right corners of the square inward, combining them in the middle of the square. The result is a pentagon.
- We bend the top of the cone in the middle. Then we bend the same cone in the opposite direction, so that a small corner protrudes beyond the border of the sheet - the future beak.
- We combine the left and right sides of the whole craft, put it so that the beak is on the left.
- We bend the upper right corner into the middle of the product.
- The lower right corner, it consists of two sheets, we bend them outward of the product. We do this by combining the lower sides, while we bring a small corner beyond the extreme left border - these are the legs of the chicken.
- We turn out a small corner-tail.
- We lower the beak a little. You can paint over with a regular red pencil for more realism. Draw eyes.
Such a craft can surprise a child, intrigue him. Having aroused interest in the toy, you can enlist the baby to help create a similar origami next time.
Master class: do-it-yourself paper crafts (video)
In fact, you can make so many crafts out of paper and cardboard that you can’t list them - animals, birds, cars, dolls. They can be voluminous or simple, colored or white. The richer your imagination, the more interesting the craft is.
The celebration of the New Year and Christmas is based on the idea of bringing family members, relatives and close people closer together. The general occupation of creativity is a good opportunity to interest adults and children, and the actual occasion will be the production New Year's toys from paper with your own hands. On the eve of the holidays, it's nice to spend time with your family and beautifully decorate the house before the clock strikes 12 times.
DIY paper Christmas decorations can be hung on the Christmas tree, walls, ceiling. Bright colors of toys and garlands will fill the house with a festive atmosphere, give a good mood in last days outgoing 2019.
Christmas decorations made of white paper (master classes)
Simple and affordable material for creativity - White paper. The color is fully consistent with the New Year theme. Decorations are associated with fluffy snow, frosty patterns on the windows, snow-white hoarfrost. Snowflakes are cut out of white paper, funny vytynankas, figurines of angels are made, you can use decorations for decorating a room, windows, decorating a Christmas tree. The master class for making such products is quite simple, adults and children will successfully cope with the work.
Snowflakes
A classic Christmas decoration is the usual bulky snowflake. White products look beautiful on windows, especially if you make snowflakes of different sizes with different patterns. The main thing is to fold paper snowflakes correctly.
Manufacturing process:
- Take a sheet of A4 paper, fold it in half diagonally.
- Cut off the excess, leaving a triangle.
- Connect the corners, bend the paper, repeat.
- Wrap the right corner of the workpiece to the edge.
- Cut off excess paper, transfer the pattern pattern.
- Cut out a white snowflake and unfold.


It is more convenient to glue simple white snowflakes made like napkins on windows. They are easy to fold, apply a pattern pattern, cut. Ideas for schemes can be taken from the photo below or come up with your own.
 6 variants of snowflakes with different patterns
 Vytynanki
Volumetric figurines of a vytynanka with many holes can be given as a cute New Year's present, hung on a Christmas tree, or you can decorate a window with them. To create a craft, you need white paper, a vytynanka template, a clerical knife, glue, a cutting board (a cutting board is suitable).
How to make a bulge:
- You need to print a figure template from the Internet.
- For a three-dimensional figure, 2 copies are printed.
- The paper is placed on the board, all the patterns are cut out with a knife.
- At the bottom of the picture, leave a strip of paper for gluing.
- Cut out drawings are glued in the upper part.
- The lower strips are formed into a clasp ring, glued together.

The figurine turns out to be voluminous and stable, such paper decor looks beautiful in the room. As a basis, you can take the Christmas tree template in the photo below.
 Download this picture and print it out
 Angels
New Year and Christmas themes are ideally matched with paper angels. Traditionally, they are made of white paper flat or voluminous.
Several options for how to make angels:
- Print the template using a printer, cut out a figure, decorate with sparkles, rhinestones, hang on shiny threads.

- Cut out a three-dimensional angel, paper elements: two truncated cones, head, halo, sleeves, wings. The cones are folded, glued, and the remaining elements of the figure are attached to the dress.

- Craft by own drawing. The sheet is folded in half, the figure of an angel with wings, a halo is drawn on one half, the craft is cut out, unfolded - the figure is ready.

If you thread the strings through the halo of an angel and prepare several figures, you get interesting decoration for a chandelier.

small house
For New Year's decorations, you can prepare fabulous houses and decorate some parts of the craft with sparkles. The houses themselves can be made from old postcards, cardboard, unnecessary boxes. There are many options! A template for making Christmas decorations from paper is downloaded and printed.
 Template example
 Next, the scheme is transferred to paper. Cut out the house according to the template, bend the paper along the fold line (it turns out a box). Separately cut out the roof, smoker, windows. All elements of the craft are glued to the finished box, decorated as desired.

From such New Year's paper decorations with your own hands, you can create a whole composition, decorate a window sill with it, add figurines of fairy-tale characters, Santa Claus, Snow Maiden.

Christmas decorations made of colored paper (master classes)
Beautiful and unusual New Year's decorations made of colored paper with your own hands can be made for the holiday in advance. Such bright crafts are used to decorate a room, hang on Christmas tree. Even a small child can make a simple chain garland.
You need to prepare scissors, glue, several sets of colored paper for craft blanks, optionally choose beautiful beads, beads, rhinestones, sparkles, colored ribbons. Simple DIY paper Christmas decorations are interesting and relevant.
simple garlands
The simplest christmas garland- chain. For her, paper of different colors is chosen to alternate the links with each other. They cut blanks of any length and thickness, then glue all the strips - first they make the first link, thread a paper strip into it, glue it again and repeat the steps until a garland of the desired length is obtained.

Another interesting decoration option is a chain of colored hearts, and it is much easier to connect the elements with a stapler. By analogy with the previous master class, the required number of narrow strips are cut from colored paper. They take the first two strips, fasten them with a stapler, turn them inside out (as if opening them), connect the two free edges, add two new strips to them, and then fix them with a bracket. It turns out an unusual decoration, looks elegant in the decor of the room.

A more complex decoration is a voluminous garland made up of multi-colored paper balls. Additionally, to make crafts, you need a sewing machine, but if you don’t have one, you can do the work manually.
How to make a paper balloon garland:
- Cut out 6 circles of the same size from colored paper in different colors.
- Prepare several sets of circles along the length of the garland.
- Stitch a stack of blanks on a typewriter, then the next and to the end.
- Carefully wrap the fragments at the seam, forming bright balls.

For crafts, you can take wrinkled or non-uniform paper - the craft will turn out more fun. Garlands are hung from the diagonal corners of the room, they decorate the Christmas tree, walls, and ceiling.

Garland of flags
A popular Christmas decoration for the home is a garland of colorful multi-colored paper flags. On colored paper, draw the shape of a flag with a fold line in the middle and cut it out. It should be a two-sided element. In the same way, flags of a different color are prepared. Each flag is opened, glue is applied to the fold line and a strong thread is glued until the required number of paper parts for the garland is collected.

Alternatively, the flags can be made triangular by gluing the free corners of the products. Sometimes patches of colored fabric are used for such decoration. After the New Year, you can hang garlands with flags to decorate a children's holiday.

Christmas trees
What is the New Year without a Christmas tree? You can decorate the festive beauty with your own colored paper crafts. To make a three-dimensional hanging decoration, you need to take paper, scissors, cardboard, glue and tape.
We make a Christmas tree in this order:
1. Cut multi-colored narrow identical strips and make a paper cone.

2. Glue the edges of each strip like a loop.

3. Glue the blanks to the cone starting from the bottom with adhesive tape or glue.

4. Decorate the top of the Christmas tree and loops with any decor, you can also hang decoration on the Christmas tree.

As an option, an interesting garland is assembled from paper Christmas trees - the figures are sewn to a bright ribbon or fixed above and below (chaotically) on a colored cord.
Christmas balls
One of the most popular Christmas decorations- balls. Colorful, bright, shiny toys make the Christmas tree more beautiful and more fun. Christmas balls can be made from colored paper.
From paper strips
To make a simple ball, cut out thin paper strips (at least 18 pieces, more stripes, a more beautiful toy) and two small circles. A large bead is selected, a thread is inserted into it, and both ends of the thread are threaded into the eye of the needle.
After that, a paper circle and all prepared strips are strung on a needle over one edge. The next step is to string the second edge of each strip, the second circle and one more bead in order, bring out the loop. If the thread is loosened, a beautiful ball-shaped toy is obtained, it can be additionally decorated.

From circles
Wicker paper balls
You can use ready-made schemes for Christmas decorations to make balls and make them out of paper with your own hands or weave complex toys. Curly stripes and a small circle are cut out according to the templates. Lay out the details in the shape of a flower, glue a circle in the center. Next, the strips need to be woven like a pigtail of many strands.
So that the structure does not fall apart, and it is convenient to work, the strips are fixed with ordinary clothespins. By the end of the weaving, a ball will form, the edges of the curly strips are again fastened with a circle and a loop of shiny thread is threaded.

 Option 1
  Option 2
  Option 3
 On the video: New Year's ball made of colored paper.
magic lamps
Colored paper lanterns look unusual and original on the Christmas tree. Decorations are easy to make, even children can handle the work. Lamps symbolize warmth, wealth, prosperity and good luck. There are several simple master classes on how to make DIY Christmas decorations from paper in the form of Christmas tree lanterns.
The most popular option: they take two sheets of different colors, glue a tube from one - the middle of the flashlight, and fold the second sheet in half, retreat 1 cm from the edge, draw a line. Then cuts are made from the fold to the drawn line. The cut sheet must be opened, wrapped around the tube of the cylinder, glued the edges and made a loop-handle at the top of the flashlight.


Striped lantern
To make a beautiful toy, you need to cut many thin strips of colored paper - all the details of the decoration should be the same in size, approximately 15 cm long. The strips are folded edge to edge, each piece is pierced in this place with a needle, pulling a cord or thread through them.
The free edge of the lace is pulled through the hole from the other edge of the strip and pulled lightly to form an arc - an elongated loop. The upper part of the flashlight (where the edges of the strips) is glued with a thin strip of paper in a circle, and the rounded loops will hang freely, forming a pear-shaped flashlight from thin strips.

Chinese lantern
The Chinese are the inventors of paper, they learned how to make interesting decorative products from it. New Year's Chinese lantern will decorate the festive tree. To work, they use a diagram, you can draw segments of a flashlight yourself. The size of one part is an average of 10 cm, according to the diagram at the top and bottom of each segment there are circles for fixing the flashlight.
How to make jewelry:
- Transfer the drawing to colored paper.
- A flashlight is made of six segments.
- Cut out the workpiece, glue the edges.
- Form the top and bottom of the flashlight.
- Sew the lower circles with a thread, then the upper ones.
- Make fasteners and a loop. A cute Chinese lantern is ready.

 Use this template to cut out the flashlight segments
 sky lattern
The decoration will be made on the principle of a flying lantern, but it does not need to be launched into the sky. Decoration is made of bright colored paper. It is necessary to prepare a large sheet - 24 by 60 cm. It is folded in half, and then in the form of an accordion. Next, the sheet is unfolded, triangular creases are made in the center (along the fold line). The same creases are made from above and below. A figurative-triangular cylinder is glued from the workpiece, a bright loop is glued.

Ded Moroz and Snegurochka
The New Year is unthinkable without the main characters of the holiday - Santa Claus and the Snow Maiden. It is quite simple to make them using blue (blue), red, white, yellow colored paper to cut out the elements of New Year's figurines on your own.
A circle is cut out of blue paper for the Snow Maiden, and from red paper for Santa Claus. The circles are cut to the middle, folded into a cone and glued together, getting the bases of the figures. Separately, a flat kokoshnik is cut out for the Snow Maiden, small cuts are made on the cone and the resulting element is inserted into them. Previously, the face of the figurine, drawn on a white oval, is glued onto the kokoshnik, and a yellow braid is attached to the back. For greater realism, you can make small cone arms, decorate the bottom of the Snow Maiden's coat with white fringe.

Santa Claus is painted a face, glued to the base cone. Then cut out a small red cone-cap. A mandatory element of decoration is a thick beard; if desired, you can make a bag with gifts.

To make the figures of the main New Year's characters more durable and voluminous, you can use colored cardboard instead of paper. To make a fringe or a beard, white paper is cut into thin strips, each strip is wound around a pen or pencil - it will turn out voluminous. You can decorate ready-made figures at your discretion with snowflakes, stars, pieces of cotton wool.
New Year's wreath
In jewelry for new year holidays a wreath is used, symbolizing prosperity, longevity, hope and happiness. The wreath serves as a kind of amulet of the family hearth from various troubles. Traditionally, the decoration is hung over the front door. To make a very simple colored paper wreath, you need more green sheets. The child must be involved in the creative process.
Master class on making New Year's door decor:
- Choose a large plate, circle its outlines on a sheet of colored cardboard (the wreath will turn out stronger) - this is the base.
- In the center of a large circle, a smaller circle is cut out under the saucer, as a result, a wreath ring resembling a donut is obtained.
- On green paper, they circle the child’s palms with a pencil and cut out many fragments - the more, the prettier the decoration.
- "Palms" are glued onto the ring, partially overlapping each other. It's not scary if it turns out randomly - it's more interesting.
- Upstairs "palms" are glued bright decorations- bells, bows, ribbons.

Volumetric paper decorations (master classes)
New Year's decor always looks more interesting if the decorations are voluminous. Making them is more difficult than flat toys, snowflakes or garlands, but everyone can do it. For creativity, paper of different colors, additional decor, bright ribbons, laces, shiny threads are used.
Volumetric crafts - stars, snowflakes, balls, garlands - are hung on a Christmas tree or on the ceiling. Having shown a little imagination and patience, you can create original toys, elegant and voluminous Christmas decorations with your own hands from paper.
Volumetric pointed balls
An interesting decoration made of white paper is quite simple. To make crafts, you need sheets, glue, a pencil, scissors, a small saucer, a coin, beads (rhinestones, sparkles), fishing line.
How to make balls:
- Attach the saucer to the paper, circle 4 blanks.
- Draw the outline of a coin in the center of each circle.
- Cut out paper circles (do not touch the middle yet).
- On each circle, draw eight lines with a pencil, not reaching the central circle.
- Insert a pencil into each sector, wrap the edges, glue.
- For each ball you need 4 blanks, they are allowed to dry.
- The elements are connected by the inner sides, a hole is made with a needle, and a fishing line is pulled through. The original Christmas decoration looks beautiful on the Christmas tree and in a garland.

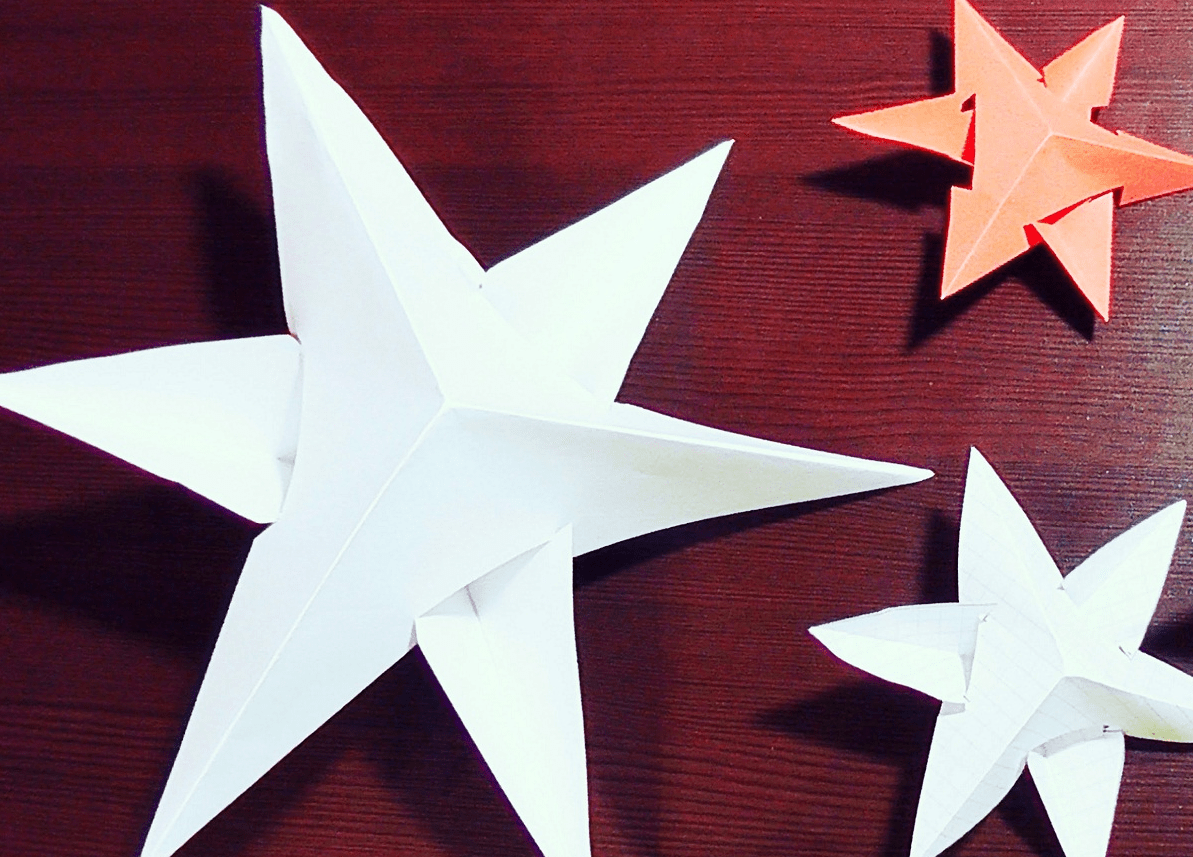
3D star
popular toy for Christmas tree is a pointed star. It crowns the top of the tree, gives the decoration a complete look. To make the product look more realistic, you can make a three-dimensional 3D star out of colored paper.
Completing of the work:
- Two identical squares are cut out - the size and color are arbitrary.
- The blanks are folded in half twice, two more times diagonally.
- A fragment of the toy is unfolded - the fold lines are clearly visible.
- Each corner is wrapped inward to the fold (like a children's airplane).
- The edges of the corners are glued according to the principle of paper bags for volume.
- The second fragment of the toy is performed similarly.
- Connect the blanks with the inner part to each other crosswise, glue.

It turns out a voluminous star with pointed rays. A ribbon or string is attached to it and a toy is hung on a Christmas tree. To simplify the work, the loop can be laid between the fragments of the star before gluing.
In the video: a voluminous star made of paper.
Volumetric snowflakes
White snowflakes are used to decorate windows, they decorate the area near the fireplace. If you stretch a silver thread through the products, you can hang garlands of snowflakes in the room. New Year's decorations made of white paper look interesting when snowflakes are of different sizes with unequal patterns. To make snowflakes with a voluminous middle, you will need white paper, a pencil, and scissors.
Operating procedure:
- An A4 sheet is folded in half, cut into 2 parts.
- Each blank is folded diagonally, the excess is cut off.
- The resulting squares are again folded in half and diagonally.
- The core of the snowflake is made from blanks by making two cuts.
- Cuts are made from edge to corner, without cutting the workpiece to the end.
- A figured cut is made in the upper part to make petals.
- The product is unfolded, the inner petals are glued to the center.

Similarly, perform the second part of the snowflake. After that, the parts are glued together crosswise. The result will be a two-sided volumetric snowfield, on one side and on the other side there is a flower in the center.

Christmas decorations made of cardboard (master classes)
Cardboard is often used to make toys and Christmas decorations. Thick paper holds its shape well, allows you to make beautiful three-dimensional figures, four-sided Christmas trees, cones for making Santa Claus and Snow Maiden are ideally made from cardboard.
volumetric balls
Decorating a Christmas tree is not complete without decorations in the form of balls. Large and small, plain and multi-colored toys are hung on a tree in a chaotic manner.
Look interesting volumetric balls from colored cardboard or colored paper and white cardboard. They are easy and quick to make:
- Circles of the same size are cut out of thick colored paper - 20 pieces, a radius of 3.5 cm.
- Separately, an equilateral triangle template is made so that it is clearly inscribed in a circle.
- A triangle is circled on the inside of the blanks, its sides will be the place where the circles are folded.
- Under the ruler, carefully fold on each mug, wrapping the paper on the front side.
- Five fragments are taken, the resulting valves of the circles are smeared with glue, the blanks are connected - the top of the ball.
- A hole is made with an awl, a lace is inserted into it, the bottom is made from 5 other blanks in the same way, but without a lace.
- Of the ten remaining blanks, glue the valve strip to the valve, close the ring, connect the top, bottom and middle of the ball.

For the manufacture of volumetric balls, you can use old postcards or colored cardboard. Toys are decorated with small decor, sprinkled with sparkles, chopped rain.

Cardboard fir trees
A variant of a New Year's decoration or a toy is a Christmas tree made of colored cardboard. On a dense sheet, they draw the most ordinary Christmas tree, trying to maintain the symmetry of the spruce paws. According to this blank, a second similar part is made, the Christmas tree is bent vertically, the blanks are glued together and decorated with small circles of colored paper, stars, beads, rhinestones, beads.

In order not to glue the figures, you can make cuts (cut one blank from the top to the middle along the fold line, and the second from the bottom to the center) and insert the parts into each other. Due to the density of the cardboard, the figurines will not fall apart.

How to decorate a Christmas tree with paper decorations
To make the Christmas tree, decorated with your own crafts, look beautiful, you need to properly hang paper toys and decorations. There are several options for placing jewelry - in a pyramid, in a spiral, vertically or horizontally. Each method is interesting, you need to pay attention to the shape, size and color homemade toys from paper.
New Year's beauty design options:
- The top of the spruce is decorated with a voluminous star of a golden hue - the color of the Earth Dog.

- In the coming year of the Dog, spruce is decorated with medium-sized figurines of restrained colors. Especially important is the use of jewelry from natural materials- paper, wood, burlap, cones and twigs.

- In the central part of the Christmas tree, you can place a dog figurine to attract good luck and prosperity.

- Use garlands of golden, brown, yellow, green, red, purple, beige.

- Paper beads, chains, flags connected in a garland are hung in one direction - horizontally, spirally, vertically, from top to bottom.

- In a chaotic manner, medium-sized balls cling to a tree; toys can be the same or different.

- The decor is complemented with figures of Santa Claus, the Snow Maiden, angels, and several voluminous snowflakes are pinpointed.

Before decorating the tree paper toys and handicrafts, a garland with light bulbs is hung on a tree. You can use a little shiny rain or complement the design with a fluffy “snowball”.
Spruce is decorated according to your taste, but in the coming year, the decor should be chosen natural, restrained, in brown colors (all shades), with unobtrusive bright accents - a few red bows, burgundy bells, paper cones decorated with beads. Then 2019 will surely bring good luck and prosperity to the house.
Christmas origami crafts (2 videos)
You can decorate your house for the New Year 2014 with your own hands! Even if you have never made anything yourself, for example, from paper and cardboard, it is not difficult to create jewelry crafts from these materials. Handmade helps to relieve stress and calm down, and also to have a good time with the whole family if you make decorations for everyone together. Here are some instructions on how to make such crafts at home.
Christmas toys made of paper and cardboard
Herringbone
A voluminous Christmas tree pendant for a real Christmas tree can be made in several ways, and the easiest of them is to glue two bent cardboard pieces in the shape of, in fact, a Christmas tree. Take colored cardboard, glue, scissors, an awl, thread (to hang up after) and a pencil. Draw a Christmas tree - in the most primitive, childish form, with ridiculously splayed branches, "paws", but always symmetrical, and cut it out, and then circle it on another sheet of cardboard to get exactly the same blank.

Do the same twice more - you will get 4 Christmas trees. Bend all the blanks along the line of vertical symmetry, and then glue the inner parts to each other. You will get a Christmas tree on each side of a large, assembled from them and voluminous, with four sides. You can make exactly the same toy from three blanks - then the Christmas tree will have three sides. Decorate it with glitter or metallic felt-tip pens, punch a hole for the thread on the top, thread the thread and hang it on a real Christmas tree or houseplant.
Torch
An old toy whose manufacturing principle has not changed for at least a century. Take two rectangles of bright-colored paper, one wider than the second, and the one that is wider, fold along and make cuts every 1 cm, 1.5 cm not reaching the edge of the sheet. Cut out the outermost of the resulting “ribbons” completely, leaving two small “tails” of paper sticking out on the side.

Then unfold the rectangle and straighten, bending outwards as much as possible, all other tapes. Fold the second, smaller sheet into a tube and glue it, and glue the first rectangle on top, smearing only the upper and lower, solid strips of paper with glue. Tie a thread - and the flashlight is ready!
Snowflakes
Simple paper snowflakes done like this - you need to take a square piece of paper, fold it four times, and cut out several abstract holes along the fold with scissors (do not forget to round or make, if you want, jagged the outer corner so that the snowflake is not square). It looks more complicated if you fold the paper five, six, seven times. It is better to take colored paper - for example, silver. Most often they are attached to windows, but sometimes they are hung on the ceiling or cabinets - so that the snowflake spins in the air at the slightest breath and creates a festive atmosphere.

You can make this craft a little more complicated by dressing a cardboard silhouette of a dancer, cut out from a template or inspiration, in a snowflake like a tutu, if you want to decorate the room in a more sophisticated way. Most likely, you have seen snowflakes on glass and mirrors in stores, applied as if on a stencil with white spray paint. You can make these at home, using a paper stencil, and it’s not at all necessary to take paint that is very difficult to wipe off the glasses - ordinary toothpaste will do if it is white.
Attach the snowflake cut out of paper in the usual way to the glass with adhesive tape, put some paste on a brush or toothbrush, bring it closer to the mirror, and then forcefully run your finger over the bristles - the paste will splatter forward onto the mirror and snowflake stencil. Do this several times, and then peel off the stencil. Now you have a graceful frost in the shape of a snowflake on your mirror or window, which, moreover, is easily washed off with soap and water!

Unusual crafts for the New Year with your own hands from paper and cardboard

Crafts for the New Year: a snowflake on the Christmas tree
Time inexorably runs forward and now white flies are flying outside the window, slowly sinking to the ground and covering everything around with a snow-white fluffy veil. However, despite the cold, the soul is warm and joyful. And all because suddenly appeared snowflakes herald the onset of the New Year. Most main holiday the year is already very close, which means it's time to think about New Year's decor, gifts and, of course, crafts.
The days are getting shorter and the evenings are getting colder and longer. What to do with yourself, and even more so with your little fidgets, when for street winter fun is it already too dark? Well, crafts, of course. New Year's crafts can be made from the most unexpected materials: cocktail tubes and much more. But there are also more traditional materials, such as paper. In this article, we have collected for you more than 60 step-by-step master classes for making paper crafts for the New Year. If you still think that only applications can be made from paper, then drop everything and carefully look at our article! Well, for those who are looking for something unusual and know what miracles can be created from plain paper, we can only advise you to start the process of creating New Year's paper crafts according to our schemes and templates without delay.
One of the simplest New Year's paper crafts can rightly be considered a garland. We all remember well from our childhood how they decorated the Christmas tree with such paper garlands not only at home, but at school or kindergarten. A paper garland is made very simply: colored paper is cut into strips of the same width, the first strip is glued into a ring, and each subsequent one is threaded into the previous ring and also glued. This paper craft is perfect for 4-5 year olds.
If the task of entertaining children is not worth it, but you need to decorate the house, then here's another version of a paper garland for your note. It is made even easier than the previous one, but you will need a sewing machine. So, to create such a New Year's paper craft, you will need: a lot of circles of different diameters (the number depends on the size of the garland), a sewing machine. Sew circles through the center on a typewriter and hang a garland. From any gust of air, such a garland will “come to life”.

So, if you decide that the issue with garlands is closed and there is nothing else to think of here, we hasten to upset you - this is only the very tip of the iceberg. Simple paper garlands are an activity for beginners. Professionals prefer more complex tasks, for example, voluminous crafts from paper. Below is a master class on making a volumetric garland in the form of light bulbs.

By the way, you can decorate an ordinary LED garland with paper lanterns. This New Year's paper craft looks very cool, especially if you decorate the wall with this garland.

Interested in a garland? Then see more ideas:

New Year is the most beloved holiday associated with miracles and magic. New Year's Eve Celebration festivities and happy meetings. It is impossible not to love this time of the year, when everything around is transformed, and every house or shop window becomes like scenery for a fairy tale. Everyone wants to participate in this transformation, and therefore they try to decorate their homes […]
Since we are talking about the decor of the apartment, it would be strange not to mention Christmas wreaths, or as they are also called New Year's wreaths. Everyone can make such a paper craft, in addition, a New Year's paper wreath is a reusable decoration that will not deteriorate and will not lose its appearance over time.

A very cool paper craft for the New Year is a wreath of roses. You will have to work hard to create such a craft, so if you decide to make yourself such a paper wreath on the door - stock up on patience and mood!

If you're planning a New Year's themed party, say Cuban or Hawaiian style, then you'll definitely need some kind of decoration to set the atmosphere. Here is such a simple, but very original wreath made of paper will come in handy!

Surely your child at school or in the garden was asked to make a Christmas wreath with their parents. Allegedly for a competition, but the main task of this task is to get parents to spend time with their children. But maybe you should not wait for a task from school, but spend time with your child yourself. In addition, with such a New Year's craft, you can decorate the house in a very original way, and most importantly, get a lot of positive emotions!

Need a Christmas wreath? See more ideas:

Preparing for the New Year is sometimes even more pleasant than the celebration itself. The whole family, including the youngest residents, can take part in the process of decorating the interior. You can decorate an apartment or house for the New Year holidays in a variety of ways, but recently New Year's wreaths, which are better known to us from romantic Hollywood Christmas films, have been very popular. However, trendy […]
So, we continue to decorate the apartment. There is a garland, there is a wreath. Something is missing? Oh, of course, Christmas trees! If you prefer to put a big forest beauty on New Year's holidays, it doesn't matter. By the way, read on. Small paper Christmas trees make a great addition to the decor, and they can also be used as small souvenirs for guests!

# 10 New Year's paper crafts with our own hands: we make a Christmas tree toy "Herringbone"
A Christmas tree made of paper does not have to be on the table or somewhere in the house. You can make a craft out of paper, which you can then hang on the Christmas tree itself, and if there is no Christmas tree, then you can simply hang such voluminous paper Christmas trees around the house. The scheme for making a Christmas tree is quite simple, but if you don’t quite understand what the essence is, or you just don’t have time to figure it out, then you can download a ready-made template.

A very cute Christmas tree can be made from corrugated paper. This paper craft looks very realistic, but it is done quickly and easily.

If you are still interested in a paper Christmas tree, but you want to make something unusual, then use this master class.

The tree does not have to be on the floor, it can also be hung from the ceiling. An excellent Christmas garland will turn out from plain paper.

How to distinguish the New Year's table from the usual festive one? Everything is correct! According to thematic elements of decor. And how to make a suitable New Year's dessert, see.


Do you want more workshops on making paper Christmas trees? See:

The Christmas tree is, of course, the main attribute of the most important winter holiday. It will not be possible to do without the forest beauty, the atmosphere is not the same, and where does the good grandfather put the gifts? It so happened that a Christmas tree is decorated in the house for the New Year holidays: someone puts a live one, someone prefers an artificial one, and someone paper. A paper Christmas tree can not only replace a Christmas tree […]
#17 Christmas paper crafts: making a movable card with wishes
From paper, you can make not only flat or voluminous crafts, but also movable ones. With our ready-made scheme, you can make a postcard with an encrypted congratulation or message. Such unusual gift will please not only children, but also adults! Download ready scheme can be lower.


In winter, wild flowers are not to be found, even in flower shops. But there is nothing to worry about, flowers can be made from paper with your own hands. And our step by step wizard class will help you with this.

A wide variety of flowers can be made from paper, the whole secret is cutting out the ends.


If you want to make a big Christmas star for decorating a wall from paper tubes, then this master class is especially for you!

A very themed New Year craft made of crimped paper. Such a paper cone looks very natural and is quite difficult to distinguish, especially if it is used as a decor. With our master class, you can easily cope with such paper crafts.

There is another technique for creating paper cones with your own hands. This method is more labor intensive and will take you more time. In addition, to create such a New Year's craft, you will need: paper, a foam blank, a lot of safety pins, a ribbon and beads for decoration. However, if you have the time and desire, then pay special attention to this scheme for making a cone, especially if you want to impress.

From paper, you can make very special crafts using the Japanese origami technique. Our step-by-step master class will help you create a New Year's paper ball that can be used to decorate both a room and a Christmas tree.

A step-by-step diagram for creating an origami star with your own hands. You can decorate the top of the Christmas tree with such a star, you can simply create a festive atmosphere in the house, or you can combine it into one big garland.

You can make the base yourself, as in the first picture. Or you can download the finished pentagon blank and, depending on the size of the pentagon, the size of the finished star will change.


A step-by-step manufacturing scheme is at your service volumetric snowflakes from paper. Follow the instructions and you will definitely get such a miracle.

#34 We decorate the apartment with cones: do-it-yourself Christmas paper crafts
In continuation of New Year's paper crafts, I would like to offer you another scheme for making paper cones. In addition to paper circles, you will need an oval or round blank, glue and fir branches for decoration.

Another great option for decorating an apartment with your own hands is a large voluminous snowflake on the wall. A snowflake can be not one, but a whole ensemble. In addition, on such a New Year's background, you will get great photos!

New Year's gift must be in a beautiful package. In my opinion, the gift itself is not so much important as the intrigue around it. After all, it is this intrigue that will remain in the memory, this is a pleasant expectation and unfolding the paper. Use our scheme for making paper flowers with your own hands and decorate gifts for dear and close people.

It is customary to decorate a Christmas tree with toys, but these toys do not have to be purchased. Even better if they are made by hand. And what could be easier than making a Christmas tree toy out of paper. Take advantage of our step by step instructions and make your christmas ball from paper.

Very simple, but incredibly cute voluminous lanterns can be made from ordinary colored paper. Even children can handle this craft, so feel free to get to work if you have little helpers. Well, if not, then you can do it yourself!

You can make completely unexpected crafts out of paper, including gift boxes. And not just boxes, but in the form of delicious sweets. For such a gift box you will need: cardboard cylinder, colored paper, glue, scissors, satin ribbon.

In continuation of the question of gift wrapping, we want to offer you another budget, but very charming option. You can make such a gift elf with your own hands using our master class.

Here's another option for you original packaging New Year's gift with your own hands.

Need more gift wrapping ideas? See:

On the eve of the New Year holidays, shop windows are full of gift boxes, decorative bags, wrapping paper for every taste. Smiling sellers helpfully offer to provide services for wrapping New Year's gifts. And all this seems to be great, because you must admit, it is much more pleasant to receive a New Year's trifle in a beautiful package. But on the other hand, the whole meaning of the gift is lost, the very gift that […]


Want more ideas Christmas balls? See:

Today on the shelves of stores you can find a huge number of the most diverse Christmas decorations, so turning an ordinary Christmas tree into a real festive beauty is not difficult. However, the New Year is a special day! The day when old year left behind, and ahead are new adventures, new events, new victories. But after all, the old year did not pass without a trace, […]


#55 A simple paper snowflake pattern: decorating a room for a party

#56 Do-it-yourself voluminous paper crafts: making a snowflake. Scheme


#58 Christmas paper crafts: decorate the house with diamond crystals
Download ready-made schemes and make your own paper diamond crystals.

#59 New Year craft paper ball "Mistletoe" with your own hands
Here you can make such a mistletoe paper ball with your own hands, using ready-made cutting templates. Stock up on patience and New Year's mood!


You can decorate a house not only with standard snowflakes or stars. You can make such a wonderful vase out of paper. Download the finished scheme and assemble the vase following the instructions in the master class.

A wide variety of decorative elements can be made from plain paper, just download the finished scheme, print it, cut it out and glue it. A wonderful Christmas paper craft is ready!

#64 Christmas patterns for cutting: a great photo shoot for the new year
Note! The templates are very large and of good quality, so the download may take some time.

Simple Christmas decorations can be made from paper. In our master class, an example with a ball is given, but it can be other shapes: hearts, stars, Christmas trees and much more. You can download ready-made templates below.

You can make a simple and original Chinese lantern with your own hands using our ready-made scheme.

An excellent decoration for the new year will be a composite paper star. You can download a ready-made template for gluing below.

In our time, you will not surprise anyone with ordinary paper cutters. Volumetric crafts cause much more delight. In this master class, a scheme for creating a simple volumetric star is described step by step. You can download a ready-made template with a large, medium and small star from the link below.

It is quite difficult to imagine a New Year's decor without all sorts of variations on the theme of stars. In this master class, you will learn how to make a volumetric double-sided star out of paper with your own hands. You can download the finished scheme below.

#70 Christmas paper masks
Carnival masks must be included in the list of New Year's paper crafts. Well, what New Year's party can do without masks? That's right, none! In fact, there are a lot of options for making paper masks, and if you turn on your imagination, you can make many wonderful crafts!

Today we will learn how to interesting and original paper crafts with or for children.
And first, let's see what we need for this:
To create crafts, we will use different types of paper and cardboard:
napkins for decoupage on boxes;
newspaper for creating papier-mâché balloons;
old magazines for crafts with beads;
crepe and wrapping paper;
colored double-sided paper;
corrugated and plain cardboard;
paper plates, cardboard tubes, various boxes and much more.
For creativity, the child will need such basic materials and tools as scissors, glue, paints and felt-tip pens.
Does it happen to you that you collect a lot of small necessary items, but there is nowhere to put them? Let's make a fun pocket in which everything will fit and which can be hung in a conspicuous place.
Paper crafts for kids: USEFUL POCKET
What will be required:
colored paper
pencil
lace scissors glue
Work sequence:
Draw the outline of the muzzle of an animal, such as a bear.
Cut out two such shapes along the contour. Make details for the ears and nose, as shown in the photo.

Apply glue along the edge, connect the parts to make a pocket inside. Punch two holes.

Glue on the ears and nose. Draw a ribbon for hanging.

This pocket is perfect for storing small items: hairpins, combs or stationery.

Paper Craft for Kids: RACE RACE
Did you know that you can make unusual racing cars with your own hands? Let's create them and have a real race. I wonder what car number will win?
What will be required:
cardboard tubes of paint, felt-tip pens
colored paper, cardboard
glue scissors
Work sequence:
Color the tubes in bright colors.

Cut out parts for cars from colored and white paper (for wheels, it’s better to take black cardboard - then your “car” will stand firmly). Use a felt-tip pen to draw what you need.

Make a hole in the straw as shown in the picture (you can ask an adult to help).

Now glue all the details. Wait until it dries - and go ahead, play!

Paper crafts for kids: PAPIER-MACHE BALLOONS
Who doesn't dream of flying in a hot air balloon? Someday you will definitely do it. Now let's try to make an unusual balloon from an ordinary newspaper.
What will be required:
glue bead
needle spoke
cream paint
Work sequence:
Inflate the balloon, lubricate it with any cream. Prepare a newspaper for crafts - for this you need to tear it into small pieces. Wetting them in water, glue the ball so that there is no gap.

Now apply a layer of glue on the ball and glue it again with pieces of newspaper soaked in water - so you need to do 2-3 layers. You may need the help of an adult.

When the ball is completely dry (for this you will need to wait 1-2 days), pierce it with a needle - we don’t need it now - and cut the ball, as shown in the photo.

Now color the ball with paints.

Now let's make a basket. To do this, the newspaper sheet was divided into 4 parts to make rectangular blanks. Then, starting from the bottom corner, roll the newspaper into a tube with a knitting needle, and glue the tip.

Take 5 tubes and put them side by side, and stretch the sixth tube across under the first, over the second, under the third, etc., alternating. The next tube must be weaved in reverse: what was below will be on top.

To secure our base, take one tube and weave it around, also passing it between the other tubes through one.

Now you can make the basket itself: to do this, bend all the ends up and start weaving them around in the same way as you did before. Weave 4 rows.

Unnecessary ends weave on top and glue, some you can just cut off. Color the basket with gouache.

Make holes at the bottom of the ball and secure the basket with a thread. The balloon is ready!

FUNNY ANIMALS
It turns out that you can quickly and easily make yourself a striped friend. And in order to be able to play with friends, let's find out how to make not only a tiger, but also other animals.
What will be required:
colored paper
glue scissors
Work sequence:
Take a sheet of colored paper and fold it as shown in the picture. Glue the ends to make a strip.

Bend the strip "accordion" in three places to get the letter "M".

Cut out blanks for the animal from colored paper.

Glue the blanks to the base. Ready! You have a tiger.

HOME THEATER
But what if you arrange a real theater in your home? It will be possible to invite adults to the performance and show them some kind of fairy tale, for example, "Gingerbread Man". I think they will definitely appreciate your skill!
What will be required:
colored paper compasses scissors glue
markers stick
Work sequence:
Draw a blank on a sheet of colored paper, as shown in the photo.

Cut out the blank and glue.

Cut out the base for the animal from colored paper
Glue the pieces to the base. Look who we got

Take your favorite animal fairy tale as a base and make all the characters out of paper. If sticks are glued to the blanks, it will be possible to show a performance from behind a screen, as in a puppet theater.
Paper crafts for kids: FUNNY CATERRORS AND SPIDERS
Have you ever seen a real spider? And the caterpillar? Let's make funny animals with furry legs out of a cardboard egg box. They will look like the real thing!
What will be required:
egg carton
glue scissors
colored paper
wire
Work sequence:
Cut out blanks from a cardboard box: three cells for caterpillars, one for bugs and spiders.

Color the blanks with gouache.

Prepare details for animals: cut out eyes from colored paper, make legs from fluffy wire.
Make holes in the blanks and stick the legs. Then glue on the eyes.

Try to make them exactly the same.

AMAZING MASQUERADE
You can celebrate your birthday in an unusual way by throwing a masquerade. Invite your friends and have everyone make an animal mask for themselves. It will be fun!
What will be required:
cardboard plates
colored cardboard and paper
scissors
Work sequence:
Color the plate blue.

Cut out the ears and color them too.

Prepare parts for a bunny from colored paper.
Cut out holes for the eyes and glue the pieces as shown.


PAPER BEADS
What girl doesn't love jewelry? Let's try to make beads from old magazines. You will get bright ones that you can wear with your favorite dress or give to your mother.
Work sequence:
Cut out the details from the magazine sheet: strips about 1 cm wide and elongated triangles.

Wind the blanks on the knitting needle - these will be paper beads. Glue the tip well.

Make as many beads as you need for the entire decoration. Take a needle and thread and carefully thread all the beads onto the thread.

This is how easy it is to make unusual ones: original multi-colored beads, bright bracelets. You can even give them to someone: what girl would refuse such beauty?!
Paper Crafts for Kids: PRINCESS DECORATIONS
All girls dream of becoming real princesses. What is a princess without a crown? Let's make it from a regular cardboard roll.
What will be required:
cardboard tubes of paint
colored paper
scissors
Work sequence:
Cut out the crown from the roll. You can do a few things.

Color the blanks in different colors.

Decorate crowns. To do this, you can use beads, ribbons and laces.
Make holes on the sides and thread the elastic so that the crown can be put on.

You can make a decoration for a real princess from an ordinary hoop: use colored paper to turn it into a beautiful diadem.
Paper craft for kids: TOY LOCKER
Probably, like all children, you have a lot. Sometimes there are so many of them that it becomes difficult to neatly fold. Let's make a beautiful storage cabinet for small toys.
What will be required:
boxes of different sizes
white gouache
patterned napkins
stationery knife
tassel pen
Work sequence:
Paint the boxes white so that the pictures and text on them do not show through.

Glue the box on all sides with a napkin. To do this, put it on the box, pressing along the edges, and with a brush, apply a thick layer of glue on top so that it sticks.

Cut out the doors with a clerical knife - here you will need the help of an adult. Glue the handles with superglue and fasten the boxes together to make a cabinet.
Everything! Our dresser is ready. Now you can put your toys there. Mom will be delighted when she sees what order you have!
CREATIVE BOX
Do you like to draw? Or maybe you like to carve or craft something? This is great! Let's make a creative bag-box where you can put everything you need for creativity.
What will be required:
shoe box
wrapping
colored paper
adhesive lanyard
Work sequence:
Tape the box and lid on all sides. If it's hard for you, ask one of the adults about it.

Make blanks inside the box. At the bottom of a sheet of colored paper folded in half, make an incision to the middle, as shown in the photo. Cut two pieces of the same length as the width of the box from top to middle.

Insert the blanks into each other and place them in the box - these will be the compartments of our bag.
Make holes on the sides of the box: they should be at such a level that the box can be closed with a lid. Make the handles of the same length from the cord so that the box is comfortable to take in your hand.

HANDMADE PHOTO ALBUMS
Where did you last go on holiday? Maybe it was a trip with your parents to the sea or a vacation in the village with your grandmother? You must have some memorable photos. Let's make a suitcase-shaped photo album for them.
What will be required:
colored paper and cardboard
hole punch scissors lace
Work sequence:
For the cover of the photo album, take a sheet of colored cardboard and fold it in half.

For pages, take sheets of double-sided paper of different colors and also fold in half.

Now connect the cover and pages together: for this, fold everything together and make holes on the side with a hole punch. Tie the sheets with a rope or cord.

Cut out the details for the suitcase from colored cardboard and glue them to the photo album.


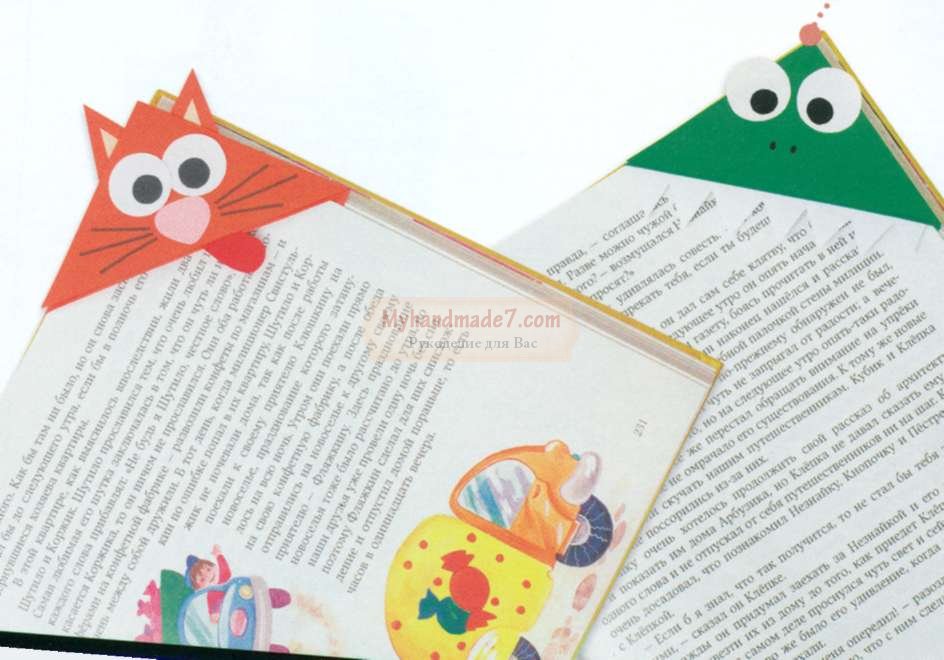
Paper Crafts for Kids: FUNNY BOOKMARKS
What is your favorite book? Or maybe several? It's great that you love to read. Let's make an interesting bookmark for the book.
What will be required:
colored paper
Work sequence:
Use a ruler to draw three squares on a sheet of colored paper, as shown in the photo. The triangles that are filled in are not needed.

Cut out the piece.

And it, as shown in the photo: first bend it to the inner corner, then another on top of it. Glue them together. Cut out the details from colored paper.

It turned out great, right? Now it will be easy to find the place in the book where you finished reading. You can also make a bookmark in the form of another animal, such as a dinosaur with sharp teeth.
CARDBOARD BAG
Do you know how you can make a bright bag out of an ordinary box? Very simple! Let's dream up and make a handbag that you can take with you outside in sunny weather.
What will be required:
cereal box
colored paper
glue scissors
Work sequence:
Color the box with gouache.

Cut out a bag with handles from the box. This may require the help of an adult.

Cut out a strip and a circle from colored paper - this will be the core of the flower. Fold the strip with an accordion and glue the ends. To keep the flower, stick it on a small square. Glue the core on top.

For butterflies, cut out blanks from 1 colored paper. To make the figure voluminous, you need to make 5-6 identical parts. Glue them together in the middle. Glue all the pieces to the box.

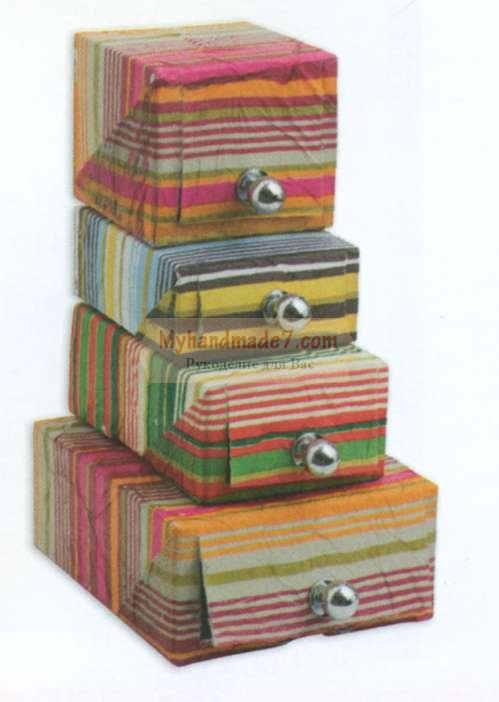
DIY Paper Crafts: Pencil Stand
Do you want to give a gift to a friend, but don't know what to choose? Don't be upset, I have an idea! Make an original stationery stand out of an ordinary cardboard box. Your friend will definitely love this gift!
What will be required:
boxes
the same width
white and colored paper, cardboard
adhesive tape
Work sequence:
Build a ship out of boxes: cut off the lids and cut them to height. Make the bow of the ship and pipes out of cardboard.

Tape each piece with colored paper inside and out.

Cut out and glue the windows, lifebuoy, steering wheel, anchor.

Glue the boxes together and glue them to the base, cut along the contour.

PUZZLE APPLICATION
Do you have unnecessary puzzles in which a lot of details are already lost? I have an idea how they can be applied. Let's do amazing colorful application with autumn leaves.
What will be required:
unnecessary puzzles crepe paper
paint glue
Work sequence:
Color the puzzles in bright colors autumn leaves: yellow, orange, red.

From crepe paper cut out a brown rectangle - this will be a tree trunk - and make green grass.

Glue the brown blank in the form of a trunk: for this, somewhere you need to compress the paper in layers, and straighten it somewhere.
Make a crown of a tree from the prepared puzzle pieces. Also glue several layers of grass to make it voluminous.


Paper crafts for kids: 3D PICTURE
Wanna do voluminous application? It's quite easy! You will get a real picture that you can give to your grandparents.
What will be required:
candy box
corrugated cardboard
double tape adhesive
Work sequence:
Cut out the necessary details for the picture from corrugated cardboard.

Glue the first layer of applique on the bottom of the box - what will be in the background.
Paste other details on top.

What a beauty! It turned out to be a real big picture. In this way, you can make a city where there are cottages and high-rise buildings, or an underwater world with shells, algae and fish.

BOUQUET IN A POSTCARD
Do you want to give your mom unusual flowers? Let's make a card-bouquet of colored paper. Trust me, she'll love it.
What will be required:
double-sided colored paper
scissors ribbon
Work sequence:
Draw a blank on a sheet of colored paper, as shown in the figure.

Cut out the blank and separately a triangle.
Glue a small triangle on the bottom, and fold the large part as shown in the picture.

Draw, and then cut out flowers of different sizes and colors. Make leaves for the bouquet.

Glue flowers inside our postcard in the form of a bouquet, tie a ribbon at the bottom.


3D POSTCARD
Surely you watched the cartoon in 3D and noticed how the characters come to life with a three-dimensional image. It turns out that making objects three-dimensional is quite simple. Let's try to make a postcard with a 3D effect.
What will be required:
colored cardboard, double-sided colored paper
scissors ribbon
Work sequence:
Take two sheets folded in half: one is cardboard, the other is colored paper.

On a sheet of colored paper, make cuts on the fold side, as shown in the photo. You should get 3 even squares of different sizes.

Now what you cut, push forward and inward. You should get a ladder, as if from boxes.
Glue the blank onto a sheet of colored cardboard. Decorate the boxes: glue colored paper and ribbons.

By this principle, you can make a card with balloons

CARD WITH PALM
Do you want to make another unusual postcard? You don’t need anything special for this: just a sheet of colored paper and cardboard, scissors, glue and your wonderful pens.
What will be required:
colored cardboard and paper
Work sequence:
Circle your palm on a piece of cardboard.

Cut out the piece with scissors. You will need two of these items.
Cut out a strip of colored paper and fold it like an accordion.

Glue one end of the accordion to one "hand" and the other to the other. Cut out from colored paper or write a congratulation with felt-tip pens.

ENVELOPE
Do you know how to decorate a small gift? You don't have to be an adult to do this, and you don't need any special equipment. Repeat after me and you will definitely succeed!
What will be required:
colored paper glue
ribbon
Work sequence:
Draw 4 identical circles on a sheet of colored paper. This is easy to do if you take a mug, put it upside down and circle it.

Cut out the circles and fold them in half.

Glue the circles together as shown in the picture.

Bend the free halves of the circles so that one turns out on top of the other. Then pull the bottom from one side up.

SWEET GIFT
Have you ever seen a gift shaped like a candy? Maybe they gave you something similar? Let's make such a surprise, and you can "treat" someone to them.
What will be required:
cardboard tube
wrapping paper glue
scissors ribbon
Work sequence:
cut out wrapping paper square. In size, it should be larger than a cardboard tube.

Cover the tube with paper. Tie one end of the candy with a ribbon.

Put candy in a gift and tie the other end.
3D FIGURINES
Have you ever wanted to decorate your room in an unusual way? Let's make voluminous figurines-decorations from colored paper. They can be placed on a bedside table or hung on a string from a chandelier.
What will be required:
colored paper glue
scissors ribbon
Work sequence:
Draw a half of an apple on a piece of colored paper folded in half, as shown in the photo.

Cut out the blank and, using it as a template, make 5 such copies. Additionally, cut out the details for the apple.

Glue the blanks together, as shown in the photo.

Glue the rest of the details.

Fruits and vegetables can be anything!
Crafts from cardboard and paper: bright flowers
Do you want to grow bright flowers in your window? Let's make them out of cardboard tubes, but in such a way that no one guesses what material they are from.
What will be required:
cardboard tubes of paint
colored paper glue
scissors skewers
Work sequence:
Make cuts on both sides of the tube so that they do not reach the middle.

Color the tubes in different colors.

When the blanks are dry, straighten the petals, as shown in the photo.
Glue the centers cut out of colored paper.

Paste the skewer with colored paper, cut out the leaves.
Connect all the details. Poke a hole in the center of the flower with a skewer.
Such a flower can be put in a vase and presented to someone.

FRAME OF UNUSUAL FLOWERS
Do you have a boring monochrome frame at home? Let's make it a real masterpiece!
What will be required:
egg carton
glue scissors
Work sequence:
Cut out petal blanks from the cells of a cardboard box, as in the picture.

Color them the same color. You should have 15-18 such sets of different colors (depending on the size of the frame).

Glue the petals together in the middle, carefully press and let them dry.
Glue the flowers to the frame. You won’t be able to attach everything at once, so do it in stages and wait until everything dries.

The frame is ready. Now you can insert your favorite photo into it.
CUTE CACTUS
How do you like such a cute cactus? It is completely safe for children because the thorns are painted on it. Let's make such a cactus and put it on the windowsill.
What will be required:
markers
Work sequence:
Draw a cactus in a pot on cardboard.

Color the picture on both sides and make another one exactly the same.

Make cuts: on one cactus from the bottom to the middle, and on the second - from the top to the middle.

Insert the blanks into each other. The cactus is ready.
In the same way, you can make a rocket or a teddy bear.
COLORED LANTERNS
Your birthday is coming up and you want to decorate your room to make it festive and beautiful? Then let's make unusual colored lanterns.
What will be required:
toilet paper tubes
crepe paper
ribbons
glue scissors
Work sequence:
Cut out a square of crepe paper and glue one side of the tube.

Make blanks from crepe paper: cut out strips and make cuts on one side along the entire length.

Start taping the tube from the bottom. You should get a skirt, as in the photo.
Thus, glue the entire flashlight. Make holes on the top sides and thread a ribbon through them so that the craft can be hung.

Such lanterns can be not only decoration, but also useful thing. For example, at a holiday you can arrange a game with prizes: hang lanterns on a rope and put something valuable in them by gluing the bottom. Each blindfolded guest must cut off a gift with scissors.

ROOM DECORATION
Would you like to have a bird? Of course, nothing compares to the real one, but still an unusual and beautiful bird can be made from ordinary colored paper. See how it's done.
What will be required:
double-sided colored paper
crepe paper scissors
ribbons
wire
Work sequence:
Draw bird silhouettes on a piece of paper.

Cut them out. Make a few of these. They must be different colors.

Make wings out of crepe paper: to do this, cut out rectangles of different colors and fold them like an accordion.
Make cuts in the blanks of the birds and insert the wings there. Tie ribbons to the figures and hang them on a circle made of wire.