Original thread decoration: interesting ideas, features. Necklace-pendant in the form of a feather made of threads Pendant made of threads with your own hands
tweet
cool
Almost every girl can boast of extensive "bins" with sooo necessary things - scattered earrings, pretty beads, bright buttons, ribbons, laces, pieces of lace and unusual fabric. It is a pity to throw away such “wealth”, but it is not clear where to apply them. But you should not despair, because it is easy to make unusual, and most importantly, exclusive jewelry out of these little things.
Surely many have heard of hand-made, but did not dare to do it for fear that the plan would not be successful. But creating original jewelry with your own hands is not as difficult and time-consuming as it might seem at first glance. Materials and simple tools for needlework can be found in sewing stores and supermarkets, or ordered online. And then an endless flight of fantasy is connected and fascinating creativity begins.
Stylish handmade jewelry always attracts genuine interest and attention to its owner. And such a gift to relatives and friends will be doubly pleasant, because it was created with certain emotions.
This publication contains several step-by-step master classes on how to transform unclaimed items and simple accessories into an unusual and spectacular neck accessory.
Asymmetrical necklace
To make an asymmetric necklace inspired by the “Diorganic Leafy Waterfalls” necklace from the spring-summer collection of 2014 of the Dior brand, you will need quite a bit - plastic beads strung on a thread, reminiscent of pearls, a rim covered with fabric to match the beads, a thread with a needle, scissors, thick fabric and glue matching in color.


Creating a necklace does not require huge efforts, but it will take a little time - since you need to carefully sew on each individual segment of beads.
First of all, you need to measure and cut off fragments of different lengths from the main thread. Then each of them must be folded so that one edge is shorter than the other, and you can begin to attach them to the base.

First, long segments are sewn to the edge of the rim and gradually you need to move in the middle, the length of the bead threads decreases.


Long fragments are also swept from the opposite end of the rim, creating a beautiful asymmetrical line - long in front and short in back.


When the main work is finished and all the threads are attached, you need to make the final touch - sheathe the bezel on the inside with a thick fabric to close all the errors and uneven seams.


Stylish bean necklace
To make a lasting impression with your appearance, it is not necessary to dress in designer outfits, you can just complete your look with an original necklace. And what could be more original than bean decoration?

In order to make such a non-standard creation with your own hands, you should stock up on the following components:
- printed necklace template,
- beans,
- golden beads,
- sheet of thin plastic 2-3 mm thick,
- neon nail polish,
- fastening chain,
- stationery knife,
- Super glue,
- tweezers,
- hole punch for eyelets.

Before starting work, paint the beans with varnish and wait until they dry.
Then you need to print out the necklace template and attach a sheet of plastic to it.

On a transparent surface, carefully glue the beans after the beans, after lubricating them with glue.

After that, fill in the remaining places with beads. You need to form a necklace in parts - first collect the circles, and then fill in the small details.


Let the filled blank dry for a couple of hours. When the semi-finished product is completely dry, it must be placed on a cutting board and carefully cut along the contour of the glued components. At the end, you need to drill holes along the edges of the necklace and insert a chain mount into them.


Cord necklace
A cord necklace seems so banal and familiar that you just don’t want to buy another one in your collection. But even such a hackneyed model can be diversified by decorating the rope with sequins and matching beads.

For alteration, you will need two types of twisted black laces, one of them with gold thread, large sequins in the same palette, a thread with a matching needle, suitable beads, scissors, pliers, glue and clasps for a necklace.

First you need to measure the length of the ropes to your size, while pure black should be longer than the other. Then you need to glue the fastener tips onto the longer cord.


Black sequins should be sewn to the tourniquet interspersed with gold thread, stepping back a few centimeters from the edge.


On top of the sewn sequins, a few more sequins are attached, only in gold, and stocked beads.


And the final touch - a cord with sequins and beads is carefully sewn to the main harness with fasteners.


Macramé necklace
A necklace made using the macrame technique looks interesting on the neck.

For the manufacture of such jewelry, 5 types of harnesses of different textures and colors, a chain, scissors, pliers, a tailor's centimeter, adhesive tape and clasps for a necklace are useful.

First you need to measure and cut the desired length of the chain for yourself.

Fold the chain in half, and put all the laces in a row on it perpendicularly.

Then make a zashmorg and fix the chain to the surface with adhesive tape and you can start weaving, as in the pictures below.


When all the laces are twisted, you should adjust the length by cutting off the excess.

Then attach the clasps to the chain.


Necklace with sequins
A sequined necklace will create a festive mood and perfectly complement any look.

As materials you will need glitter, matte decoupage glue, a brush, a base for a necklace, pliers, clasps and a chain. Apply a drop of glue to the metal base, fill the entire surface with it and sprinkle with glitter. When the first layer dries, you need to chip off the remaining glitter from the workpiece and repeat the procedure with glue again and so on until the glitter fills the entire space in the base.
Attach the chain and fasteners to the already dried semi-finished product.


Alternatively, crushed glass can be used instead of glitter.

To create such a necklace, stack pieces, a hammer, a pendant base for a necklace, matte glue, nail polish, nail polish remover, cotton swabs or a disc will come to the rescue. Grind the glass with a hammer and repeat the same as with sparkles.


After the structure has dried, you can paint the glass in the color of interest, and gently remove the remaining varnish with liquid.


Handmade jewelry always attracts the attention of others. And the more original the decoration, the more in demand it is. Today we will talk about jewelry, which is created from threads. In the master class, we will show how to assemble a bracelet from threads and beads with your own hands.
Thread jewelry can be safely attributed to non-standard types. But by doing so, they only bribe modern fashion and gain momentum in their use in needlework. The threads that craftsmen use in their work can be very different: simple sewing threads, threads for embroidery (mulina), threads for crocheting, etc. The decoration can consist only of threads or be combined with other elements of accessories: beads, beads and others. Consider examples of such decorations.
Ideas for jewelry from threads in the form of beads and necklaces.


Examples of the use of threads in the creation of pendants.


Thread earrings. Knitted earrings, ganutel earrings, tassel earrings, etc.


DIY thread bracelet ideas:


Thread rings, hairpins, brooches and headbands or tiaras:


Master class of a bracelet made of threads and beads.
Accessories:
Cord for warp 18cm
Mouline thread 1 skein
End caps 2pcs
Connecting rings 2pcs
Carabiner lock 1pc
Wide hole beads 5pcs
Instruments: Round nose pliers, glue

We place on the desktop, the basis for the bracelet in the form of a lace. With the help of adhesive tape, we fix the edge of the floss thread at the base of the lace. We start wrapping. We wrap the floss to the end of the edge of the lace and fix the thread, as at the beginning, with adhesive tape. We string golden metal beads with a wide hole on the wrapped lace. We put a few drops of super glue into the end cap and put it on the cord, thereby shaping the edges of the bracelet. We connect the loops of the limit switches with connecting rings. We add a carabiner lock to one of the rings.

We collect bracelets in this way in various and desired colors.

View of the finished bracelet made of threads and beads.

In the new review, the attention of readers to 12 stylish jewelry at once, each of which can be made with due diligence and attention to the issue with your own hands. Definitely, any of these crafts will help to make a positive impression on others, so watch and remember.
1. Thread earrings

Original long earrings that will be a great addition to both everyday and evening looks, and the process of their creation will take no more than half an hour. To create such earrings, you need a skein of floss threads of the color you like, which you need to carefully cut, form two tassels, attach loops to them, fasten with a thread of a contrasting color and put on base hooks, bought in a specialized store.
2. Pin necklace

From safety pins of the same color and size, beads, two strong cords, you can create an unusual and very effective necklace that will become an exquisite addition to any look.
3. Resin pendants

From epoxy resin, without special skills and efforts, you can create incredibly beautiful pendants. To do this, you need to put dried flowers, shells, beads or sparkles in special silicone molds, fill them with epoxy resin, pre-mixed with a hardener, and wait for it to harden.
4. Glitter pendant

A simple and at the same time very attractive shimmering pendant that you can make yourself from a metal base, decoupage glue and sparkles. Sequins should be carefully laid out in layers on a base greased with glue. Each new layer must be smeared with glue and filled with glitters until they fill the entire pendant.
5. Bright necklace

A stunning large necklace made of dyed beans will be a wonderful addition to the spring and summer look. Painted beans, together with accessories, must be glued to thin plastic according to a specially prepared template. When the layout is finished and the glue dries, the necklace must be carefully cut out, holes made on the sides and fastened to the chains.
6. Asymmetrical necklace

An original asymmetrical necklace in the style of Christian Dior, which can be made from a hoop by sewing strings of beads of different lengths to it.
7. Choker

Trendy choker with a ring in the middle, which is not at all difficult to make with your own hands. To do this, using glue and a small ring, you need to fasten two identical pieces of thin velvet ribbon and equip the product with a clasp or ties.
8. Massive necklace

An original massive necklace made of rope and knots, which, despite the simplicity of its creation, will become a universal decoration and addition to any outfit.
9. Necklace-harness

An ordinary clothesline can be braided with threads of beads and create a unique and very beautiful neck decoration that will undoubtedly draw attention to its owner.
10. Wooden earrings

From small wooden blocks, special accessories, glue and varnish, you can make unique long earrings that will surely appeal to all lovers of natural materials and connoisseurs of creative things.
11. Dreamcatchers

Simple in execution, but at the same time beautiful and airy talisman earrings that you can make yourself from special accessories, small rings, wire, threads and feathers.
12. Volume necklace

Leather accessories always look expensive and elegant, and if the product is also made with your own hands, it automatically becomes exclusive. Getting a unique necklace is not difficult at all. You just need to cut out several identical petals from the skin, give them the desired shape, fasten them together with glue and connect them with a chain.
Every girl loves jewelry. For any outfit, you can purchase suitable beads or a necklace. In the article, we will present a variant of threads. Such products look original, there are few of them on sale, and you can choose the right color of thread for any outfit.
In order to learn how to make such decor items, it is not necessary to be a handmade master, you only need to have patience, endurance, since weaving is a painstaking task. You will also need to be careful and careful. After all, even one wrong turn will stand out from the rest. The work is a little monotonous, since for the manufacture of lacing you need to perform the same turns. Therefore, be patient and start making original decorations from threads.
Necklace with large pendant
Before starting work, think about what dress or blouse this item will be worn under. Having decided on the color scheme, go to the sewing accessories store and look for suitable threads. You will also need a large pendant. If it is golden, as in the photo, then the fastening threads must also be selected in gold. Then the product will look aesthetically pleasing.
1. First of all, you need to unwind the coils. To do this, you need to use some kind of dense template. For example, take a cardboard shoe cover or simply stretch them between the sticks of the back of a chair. The template should match the length of the thread decoration.
2. The threads are removed from the template and the edges are trimmed. It turns out a pack of threads of the same size.
3. Now you need to make a buttonhole separately, on which the whole structure will hold. To do this, insert a small round button into one of the threads and tie a knot. Having correctly measured the length of the necklace, on the other hand we make a loop according to the size of the button and also tie it in a knot. The thread thus prepared is applied to the rest. The ends of the bundle are tied with threads so that they do not fall apart during further work.
4. The most painstaking work remains. It is necessary to weave dense rings around the main part of the thread decoration with golden threads. The edge is hidden at a distance of 1 cm from the end of the beam so that it does not crawl out. Then tightly begin to wind the thread around. There are two ways: just wind the thread, pressing it tightly against the previous turn, or each time pulling the previous turn into the loop. In the second option, a pigtail will be visible on the side, which will need to be positioned evenly. But the threads will not overlap each other and the product will turn out neat.
Necklace with roses
The principle of making such an ornament from threads is the same as in the previous method. In this product, instead of a button, a large bead is put on one end of the bundle, in the tone of one of the roses. When the whole main part is done, we begin work on decorating with flowers.

To do this, you need to separately wind a bunch of threads of the main beige color and the same - contrasting, for example red, as in the photo. The ends are wrapped with brown threads on both sides so that they do not fall apart. Then we make several turns of yarn in a circle, threading the main part of the bundle into the loops formed. But not too tight. The middle of the rose should be free. Finished decor elements are placed in the center of the necklace and sewn on the back with simple threads. They should not be visible on the front side.
Adding braids
The decoration of threads on the neck, made in a way familiar to readers, can be diversified by adding any details. It can be beads or rings, pendants and knots. The next necklace is made with weaving thin braids. At the first stage of pulling the threads on the template, you need to separately weave several braids. For this, several threads are taken in each strand so that they have volume. It all depends on the desire of the craftswoman, because you can weave several different braids using a different number of threads for the strands.

Then the finished pigtails are placed in a bundle, located in different places so that each is clearly visible. You can decorate the yarn decoration with a bright contrasting bead.
So that she does not roll up and down the yarn, it is necessary to tie a knot that will hold her in one place. The pigtail that comes out of the bundle with a bead looks beautiful. It turns out an asymmetry that adds originality to the product.
big pigtail
A thick braid is woven from floss threads. Rings made of beads and beads are put on it. They should be bright and contrasting with the main color of the yarn.

The lock on this model is purchased. Now you know how to weave a beautiful decoration from threads. It's easy and looks very effective.
Loop decoration
For such a product, you need to choose the same threads of two contrasting colors that would look harmoniously together. They are selected the same length. Then the bundles are intertwined with each other, forming a loop in the middle. Then, purchased plastic or metal jewelry is inserted from one and the other end, and they must be the same.

"Chocolate with milk"
This original decoration is also made of two parts. The first half is represented by chocolate-colored yarn, which is assembled from long threads and folded in half. Since the necklace has an asymmetric structure, the brown threads should be longer than the white ones.
One end of the yarn is wrapped with black thread. The central part of the beam, divided in half, is processed in the same way.

The lock is made according to the method described earlier, only a large bead is used instead of a button.
Thread earrings
Now earrings made in the form of thin tassels are fashionable. Making them is very simple, you just need to know how. If you have never done such things before, then look at the step-by-step instructions. There is nothing complicated here. The only thing is that it will take a long time to wind the threads around the template, as they are very thin. To make the brush so lush, you need to unwind the whole coil. The pattern must be tight. You can use a wooden plate or very thick cardboard.

When the bundles for earrings of the required thickness are tightly wound, the extreme turns are tied in a knot. Then everything is removed from the template. It turns out a ring tied from opposite sides to knots. Putting the threads together, from above we perform several windings around the end, under the knot. And carefully cut the lower part under the ruler.
If you didn’t get it right the first time, then you can trim the edges with sharp scissors. The upper knot, together with the winding, is hidden in the purchased elements of the earrings. The second earring is made in the same way.
When the master makes the jewelry on his own, you can choose the color of the threads for any outfit. When buying ready-made products, you will have to choose only from what is presented in the window. The desired combination of shades can not be achieved. And what you buy won't always fit perfectly. So don't be afraid to try making your own decoration. It is not so difficult, but the result will exceed all expectations.
Plain solid color bracelets
To make such jewelry, you will need to purchase a plastic even bracelet and thin silk threads of the desired color. PVA glue is also used here. Before you start winding the thread in a circle, you need to tie a knot at the beginning of work and hide the edge under the turns of thread. A 1 cm bracelet is smeared with glue and we begin painstaking work. When the entire area is filled with threads, the next centimeter of the surface of the product is smeared. The glue dries quickly, and the winding is slow. The threads need to be pulled tight so that there are no sagging areas.
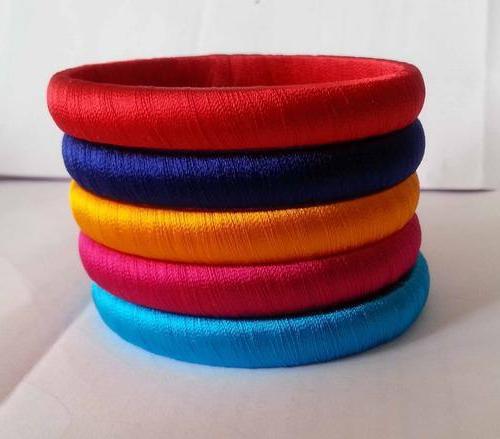
The end of the threads must be hidden under the last couple of turns. You can make a whole set of matching colors, consisting of two or three bracelets.
Wide bracelet with decor
Such jewelry is made in a similar way, only a plastic ring is bought in a larger size. After completing the winding with threads, work begins on decorating the bracelet. To do this, a simple single pigtail is woven from the thinnest blue satin ribbon according to the size of the circle. Stick it in the center of the ring. Further, two rows of purchased chains of plastic balls are placed on both sides. They have a large selection in hardware stores.

It remains to stick the half-beads with rhombuses at some distance from each other. Everything, a beautiful bracelet is ready!
The popularity of baubles
If you ask people on the street about the name of a thread decoration, then the answer will be unequivocal - a bauble. This is a braided bracelet. The Indians of North America wove such products. They associated such weaving from threads with strong friendship. Such traditional decorations have been passed down from generation to generation. If the bracelet was removed or returned to the person who presented it as a gift, then this was considered a very offensive act, interrupting communication. Especially if the removal of the baubles took place in public.
The ancient Slavs also wove such ornaments with symbols to protect them from evil spirits. Such amulets were popular with both women and men. In the last century, they remembered such wicker hippie jewelry. Baubles also received another meaning. Couples in love wore jewelry on a red thread. Special baubles were also made, which had the meaning of a talisman, a symbol of friendship. Each color has its own meaning. Consider how to make a simple red bauble for a couple in love with your own hands.
Baubles of love
An ornament made of threads, whose name is a bauble, can be not only woven from different threads, but also twisted from one. For lovers, they are usually made from red threads. This is a symbol of love. In the center of such baubles, either identical beads are put on, or the letter that is the first in the person's name. Making this product is easy. A dense red thread is taken. Having hooked it on some kind of strong base (a hook, the back of a chair or a cabinet handle), they tie a knot and begin to twist the two threads together. Approaching the central part of the bracelet, make several knots. Then they put on a letter or a bead and again tie the same number of knots so that the product looks symmetrical. Then again, the two threads continue to twist.

At the end, a knot is made that will be inserted into the first turn of the thread. It will play the role of a lock fastening a bauble on the owner's wrist.
Lovers wear such products as a sign of eternal love. Make them the same.
You can make any products from threads, it is not difficult to make them, and you can embody any creative ideas.


