How to make Christmas decorations. How to make Christmas toys for a Christmas tree out of paper with your own hands


Do-it-yourself outdoor Christmas toys
If the area of \u200b\u200byour house allows, you can make a variety of floor New Year's toys with your own hands. For example, make a snowman out of plastic cups, as shown in the photo, and put an LED garland inside. If there are kids in the house, finding sweets in the cavity of the cups will bring them real surprise.
You can also design cone-shaped outdoor Christmas toys with your own hands. It is necessary to make a base-cone from thick cardboard, and then arrange it in the form of a Christmas tree, a gnome, Santa Claus and other figures. Use colored paper. Cut decorations out of it and glue them to the base. You can also use foamiran, felt and other materials. You can make a cone-shaped frame from a bending strong wire, wrap it with green thread, and strengthen the LED garland in the middle - you get a Christmas tree.


Making Christmas toys with your own hands in large and small sizes
Making New Year's toys with your own hands using the most ordinary materials allows you to create the most unusual products that sometimes amaze not only with originality, but also with their size.
DIY mini Christmas toys
To decorate a small Christmas tree or a bouquet of fir branches, we recommend making mini Christmas toys with your own hands. The easiest way to make such decorations is from salt dough. Take 250 g of water, a glass of salt and 2 glasses of flour, knead the dough and start modeling. You can form voluminous figures or flat ones by rolling out the dough in a thin layer. Sculpt whatever.
It can be snowflakes, Christmas trees, balls, snowmen. It will not be superfluous to make a small puppy - a symbol of the coming year. All these "semi-finished products" must be dried in the oven (5 - 6 hours on low heat) or 2 - 3 days in the fresh air. Such New Year's toys with your own hands can be decorated, sprinkled with sparkles, pasted over with tinsel and other decorative elements.

Huge DIY Christmas toys
For the decoration of a private house, spectacular decorations are often used, which differ in their scale. It can be overall garlands and huge New Year's toys with your own hands: New Year's creatures, balls, bells. Such decorations can also be found at city celebrations and fairs. A large do-it-yourself Christmas ball toy can be made from an ordinary gymnastic ball, you just have to decorate it and decorate the loop beautifully, disguising the handle with a satin ribbon with a bow.
A huge do-it-yourself New Year's toy "clock" can decorate not only the exterior of the house, but also the interior of a spacious room, if you install a flat design against the wall. They can be a great element of the corner for a photo shoot, and the arrows will remind you of the upcoming holiday. Such a clock can be made from plywood, and the mechanism may not be available at all, or you can get it along with an old clock at a flea market. Like all DIY Christmas toys, the clock should also be decorated. This can be done with multi-colored tinsel, the image of Santa Claus on the dial, artificial snow.


How to make Christmas toys with your own hands in different stylistic directions
The design of the New Year's interior has become quite fashionable in compliance with one or another stylistic orientation, on which the design of New Year's toys with their own hands largely depends. Let's consider some options.
Do-it-yourself New Year's toys in Provence style
Provence is the style of an old French village, characterized by comfort, warmth, natural materials, textiles and floral prints. To make New Year's toys in the Provence style with your own hands, take old ball toys, wrap them in a bag of natural patterned fabric, make lace bows on top and decorate with beads. A variety of toys made of felt or decorated with decoupage technique with images of small flowers will also be an excellent solution.


New Year's eco toys with their own hands
Eco style has become more and more popular over the years, as humanity has appreciated the priority of natural materials. Do-it-yourself Christmas eco toys can be made from wood, cones, branches and other natural materials. For example, having collected acorn caps in an oak grove, you can paste over a simple New Year's ball with them. To make such a toy look spectacular, treat each hat with varnish, dip it in golden sparkles and glue it on. The addition will be a loop of gold braid.

Do-it-yourself vintage Christmas toys in retro style
You can make interesting New Year's toys with your own hands if you decorate them antique. To decorate the decor of New Year's toys with your own hands in antique style, you can use the decoupage technique. Paint the ball initially not white, but light brown paint to get the effect of antiquity. You can choose napkins with the image of angels, since the decoration of the Christmas tree was previously considered a purely Christian tradition. Apply it with PVA glue and, after drying, open it with varnish. The toy can be decorated with a satin ribbon bow, beads or pebbles can be glued on.
Do-it-yourself vintage Christmas toys can be made from salt dough according to the recipe that we reviewed earlier in the article. When decorating them, you should not use bright unnatural colors, but it is better to choose muted ones. Scuffs on toys will be an ideal addition.


DIY Christmas toys in modern minimalism
The minimalist direction in its purest form implies the absence of unnecessary non-functional decorations, but on New Year's holidays you can make some exception. When decorating New Year's toys with your own hands in this style, you should choose one or two primary colors that will be present in the interior. It can be white with blue or yellow with red, etc.


The forms of toys should also not be full of variety. Make neat bows from satin ribbons, paint the balls in one color and hang it all on the Christmas tree in a checkerboard pattern. You will be convinced that even such a seemingly modest design will have a rather spectacular look.
There are a large number of different ways to make New Year's toys with your own hands, and in our article we tried to present some ideas for their design, and it's up to you to decide which technique to use. In any case, you will get an exclusive and original decoration.
The New Year is already very close, it's time to make holiday toys for the New Year tree. What could be better than handmade toys? After all, you put a piece of your soul into them! If you have a rich imagination and a great desire to decorate your house in an original way for the holiday, then these ideas are just for you!
Fill clear balloons with decorative sprinkles or beads.

You can make these hearts. These are made of polymer clay with the addition of cinnamon and apple flavors. So you can’t eat them, but they smell - what you need!

And this, already quite edible, gingerbread cookies

You can decorate transparent balls with fragments from an old disk. It will turn out a kind of Christmas disco ball.

Shiny mustaches are the hit of the season.

You can draw a reindeer with one thumbprint.

Yarn toys look very warm and cozy.

Also, with the help of yarn and cones, you can make such cute decorations.

Tangerines can decorate not only the festive table, but also a beautiful Christmas tree.

Tree branches can be turned into original and cozy Christmas decorations that look quite simple, but at the same time stylish.

A very original decoration in the form of an eco-friendly terrarium ball.

Toys can also be made from paper - just look for a suitable origami instruction.

And if you take, say, an old map instead of plain paper, you get more “global” toys.

From small beads you can make cute New Year's toys.

Make a New Year's pickle for the Christmas tree! Looks very refreshing.

From copper buttons and foam balls you can make unusual toys for the Christmas tree.

One of the cutest ideas for toys for the Christmas tree with our own hands, we consider painted acorn caps, inside which you can put a ball of bright fabric or a ball of felted wool

Ball in decoupage technique

Christmas decorations made of wire and rope
You will need quite a bit of skill and a little imagination to turn ordinary wire and twine into elements of a festive decor or an original New Year's toy.

Make great decorations with salt dough and stamps.

Balls can even be made from old rugs.

From polymer clay, you can make such cute plates with bright stamped patterns.

Melt colored pencils inside the transparent balls to achieve this streak effect.

Does your child have a lot of plastic toys that he no longer needs? Color them and give them a second life as Christmas decorations.

Well, if this tiny sweater doesn't convince you that it's time to learn to knit, then nothing will.

Mini mittens in pursuit of a sweater.

You can make names out of wire and tie them with beautiful strings.

There is a special paint that, when dried, allows you to write on it with chalk, like on a blackboard. A great option for Christmas decorations, because you can write anything.

Love Harry Potter? Make yourself a Golden Snitch!

Or a LEGO Death Star toy if you're a Star Wars fan.

On polymer clay, you can also make these prints with a napkin. Very tender and airy toys will turn out.

Birds also love the New Year. Make a cute feeder for them.

And from felt you can make cute flat balls with a variety of patterns.
Scientists say that the tradition of decorating a Christmas tree for the New Year came to us from our pagan past. There is a lot of controversy and debate on this subject. But we, the descendants of those same pagans, by and large do not care where this tradition came from. The main warmth of the family hearth and such a bright symbol of the new branch of time. New Year is for many that point in the life span of time, which is so required to be set. Mark the end and, accordingly, the beginning.
Both big and small love to decorate the green fragrant beauty of the Christmas tree. Agree, there is something magical in this. We could not avoid this issue and we offer you a selection of ideas for making Christmas toys for your crazy hands. Let's not talk about value, a lot has already been said about this, and on our website, in particular.

Just read the article, you will surely be interested in one of the ideas. And if one of the crafts we have proposed takes pride of place on your New Year's green or maybe not green beauty, it will be a holiday for us.
In this article, let's talk about Christmas tree decorations that can be built from improvised means and which are advantageous to distinguish your Christmas tree from many others. So, let's begin…

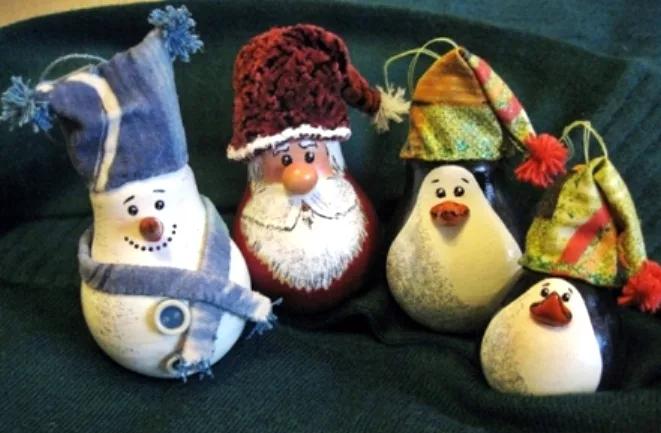
The snowman is one of the traditional symbols of the New Year and, as a result, the most popular Christmas decoration. But how often have you met snowmen made of iron bottle caps? Not? Then meet: snowmen from caps.
What you will need to create a fun snowman:
- Iron caps from glass bottles (these can be found on beer bottles and lemonade bottles in glass containers).
- Acrylic paints.
- Paint in a can. White.
- Tapes. Preferably not wide up to about one centimeter.
- hot glue
- Buttons.
- Scissors.
- Tassel.
- Glitter or something similar for decor at your discretion.

Using spray paint, paint the inside of the caps white. Before painting, bottle caps should be washed, dried and laid out as tightly as possible on one plane. Painting is preferably done outdoors. The paint should cover the inner surface of the lid tightly, if necessary, repeat the staining.

We form the body of a snowman
We form the body of a snowman
After the covers are dry, you can start assembling the bodies of the snowmen. Lay three lids in a row, with the convex side facing you. Try on how many ribbons it takes to secure all three lids together with hot glue. Cut off the measured piece of tape, do not forget to leave a margin of tape in order to make a loop for hanging.
Glue the cut tape, as mentioned above, with hot glue to the lids. You can grab the covers a little beforehand so that they hold better on the tape, so to speak, add structural rigidity.

Take acrylic paints and use a thin brush to paint eyes, nose, mouth and buttons on the painted side of the bottle caps. If you do not have a suitable brush, you can replace it with a toothpick. The edge of which needs to be kneaded a little to get something like a miniature panicle. After the paint dries, you can add a little sparkle.

Cut small pieces of colorful ribbons and tie them to your snowmen in the manner of scarves. In places where you tied scarves, glue on a bright button. How do you like the idea?
A burnt out light bulb is considered garbage and is rushed to be thrown away. Well, in vain. In our business, exactly what should be thrown away will ideally fulfill the role of something new. Here's an idea with funny penguins for you to consider. Such penguins will perfectly decorate the Christmas tree and delight your family.

So, what you need to create a cute inhabitant of polar ice floes:
1. Damaged incandescent bulbs.
2. Acrylic paints or gouache.
3. Tassels. It would be nice to prepare a few. It is good to cover large areas with large ones, and draw small details of faces with thin ones.
4. Ribbons, cords, threads or something similar.
5. You can prepare hats in advance. The hat left from the toy will do or you can build something similar yourself.
6. Hot glue.

Damaged light bulbs should be cleaned of dirt and degreased. Then cover with black and white paints. Do you remember the color of real penguins? Exactly. The back is black, and the belly and muzzle are white. You can make a simple and slightly complicated coloring of a pingini. You can simply cover the light bulb with white and black paint, or you can draw a little fins and an arc above the eyes.
Light bulbs painted white and black must be dried. Then paint the muzzles. Just use a thin brush to draw eyes, nose and blush.

Tip: to make it more convenient to work, take a reel of scotch tape or toilet paper, or something similar. Install the bottom of the light bulb in a round hole of suitable size, it will not stagger and thus it will be easier for you to apply drawings to the surface.
After you have painted the penguins and painted their faces, you need to dress the cute ones. For this purpose, doll things are well suited. And if you wish, you can build clothes on your own. Knit simple hats and scarves from the remnants of the threads.

Yes, but don't forget the hanging loop. If your penguins will not be wearing hats, then simply use hot glue and apply the right amount of it to the very top of the cartridge and glue a loop of lace or tape. And in the case of hats, you must first leave a hole in them in order to thread the loop.

We put on hats, put on scarves. Scarves can simply be tied on penguins, or you can fix them with hot glue. This is at your discretion and wish.
That's all. Cute lamp penguins are ready. Hurry up to hang them on the Christmas tree. Let the family please.

The fashion for knitted napkins is immortal. All the same, for several dozen housewives there is one who will not fail to decorate the furniture with a knitted napkin or throw light lace on the monitor, in the manner of a grandmother's decor. Yes, they are not extinct, they exist. Therefore, rummaging through your stocks or mother’s, or even grandmother’s, you can find a couple of three openwork lace napkins. It's time to give them a second life.
Openwork ball can be used as christmas tree decoration or as a New Year's room decor. And even leave it as a ceiling. There are many applications for this product.

- Lace. The remains of simple lace are perfect. Old knitted napkins.
- Inflatable ball.
- PVA glue.
- Tassel.
First you need to dilute the PVA with water. The approximate ratio of parts is 2:1. Glue and water must be thoroughly mixed and poured into a container with a fairly wide neck, you can even take a plate for this purpose.

Tip: do not use any other glue, especially silicate. He has a quality that in this particular case is completely out of place. After drying, this glue is known to turn into a substance that vaguely resembles glass. And having a tendency to crack and turn into sand from mechanical stress. Which is absolutely inappropriate. Yes, and when it dries on the ball, it will burst it. Experimentally proven.
Then, lace and napkins should be soaked in the resulting solution.
Tip: Naturally, the material of napkins and lace should have absorbent properties. At least the minimum.
Diluted glue can be applied to napkins and with a brush. Having previously laid them out on an oilcloth.

Now we need to inflate the balloon. Ideal if you take a simple and strong round ball. Determine the size yourself.
Gently cover the inflated and ball with glue-soaked napkins and lace. Try not to leave unfilled space between the material, but do not apply it in a thick layer. After the ball is completely wrapped, it must be carefully hung up and wait until the glue is completely dry and turn the napkins with lace into a kind of crust.
Next, the ball must be burst with a needle or something similar. The rest of the ball must be carefully removed. Now, for greater stability, the openwork ball can be sprinkled with hairspray. It was hairspray that showed itself perfectly in this case. Proven experimentally.

Tip: do not use this design as a candlestick (there are such ideas on the Internet). An openwork ball can easily ignite and then the result may be slaps on the butt of firefighters, and not a fun pastime. Don't ruin your holiday!
Watch the video on the topic: Christmas ball of threads
Although sometimes winter in our area reminds us of spring, and deep autumn, and then spring again, in a word, any season, just not winter with snow. But a warm knitted hat still remains a symbol of winter cold and snow. Use our idea and make funny warm hats as toys for the Christmas tree. Original, and what is important, practically from garbage.

So what you need:

1. Garbage. More specifically, toilet paper reels, cling film, or any other lightweight cardboard reel that you may be taking out of the trash can right now.

2. Remains of threads from knitting. It is desirable that they be approximately the same in texture and thickness, the latter is more important. The length of the segment can be taken from 25 centimeters.

3. Scissors.
4. Ruler.
5. A simple pencil or something with which you can take notes.
Let's start making:
Cardboard cylinders should be marked and cut into rings, like a cucumber. Choose the width of each ring yourself. This will determine what kind of cap lapel you want to make.

Tip: if you are planning to make wide lapels, then the length of the threads also needs to be increased.
The threads must be folded in half and make loops on the cardboard rings. They must be constantly tightly shifted one to the other. The cylinder must be tied tightly.


Leave a few loose threads about a centimeter, when you cut off the excess, they will form a semblance of a pom-pom.

This will give the cap realism and cuteness. A loop for hanging can be made from the same thread with which you grabbed the top of the cap under the pompom.

Thus, when hanging, the hat will not hang evenly, and this will give the product asymmetry, which will only benefit the appearance.


And again, the material for the future masterpiece is nothing but garbage. The lemonade bottle would have been thrown away at any other time, but not in this case. We offer you the following idea for service, namely a snowflake from the bottom of a plastic bottle. This craft will fit perfectly with any other Christmas decorations. A snowflake is a traditional symbol for winter and the New Year.

So, what do you need to create a wonderful Christmas decoration:
- Plastic bottles. Standard clear or blue/light blue.
- Stationery knife.
- Awl.
- Dye.
- Tassels.
- A thread or thin ribbon so that the toy can be hung.
- Sequins for decor at your discretion.
From the whole bottle, we are only interested in the bottom. Cut it off with a utility knife. Make it as low as possible. Heat the awl and carefully make a hole in the cut, into which you will eventually thread the thread for hanging.

Now apply a pattern of curls or lines to the cut bottoms. It can be both complex and simple, it depends on your imagination and wishes. You can add sparkles to the drawing or mix it with paints. That's all, the Christmas tree decoration is ready.

Call the kids! The proposed idea will simply honestly allow you to spend amusing minutes, or even hours, together. Everyone is used to the fact that Christmas balls are round and convex. No, but this does not affect the originality and beauty of the toys at all. Moreover, the manufacturing process is absolutely simple. Even a small child can handle it. It will even be better for the children to help you in the manufacturing process. Since a kind of awkwardness inherent only in children, let's call it charm, is required to stylize our jewelry.

- Knitting threads, multi-colored. Better than medium thickness.
- Wire or twigs that will be easy to bend, and they will keep their shape.
- Pliers.
- Beads with large holes.
- Fantasy.

Let's start doing Christmas crafts
We take the wire and wrap it with a piece of dark fabric, or thread or dark paper. It is not necessary to do this carefully, it is enough that the wire is hidden by 80%.

We grab the free ends with pliers and make a few turns. Make sure that the wire is fastened and the wrapping material is fixed. It turned out a kind of not quite even circle with antennae.

If you use twigs, then fasten them with a thread so that they keep their shape. Just made a few turns. And don't forget to leave long loop ends so your balloons can be hung up.

Now we take multi-colored threads and wind them on an impromptu frame. We do it not tightly, but also weakly. You can use up to three colors, preferably contrasting.

On the thread that you plan to wind last, string a few beads, if desired. Attach the thread to the "tail" of the frame.

Everything, your New Year's toys are ready. Extremely simple and at the same time extraordinary and eye-catching. Happy New Year!
Good afternoon! I hasten to please with New Year's ideas of toys, and those who have not yet made gifts for the New Year, I recommend not to delay this for a long time and choose them in this
Tell me, what do you prefer to give for the New Year? What about receiving? Probably everyone really likes to receive toys for the Christmas tree, and just all sorts of things. Agree, I remember when I published a post about crafts for the upcoming holidays, so a lot of people sent me wishes and congratulations, so I also want to congratulate everyone on the upcoming!
Having written the last note about New Year's crafts, letters came to my mail with a request that I publish more options for what can be made from plasticine, I share with you my best practices.
Here she is a beauty!

Do you like to sculpt Christmas trees and snowmen? Then use this step-by-step instruction with a photo:


Where without Santa Claus, the kids just love to see him at the holiday, and even more so to sculpt crafts.

These are the compositions you can get.

If you want, you can even sculpt Peppa Pig and her brother George from a cartoon.

Or for example a mouse or a rat.

You can make a dog lying near the Christmas tree, let it bring warmth to your home and become a talisman.
Such an affectionate and sad puppy girl.

Or playful Tuzik, what do you choose?

I remember once upon a time I had to work in a kindergarten, you yourself understand that kindergartens are almost not funded, so at that time we made and decorated our group from what we could, in general from all sorts of things. It was ordinary foam or they took cheap ceiling tiles and this is what happened:

Agree, there seems to be nothing difficult, but it also looks original, with a twist.

A little more difficult, and time-consuming, are toys made from salt dough.


Beautiful felt toys for the Christmas tree
Now, as for felt, well, a lot of ideas can be created and found on the Internet.


Their patterns and patterns are quite simple, you can easily draw yourself.
Funny deer.

The Christmas tree is a forest beauty.

If you are interested in this Christmas tree, or such a bookmark for books in the form of a dog, then write to me below, I will send you templates and a diagram.


Snow Maiden from felt.

And how do you like such wonderful creatures, if you decorate a Christmas tree with them, there are diagrams in an enlarged form, they will soon appear in another note, or write to send.

By the way, I was so hooked on the topic of felt that I will soon write a separate article on this topic, so expect fans, add my blog to bookmarks and rejoice with me))). By the way, if you need crochet toys, then feel free to go here, there is a whole
Master class of paper crafts in the form of balls and lanterns
Who doesn't love Christmas tree balls? Probably everyone just loves them, let's make a simple option.
You will need colored or multi-colored paper, scissors and glue. You will need to cut out 20 circles of the same size from it. And then act according to this scheme, roll up as shown in these pictures.


Then, as shown, glue with good glue, it is better to take an erikrauzer or PVA.

There is another version of such a paper Christmas tree ball.

And I also give you the most popular type of balloon decorations, in this video everything is shown in great detail and clearly, you just have to repeat the necessary steps after the presenter:
And here is another super idea that you definitely haven’t seen before:
For school and kindergarten, I can offer such interesting flashlights that everyone probably knows and remembers.


And another masterpiece in the form of a garland, it's not that unimaginably beautiful. Watch this video from YouTube channel:
Paper toys for the New Year
The first place can rightfully be given to snowflakes of various types and in origami style and volumetric options, who need all sorts of ideas and patterns, see snowflake patterns here


It is also easy to fold various figures from paper stripes.


We make Christmas decorations for the Christmas tree with our own hands from plastic bottles and light bulbs
A fairly common craft, a souvenir, and someone will even give such a treasure as a gift, I recommend doing it yourself at home. Just be careful if you are making crafts from a light bulb, after all, this is not for children's hands.

Made of plastic bottles will be safer and more durable.


Souvenirs from improvised materials
You can make crafts from wire and knitting threads.

As they say, an idea does not come alone, it pulls another.

From satin ribbons and beads, balls.

In just a couple of minutes, you can fashion a chic spruce out of cardboard. Cut out a Christmas tree shape from cardboard, use three templates, then drag it with threads.

Then glue the napkin on the glue, after drying, paint with gouache paint and decorate with beads.

Cool magic rope star.

Love to collect cones in the forest, then make such a gift.

It can also be made from foamiran.

Believe it or not, you can even make a souvenir out of oranges.


Using cotton pads, you can make an angel:

Video on how to make shibbeh chic toys
Well, I think you have not heard of this, so you can see this miracle more clearly in this video and repeat. It turns out indescribably beautiful, and most importantly, it is not particularly difficult, it resembles decoupage.
That's all for me, if you want more ideas, then look in. Have a great weekend everyone and see you soon. Bye Bye!
Sincerely, Ekaterina Mantsurova
(2
people already rated)
If you are a creative person or just like to do something with your own hands, then the New Year is the perfect time for creativity. When it became cold outside, many immediately associate that the New Year and Christmas are coming soon. Of course, for these beloved holidays, you need to start preparing in advance, several months in advance.
In this article, we offer you the best options for handmade Christmas decorations that you can make yourself without much effort and your New Year's green beauty will become the most beautiful. Please yourself and your loved ones with the magical atmosphere of the holiday.
In the decor of Christmas tree decorations, you can use anything you can think of.
1. New Year's toys from cones.
Many, having heard about cone toys, will say that this is the last century and far from beautiful. But it's not. Even the simplest decoration can be a highlight in the decor. Just look at these amazing decorations made from simple cones. They don't seem easy.
To make a Christmas tree toy from a cone, you need pliers, not thick wire, and decor materials.
First you need to bend a small piece of wire, bend it in half and twist the ends with pliers to make a loop for the ribbon to hang the bump from. Then screw this loop into the cone, stretch the ribbon and you can start decorating.
You can leave the bump in its normal form. You can decorate with a bow of satin ribbon or burlap. You can also paint the whole or just the tips of the bud with silver or white acrylic paint and sprinkle with glitter.


2. Acorns in New Year's decor.
Acorns, as well as cones, are very often used in New Year's decor, including for decorating Christmas tree decorations. Acorns in and of themselves can be a good decoration. You can paint the whole acorn or just the cap of the nut with acrylic paint and sprinkle with glitter.
You can also make a beautiful Christmas tree decoration by simply pasting the ball with acorn caps.


3. Decor of transparent Christmas balls.
Transparent balls will look very beautiful on the Christmas tree. You can use glass or split plastic balls. But keep in mind, working with glass is much more difficult and requires additional skills. Therefore, to simplify your task, buy a few transparent opening balls and start decorating.
There are a lot of options for decorating them. We offer you photos of the simplest and most original ideas that are so simple that they do not even require a description. Everything is so clear. Use various laces, ribbons, spruce branches, photos of your family, salt as an imitation of snow, various small figurines in the form of Christmas trees or animals that you can order online or buy in a specialized store to decorate transparent Christmas balls.


 4. Decor for Christmas decorations with fabric and threads.
This toy decor option is the most diverse and depends on your imagination. As a base, you can use ordinary round toys or foam balls. All you need is to choose a beautiful fabric (it can be cotton, satin or even burlap) and cover the ball with it, then additionally decorate the toy with various bows, ribbons, pendants, lace, etc. As a result, you will get chic vintage Christmas decorations.


Also decorate New Year's balls by completely wrapping them with thick woolen and jute thread. For this option, it is better to use a foam ball as a basis so that the thread sticks well and does not roll.


Also, with the help of threads and glue, you can make beautiful hollow balls and decorate them to your liking. For example, make an imitation of snow using fine salt or white sparkles.

hollow ball for christmas tree


