Summary of the lesson "Goldfish". Circle "Isothread
gold fish is a symbol of good luck in many countries. And everyone knows that we ourselves are the smiths of our own happiness. Therefore, today we will learn how to make a goldfish with our own hands and will not wait for it from someone as a gift. This article contains the most interesting and simple ways to make a goldfish, you just have to choose the most suitable one for yourself.
from waste material
You can make an excellent goldfish from waste material, which will decorate your home or become the central figure on any postcard or picture. Now we will tell you how to do it.
What we need to take:
- cardboard of small thickness;
- acacia leaves or maple seeds;
- ordinary PVA glue;
- can of gold paint;
- scissors;
- adhesive tape with a double-sided adhesive surface;
- ordinary pencil;
- medicine blister pack;
- black button;
- hairdressing varnish;
- shiny ribbon.
The first thing we need to do is draw the outlines of our fish on cardboard. The larger the seeds, the larger the fish should be. We cut off the excess cardboard so that we only have the working form of the fish left. Starting from the tail, cover the form with glue and put leaves and seeds on top, leaving no gaps between them. These materials will act as fish scales.
Next, we need to do the head of our craft. From the same cardboard we form the head. At the point where the eye will be, we make a hole and attach a plastic mold from the blister there. Do not forget to put a button in the blister - it will serve as a pupil.
The first stage has been completed. Next, cover the product with gold paint and let it dry. Now let's finish the work with the head of our fish. We glue the blister with a button inside on double-sided tape to the head of the fish. See how it's done in the photo. Draw eyelashes with a regular pencil. You can also paint a mouth or a few scales on the fish. The final stage: so that the paint does not get dirty, cover the fish with hairspray. We tie a shiny ribbon on the ponytail.
The master class is over, our fish is ready. It remains only to find a use for it.
Unusual solutions
Pasta fish is made very simply and very quickly.
A shape is cut out of thick paper or cardboard. The eye and outlines of the head are drawn.

Dry pasta is covered with transparent strong glue and superimposed on the form.

By bending small pieces of paper in the shape of a fan, we get the tail and fins of our fish. We glue the parts to the places where they should be.

The rest of the canvas is decorated with paper in the form of algae. You can also use pasta of a different color as a decoration, they will become pebbles. Or attach real beads, or pebbles to the bottom of the picture.

The pasta fish is finished. Such a picture can definitely be suitable as a craft in Kindergarten Or as decoration for a child's room.
Video how easy and simple it is to crochet a goldfish, even if you do not know how to knit. The lesson presents detailed diagram and a description of the knitting process.
DIY beaded fish:
In the technique of quilling
Any quilling patterns turn out to be very unusual and bewitching, our goldfish is no exception.
For work we need:

- pieces of paper of various colors (shades of orange and yellow for goldfish. Shades of green are suitable for algae);
- pebbles, rhinestones or beads to saddle eyes;
- ordinary toothpick;
- PVA glue and super glue;
- plastic cap.

If you plan to put the fish in the aquarium, you need to:
- small glass aquarium or round vase;
- pebble.

Additionally prepare:
- a ruler with round holes;
- pins;
- stand for work.

We cut orange colored paper into equal strips and use a toothpick to fold the strips into a paid roller. We lay the roller in the round hole of the ruler and release it so that it can bloom. The hole should be average in size among the rest. We take out the roller and glue its end.

We make six pieces of such rollers and flatten each of them in the middle.

We glue six rollers together as shown in the picture, take a piece of paper strip, wrap it around the glued rollers and glue the end of the strip in the same way.

We twist an additional roller, glue it in the center of the workpiece and coat it and the edges of the workpiece with glue.

We twist the second exactly the same part, which will serve as the body of our fish, and glue it with the first one. Do should protrude slightly in the center on both sides.
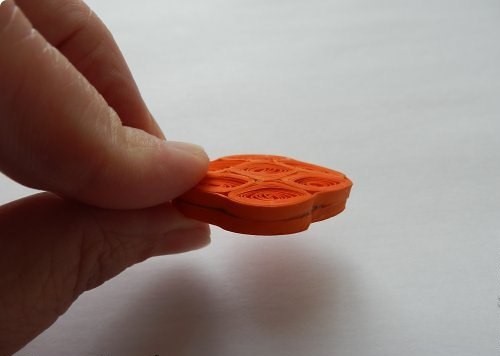
We glue our detail with a strip of paper.

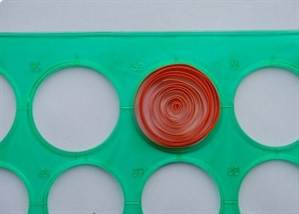
We pass to the second stage. We need to make eyes and fins for crafts. To do this, we take two pieces of colored paper, one lighter, the other darker and glue their ends.

We twist the roller from the resulting strip and lower it into a larger hole. The dark paper should be on the outside.

We flatten our rollers and bend them around the edges.

We fasten the parts with glue to the body of the fish.

On both sides we put eyes on the glue.


In the same way, we glue three bright and two light stripes between each other and, after twisting, lower them into a thirty-six mm shape.

We take a couple of pins and use them to move the center point to the side. We fix it with pins, drip a little glue and wait until it dries.

Once the glue has dried, bend the roller like this.

We make a ponytail from larger and smaller parts and glue it.

We fasten the third from above.

Fourth from the bottom.


Glue the tail to the fish.

Here's how we did it.


Isothread technique only at first glance it seems to be a complicated technique. It is enough to master two embroidery techniques (angle and circle), which, however, are similar, and you can create many unique works.
Isothread can be decorated and greeting card, and perform , and pictorial work. But this, of course, is not immediate. From the first time, it is unlikely that masterpieces will turn out. It is better to start with small simple tasks. I suggest you embroider fish. Such a fish can decorate a postcard, or the interior of a children's room. we are compatible with the pattern.
For work, we need: sewing threads in two close tones for each fish, white, blue, black for the eyes, landscape sheet, colored pencils, sewing needle, pin (with a ball at the end), scissors, glue stick, simple pencil, compasses , carbon copy.
Let's get started:
First, let's practice embroidering a circle. Draw a circle with a compass. 
Divide the circle into 16 equal parts (in half, each half in half, each quarter in half). 
Number as shown in the photo. 
We pierce each division with a pin (if you have it with a ball, then it’s just convenient to hold it for it). We embroider as follows: from hole 1 we go to the front side, we go into 2, we go out into 3, we go into 4, etc. The arrows in the photo show the direction of the thread. 
The result should be the following pattern: on the left - a pattern from the front side, on the right - from the wrong side. 
Let's get back to the work itself. Draw a background for the fish on the landscape sheet with colored pencils. Colored pencils are the best option (the sheet will warp from watercolor, from gouache - the threads will be smeared, felt-tip pens are too bright, etc.). And colored pencils will create a soft pastel background, on which the fish will not get lost, but will stand out. 
Draw fish or copy the suggested ones. 
Using carbon paper, transfer the design to the wrong side of the background. We divide the circumference of the body into equal segments (an even number), pierce holes. We start to embroider. We embroider the torso as a circle with lighter threads. 
We embroider the fins as an unfinished circle with the first color. 
The tail is similar to the fin. 

If the fins are not sharp, but rounded, like this fish, gill fins, then they can be embroidered as a circle. 
We “outline” the fish with a second color, it should be brighter or darker in tone. For fins, straight lines can be made with one stitch. The body, gills, mouth, scales are embroidered as follows: we go out into the first hole, we go into the third, we go out into the second, we go into the fourth, etc. Those. It turns out a stitch through one hole. 
The eye is a circle with white threads. 
A circle with a smaller diameter of blue threads. 
The pupil - a circle - with black threads. Along the edge, we embroider all the circles through one hole in blue or black, so we “outline” the pattern, making its edges clearer. A photo 
We embroider the second fish according to the same principle. The main details of a lighter thread. 
"Circle" darker. 
Isolate for preschoolers"Fish."
Some details of the "underwater interior" can also be embroidered. But do not overdo it so that the fish do not get lost in the background.
Enjoy your creative time! By the way, a child can easily give such fish to his mother on Mother's Day or by March 8, 2013. And older kids can cook Milanese chicken schnitzel taken from the site http://cooking.ua/milanskij-kurinyj-shnicel.html .

Another week has passed, much has been done, but much remains to be done. I wish you that the sun appeared this weekend. And we'll see you again on Monday. Until soon. . .
With the help of simple materials, you can simulate a cobweb and make original toys, flowers and much more. Put a little effort and imagination, and you will get a great result!
You will need:
1. Silicate stationery glue in a plastic bottle.
2. Spool(s) of white (optionally colored) thread? 40-60.
3. Glass jar for spools of thread.
4. Scissors.
5. Thick and long needle.
6. Balloon (preferably a fingertip).
7. PVA glue for gluing parts.
8. colored paper for the manufacture of parts according to patterns.
Operating procedure:
#
inflate balloon about the size of an apple, tie it well, cut the ends of the thread.
#
Put the spool in a glass jar so that the thread from it unwinds easily and freely.
#
Thread the end of the thread into the needle and pierce the bottle with silicate glue with it, then the needle can be wiped and removed, it is no longer needed until it is needed.
#
Pull the thread a few times different sides, check whether it easily passes through punctures in the bottle.
#
Then take a balloon in your left hand and, slowly, wrap it with a thread soaked in glue - this is how a cocoon is made.
#
If you use the full coil, the cocoon will be too frequent. How less thread, the lighter and more openwork it is. Two very beautiful cocoons can come out of one coil.
#
Wet cocoon should be put to dry on oilcloth away from heating appliances. It will be ready in about 4 hours.
#
If the drying cocoon crackles, it means that air comes out of the ball and the cocoon will not be rigid enough, which in turn will affect the quality of the product.
#
When the cocoon dries, you need to pull out the balloon from it. Carefully pierce it with a needle and pull it out through the cell in the bottom wall. If you still need a balloon for one item, carefully untie the thread and release the air.
You have in your hands a weightless openwork product made of a magic cobweb.
In order to make such a charming goldfish, you need to make an oval cocoon of white thread. To do this, take a fingertip, inflate it harder and tie it tightly with a thread. Next, using the technique already familiar to you, make a cocoon of white threads, and while the cocoon dries, prepare the rest of the details. It is best to make them from colored foil, but colored paper can also be used.
The eye is assembled from three parts - yellow, red and black. The parts should be cut out, put on top of each other and connected with droplets of PVA glue.
The tail is also assembled from three parts - two on the sides (identical) and one in the middle. Attach the side parts to the paper circle for the valves towards each other. In the middle between them, pour middle part tail.
Crown. Cut the flap on the crown with a fringe and fold it inward. Then close the crown into a ring and glue the edges.
Mouth and lower fins. Cut out these parts, bend the valves.
Dorsal. Cut out the fin scan, bend it in the middle along the fold lines. Then, before gluing the fin, attach it to the back of the goldfish - to the cocoon itself. To do this, tie a long thread to the top of the cocoon in the middle. Pierce the open dorsal fin in the middle and, passing a thread through the hole, connect it to the cocoon. Lubricate the bottom of the fin with glue and glue it to the cocoon. Then lift up the edges of the fin and glue them together.
Assembly should be carried out only after the cocoon has completely dried.
Glue the eyes, mouth and lower fins (for the valves) onto the cocoon with the dorsal fin. On the crown, glue the valve bent inward with glue and press firmly against the head. Lastly, glue the tail assembled on the mug (press the circle smeared with glue to the cocoon). Hang the finished fish by the thread released from the upper fin.
Pattern 
Agayeva B.A.
Summary of the lesson "Goldfish". Circle "Izonit"
Subject « gold fish»
Tasks:
Continue teaching technology to children isothread.
Strengthen cornering skills.
Exercise children in the ability to thread a needle, independently select the color of the threads, and finish the image after embroidery.
Cultivate a sense of color, accuracy and independence.
Material:
For each child - a colored cardboard, on the wrong side of which an angle is drawn, holes are made, a needle with a wide eye, threads, scissors, felt-tip pens, adhesive tape.
preliminary work:
Reading a fairy tale by A. S. Pushkin "The Tale of the Fisherman and fish» , Russian folk tale "By magic". Watching a movie "By magic", and "Tales of the Fisherman and fish» .
Corner embroidery
Lesson progress
caregiver: Guys, do you like fairy tales? Do you want to be in a fairy tale? (children's answers) Walk on the carpet, sit down and close your eyes.
(music turns on and appears small fish, reads an excerpt from the fairy tale by A. S. Pushkin "The Tale of the Fisherman and fish» )
Guess who it is? And from what fairy tale did it come to us gold fish? Who wrote this tale?
Children: A. S. Pushkin "The Tale of the Fisherman and fish»
caregiver: In what other fairy tales can we meet small fish? Children: In a Russian folk tale "By magic"
caregiver: And Zhenya will now tell you riddle:
Glass house on the window
With clear water
With stones and sand at the bottom
And with goldfish.
Children: Aquarium
caregiver: That's right, well done! I also have a magical aquarium, only there are no fish in it. How can you make a fish?
Children: Can be molded, appliquéd, painted, embroidered
Rybka: That's right, well done! I want you to embroider me
girlfriends of fishes on technology isothread.
caregiver: Good small fish We will embroider on cardboard with colored threads. We will work with a needle and scissors. Let's remember the rules for using a needle.
Children: Store the needle only in the needle case and with thread.
Do not drop the needle on the floor.
Pass the needle to each other only with the blunt end forward.
You can not stick a needle into clothes, keep it in your mouth.
The thread must not be bitten off with your teeth.
Do not hold scissors with sharp ends up.
You can only pass scissors to each other in rings
caregiver: And now we start to work. Take your needles and thread and thread the needle. Choose the thread color of your choice. And we fasten the thread with tape. (I help as needed)
Take the cardboard and start working with me.
(We took up the matter boldly, with a smile and diligence)
(Do it in a hurry - do it for a laugh)
We start to embroider a ponytail fish(injection).
First, we insert the needle from the inside into the number 1 (red, pull the thread to the front side and insert the needle into the top of the corner
From the inside, we insert the needle into the number 1 (blue,
Then to number 2 (red)
And so we reach the last hole on both sides of the corner.
(On the front side, the threads intersect, on the wrong side, the stitches go down on one side and up on the other).
We fix the thread.
caregiver: Now, with the help of felt-tip pens, draw fish body, eyes, mouth and fins. Cut out with scissors.
You have not forgotten that our aquarium is magical. The fish will do well in it. if you run them along with your wish.
(Children stick fish in an aquarium and say their desire)
Rybka: Oh, how I liked my girlfriends. In parting, I want to treat you guys. (Rybka distributes food to the children
Related publications:
Presentation "Goldfish" Children love to play in the sandbox, build castles, draw with sand, hide something in it, and then find it. The sandbox is good.
Synopsis of a game lesson in preparatory group based on the application based on the fairy tale by A. S. Pushkin "Goldfish" Purpose: Introducing children to.
 Purpose: To form the ability of children to depict images large, on the entire plane of the sheet, to maintain proportionality between parts of the image;
Summary of the GCD for applications in the preparatory group on the topic: "Goldfish in the aquarium"
Topic: "Goldfish" based on the fairy tale by A. S. Pushkin "The Tale of the Fisherman and the Fish" Tasks: -Help children feel the properties of fine art.
Synopsis of educational activities on artistic and aesthetic development in the senior group "Golden Fish" Areas to be integrated: 1) Cognitive development 2) Artistic and aesthetic development 3) Speech development Purpose: To learn how to draw fish by transmitting.
gold fish
You will need
Thick blue or blue cardboard, red, orange, yellow threads, needle, scissors.
Working process
1. On the cardboard with a needle, make working holes of the sketch of the drawing. They must be applied to the wrong side in a mirror image in accordance with the pattern.
2. Sew a circle of fish inside the body with red threads based on the base element “circle”. Then, on the body with orange threads, sew an oval based on the basic “arc” element.
3. With yellow threads, make a fin based on the base element "triangle". Moreover, the lower side of this figure is simultaneously the upper part of the body.
4. Run the tail of the fish with yellow threads based on the basic element “triangle” (Fig. 56).

Medal "Gold Star". 1939 The highest degree of distinction - the title of Hero of the Soviet Union was established by the Decree of the Central Executive Committee of the USSR of April 16, 1934. The medal "Gold Star", as a sign of this title, was established only on August 1, 1939. fourteen
From the book Pillow Toys author Boyko Elena AnatolievnaHammer and Sickle Gold Medal. 1940. The highest degree of distinction - the title of Hero of Socialist Labor and the position on the title were established by Decree of the Supreme Soviet of the USSR of December 27, 1938. Gold Medal "Hammer and Sickle", as a badge of distinction for the Heroes of Socialist Labor,
From book The big Book applications from natural materials author Dubrovskaya Natalia VadimovnaPillow "Goldfish" To make a pillow "Goldfish" 60 cm long and 50 cm wide, you will need: - satin fabric golden color;– silver satin fabric;– purple satin fabric;– silk threads white color;- silk threads
From the book Stained Glass with your own hands author Kaminskaya Elena AnatolievnaGoldfish A sheet of paper turned into white sea foam, from which a goldfish peeked out, and then quickly disappeared into the waves, sparkling with scales. Materials needed: A4 white paper, elm leaf, ash and elm seeds, lemon immortelle flower, rowan berry,
From the book Four Seasons of the Angler [Secrets of successful fishing at any time of the year] author Kazantsev Vladimir AfanasyevichStone fish Required materials: Flat gray sea stone with white stripes, cardium shell, black bead, mother-of-pearl sequins, PVA glue, tweezers. The selected shape of the pebble will tell you the image of a fish, and the white stripes on the pebble will give the fish
From the book Weaving from Newspapers author Egorova Irina VladimirovnaA fish painted on a stone Materials needed: A flat oval gray sea stone, multi-colored beads, a green button, black, white, yellow, green, purple gouache, a soft round brush, PVA glue. Type black gouache on the brush. tip
From the book Country Smokehouse. From the construction of a smokehouse to the proper preparation and storage of food author Kozlov Anton ValerievichTropical fish Required materials:A4 thick cardboard, White paper A4 size, thin blue disposable tablecloth measuring 30 x 30 cm, small lilac and white pebbles, large green, yellow and orange pebbles, round and oval glasses, shells,
From the book All about tiles [Do-it-yourself laying] author Nikitko IvanFish in the orange sea Buying fruits or vegetables in multi-colored nets, you probably threw away the packaging without thinking. Don't rush to do it. After all, such a bright net can turn into an orange sea for a fabulous fish. Materials required: A white sheet of paper and