How to tie ties in patterns. Finding the easiest way to tie a tie, or instructions to help men
A tie is one of the most important details of the image of a successful man, but it is important not only to purchase a quality accessory, but also to be able to tie it correctly. In fact, there is nothing complicated about this and all kinds of schemes have been invented a long time ago - you just have to follow the instructions step by step, and everything will work out!
Main Rules
When tying a tie, you need to know two things:
- It should not cause physical discomfort, so do not overdo it when you tighten it;
- A tight tie knot looks ugly, and the quality of the fabric does not matter. Both silk and wool ties should not be overly knotted and crumpled.
Tie length
A tie is, by and large, a ribbon whose length can be adjusted. Pay attention to the end of the tie in the photo.
The second picture shows the optimal length - this is how to tie a tie correctly.
Where could I buy
If you haven't bought a tie yet, or the one you have doesn't suit you, AliExpress Huge selection of cool ties and great discounts!
Hurry to buy - BUY A TIE WITH A DISCOUNT!
Classic tie knot

The classic tie knot is versatile and goes perfectly with any shirt collar.
Light knot

This diagram shows the easiest and fastest way to tie a tie. If you are in a hurry and you have little experience in this matter, it is better to stop at this node.
Instructions: How to tie a simple knot step by step
Video source: Megaimage
Knot Pratt

In terms of complexity, the method does not differ much from the previous one and there are almost no external differences either. In choosing a knot for a tie, most people are guided mainly by habits.
Instructions: How to tie the Pratt knot yourself
Video source: TheCravatta
Double Windsor

The diagram shows the most popular tie knot. It looks most impressive with a plain shirt in a strict business style.
Step-by-step instructions: How to tie a tie with a double knot
Video Source: Ray Anor
The bow tie

Of course, it is much easier to get a bow tie with an elastic band than to tie it every time, but for many men this option seems frivolous.
step by step diagram

Tie a bow tie is not as difficult as it might seem. In any business, experience is important, so follow the step-by-step scheme and fill your hand!
Instructions: How to tie a bow tie
Video source: Ideas for life
Intricate tie knots
I use the above schemes, it was possible to tie a tie for a special occasion or official event. Now take a look at other knot options that can be used for parties and informal gatherings.
Knot Eldridge

Since the knot in this case is the central part of the tie, the emphasis should be on it. It is desirable that the tie be plain.
step by step diagram

Agree, it is difficult, but very effective! We advise you only not to postpone this matter until the last moment, because the first time it may not turn out perfectly. Watch the video tutorial, everything is shown step by step.
Instructions: How to tie a tie in a knot
Video source: Ekaterina Vozhova
Trinity knot

The knot, as shown in the photo, is much easier to tie on ties made of smooth fabric.
step by step diagram
 The Trinity knot looks very unusual, but at the same time restrained. This option is suitable not only for stylish guys, but also for those who are tired of the classics. With a strict shirt, a tie tied in this way also looks very nice.
Instructions: How to tie a tie in the Trinity knot
A tie is a stylish accessory in every man's wardrobe. Properly matched to clothes, it gives the representative of the stronger sex rigor and charm. In an official setting, this attribute is almost indispensable. Whether it is worn daily or several times a year, a man must know how to tie a tie correctly and without wasting time.
easy ways to tie a tie
There are more than 80 tie knots, but the most common and simple are 5. It is not difficult to learn them. However, the knitting skill is necessary, otherwise, in a hurry, you can be late for an important event.
In all of the following methods, step-by-step instruction how to tie a tie correctly, and the necessary steps are schematically described.
simple knot
It is also called "Kent" or "Oriental". It is universal and is used with almost all ties. A simple knot is knitted in the following order.
- The tie is placed around the raised collar of the shirt with the seams outward, the narrow part should hang freely on the right, and the wide part on the left.
- Both parts are placed crosswise so that the narrow part is on top.
- The wide part is wrapped around the narrow one in the direction of the left hand and brought out from the bottom up into a large ring around the neck.
- The wide part is passed to the waist in the formed ring and the knot is fixed. You can pull the narrow end to vertically adjust the tie.
The location of the wide and narrow ends (starting from the first point), as in all subsequent knitting methods, can be the opposite, to whom it is more convenient. Accordingly, the entire further sequence of actions will be performed in the opposite direction.
The knot looks great on tall men, especially if the collar of the shirt is narrow.
quarter knot
He is the Four. This is another way to quickly tie a tie. "Four", like "Kent", is used quite often. Its peculiarity is that the tie triangle looks asymmetrical, but this does not in any way reduce the ubiquity of using the method. How to tie a tie this way? Let's describe it step by step.
- The accessory is placed around the neck with the seams inward so that the working (wide) part is on the right hand, and the narrow part is on the left.
- The working part is placed on top of the narrow one and under it they make a turn to the right side.
- The working part is once again wrapped around the narrow one and, when it is on the left, it is dragged upwards into the neck loop.
- The tie is pulled into the loop formed from the working end and pulled down, adjusting the tightening force. The size of the neck loop can be increased or decreased due to the narrow end.
Such a knot is quite suitable for both a business meeting and an informal setting. For the “four”, the size of the collar of the shirt, as well as the material from which the tie is made, is of no fundamental importance.
Windsor knot
Its other name - "Windsor", refers to the classic knots. Visually it looks voluminous and beautiful. For many respectable men, Windsor is the easiest way to tie a tie beautifully. The sequence of actions is as follows.
- The tie is placed on the raised collar of the shirt with the seams inward. The narrow part hangs on the left, the wide part hangs on the right.
- Both parts are crossed together, putting a wide one on top, and immediately bring it up through the tie ring around the neck.
- The wide part is passed down in the direction of the left hand.
- They wrap it under the narrow one and pull it to the right.
- They pass the wide part into the tie ring around the neck from above and direct it down to the right side. With proper knitting, you should get two tightened loops.
- The wide part is pulled over the narrow one to the left and brought up through the tie ring around the neck.
- The wide part is pulled into the formed central loop and the knot is pulled together.
The shape of the resulting triangle in Windsor can vary significantly: everything is determined by the parameters of the accessory itself. With a certain skill, you can achieve almost perfect symmetry of this knot. It looks good on shirts that have a significant distance between the right and left edges of the collar. It is also great for men with a dense physique.

Knot Pratt
Its second name is Shelby. Combines elements of "Oriental" and "Windsor". Looks great on shirts with a narrow collar. So, before you is the scheme "How to tie a tie with a Pratt knot."
- The starting position is around the neck with the seams outward, as with the Kent knot, but the leading (wide) part should be on the right, and the narrow part should be on the left.
- The parts are crossed, leading the leading one under the narrow one.
- The leading part is pulled up, threaded into the neck loop and brought down in the direction of the right hand.
- Further, as in the case of the Windsor, the leading part of the tie is turned over the narrow one to the left and pulled up through the large ring on the neck.
- They drag it down into the loop obtained from the leading part and form a knot.
The result is a small narrow triangle. Accordingly, this method of tying is more suitable for narrow and short ties.
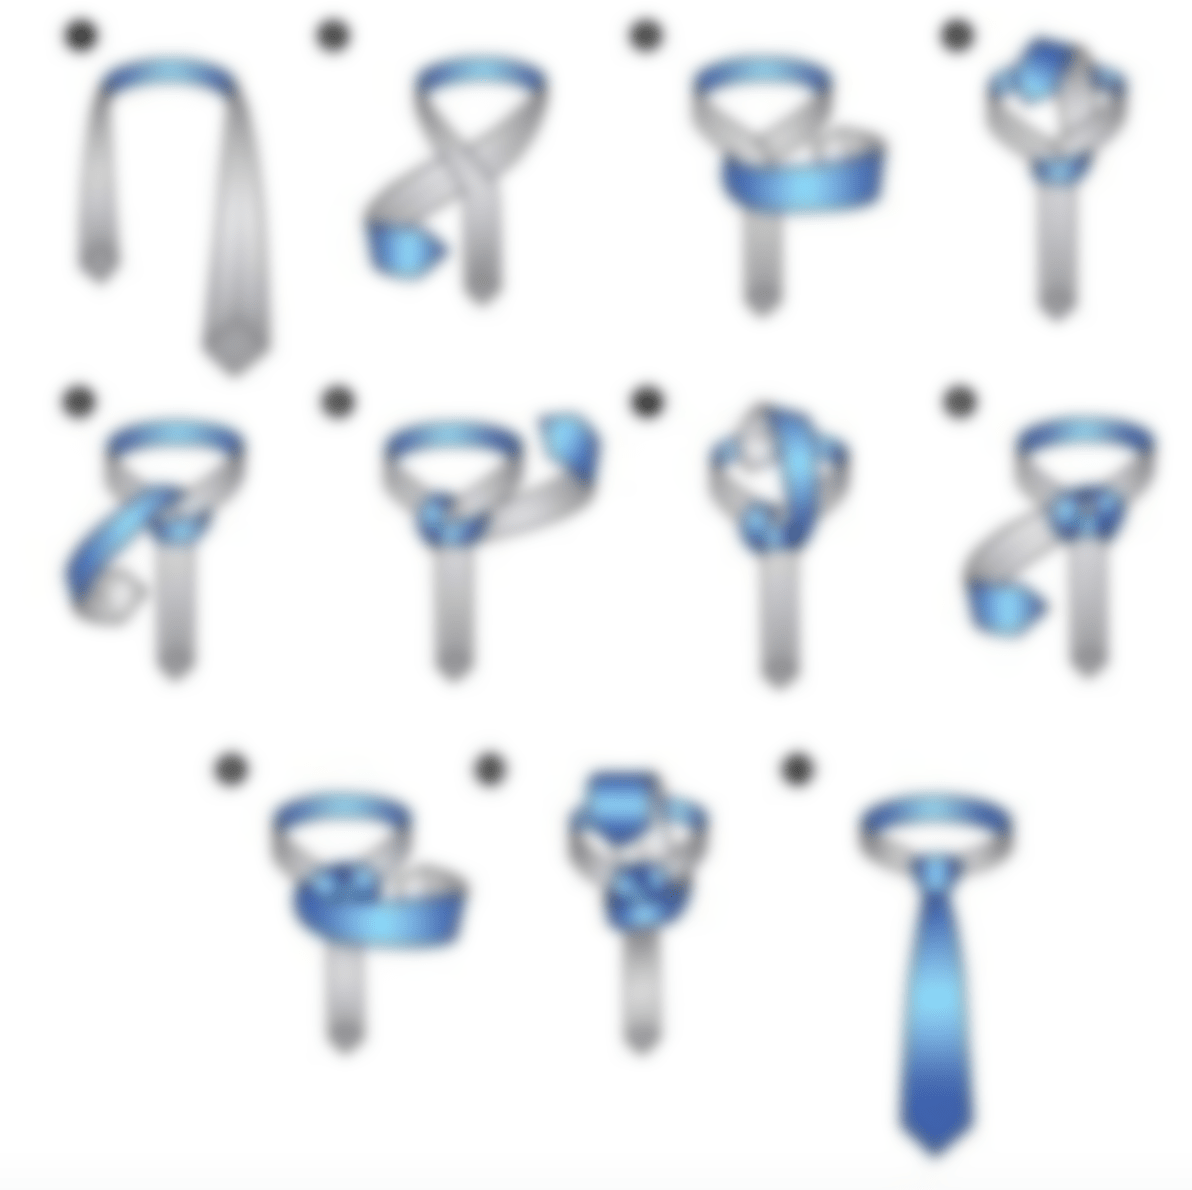
double knot
He is also called "Prince Albert", although in no manuals and manuals on tie knots there is no direct connection between the method and royal family. It looks great on men of short stature, especially if the collar of the shirt is widened or fastened with buttons. The procedure will be described below. So, how to tie a tie step by step with a double knot?
- The male accessory is wrapped around the neck, the wide (leading) part hangs down on the left side, and the narrow one on the right. For the upcoming knitting, a sufficient length of the leading part is necessary, so the narrow part should end at the level of the navel or slightly higher.
- Both parts are crossed, laying the leading one on top of the narrow one.
- Make two turns with the leading part around the narrow one in the direction of the right hand. Two loops should form, while the second is made just below the first.
- When the wide part is on the right hand for the second time, it is brought up through the tie ring around the neck and pulled through both loops obtained in the previous step.
As a result of two turns, an interesting knot "with a twist" was obtained. It is possible to pull the tie at the last stage only into the second loop, then visually it will be less voluminous.
In order for a tied men's accessory to look beautiful and aesthetically pleasing, it should not be too short or too long. The optimal location of the wide end is at the level of the middle of the belt buckle. Tight tightening of the tie around the neck is not allowed. In this case, any knot must be tightened enough so that it does not bloom.
You need to tie a tie immediately around your neck with a shirt on, but if you do it on your hands, the result can be disappointing. A little training, and soon all the knots you will get almost automatically!
A tie is one of the main accessories that make up the image of a business person. Unfortunately, not all men who have to wear a business suit know how to tie such an important part of the wardrobe. In this article, we will offer you some basic, simple ways tying a tie. There is nothing complicated about them and you can easily remember them after a few workouts.
Let's start with a few important tips:
- Do not overdo it with tightening the knot on the tie. It should not cause you discomfort and tighten your throat.
- The fabric should not be wrinkled, crumpled, dirty.
- The length of the accessory must comply with the rules of etiquette. You can read more about this in our article on the right one.
- If you decide to choose the method of tying with a wide knot, remember that the distance between the corners of the shirt should be large.
- Complex knots should be chosen if you have a tie made of thin fabric, such as silk. For wool, simple methods are suitable.
Simple knot or "four"
For those who do not strive for special frills, we offer a diagram of the simplest and fastest knot in tying.

This video clearly shows how to tie 4 knots: Simple knot or "four", Half Windsor Knot, Windsor Knot and Butterfly.
"Pratt"
This method does not differ much from the previous one either externally or in the way of tying. Symmetrical, voluminous knot, especially suitable for short ties.

"Half-windsor"
A simplified version of his older brother. The most common, popular option among office workers around the world.

"Windsor"
This knot is quite voluminous and complex, which means it is most suitable for thin, narrow, unlined ties. Recommended for shirts with a wide collar.

"Eldridge"
We will also offer you one of the complex knots. This is a spectacular, non-standard, but quite popular option, very beautiful and unusual looking.

A tie is an elegant accessory that successfully complements the image of both an adult man and a young boy. A stylish attribute will emphasize the taste of its owner, becoming a concise completion of the image.
But how to tie this seemingly simple "ribbon"? There are many techniques that allow you to beautifully fix a tie around your neck. Some of them are simpler, and some require some skill.
Tie a tie correctly
Starting to tie a tie, you should remember a few simple rules.
- Regardless of the technique chosen, keep the movements smooth and soft during the formation of the knot, do not stretch the tape.
- The knot should be tight enough, without folds.
- It should be tied at the collar, but not at the neck. Thus, at the output you will get the required length.
- When choosing a knot, pay attention to the shirt collar - the accessory should not look overly bulky.
- And remember, no matter how flawlessly the tie is tied, if it does not harmonize with your rest of the clothes and appearance, the whole effect will be nullified.
Tie knot techniques
Knot simple
Based on the name of the node, the technique for its formation is really simple. Throwing a tie around your neck, position it so that the wide end is 30 cm lower than the narrow one. Cross them. Loop the wide end around the narrow end (wrap it 360°). Next, send it under the loop that is on the neck and lower it vertically down. At the last stage, the end should not just be lowered, but passed through the front of the knot.
Windsor knot
Place the ribbon around your neck, lowering the wide end slightly below the narrow end (30 cm). Cross it over the narrow end and thread it through the resulting loop. Lower the wide part of the tape down, then on the right side, pass it behind the narrow half. Then again thread the wide end into the loop and direct it from the left side over the narrow part. Bring the ribbon through the loop (from below) and lower it down in front of the tie, after passing it through the front of the knot.
The bow tie
Throw a butterfly around your neck, keeping the asymmetry of the ends (the right one is lower than the left one). Cross the long end over the short end, thread it through the loop and lower it down. Let's move on to the second half. Fold it in half, imitating half of the bow (end A). Similarly (accordion) fold the straight part of the tape (end B). Bring the folded end of B into the loop. Stretch the resulting butterfly in opposite directions by the edges.
Knot Pratt
Place the ribbon around the neck and cross the halves, placing the wide part (A) over the narrow part (B). Pass half A through the neck loop, bringing it in at the bottom. Bring it to the front of the tie and point it down and under half B. Pull part A into the neck loop and loop it around the narrow half from right to left on the front side. Pass it through the loop again and bring it forward through the front knot.
cross knot
Let's label the thin end as A and the wider end as B. Cross the ends by placing A over B. Next, bring A from the bottom into the loop, bring it out from the top down, leaving a slightly loose loop. Draw end A behind end B and guide it through the neck loop again, but on the other side. Bring A through the left loop and secure the knot.
If the tie is thin
This type of tie is in demand in everyday wardrobe. Position the tie around your neck, keeping the principle of asymmetry. Unfold the wide end with a seam and place it under the narrow one. Lift it up, guide it into the neck loop and return to its original position (the seam is on top). Next, unfold the wide part with the right side and draw over the narrow end. Pass this half of the tape through the loop again and bring it out to the front, passing through the front of the knot.

When tying a tie, remember that its long end is on the same level as the belt. Having correctly selected and tied a tie around your neck, you will receive a spectacular accessory that is guaranteed to be appreciated by others.
IN modern world any man can pick up a business suit and feel confident in any situation. But to make the image look complete, you should know how to tie a tie in a simple way. Help to figure it out step by step photos.
A simple knot for beginners
double knot
Another easy way to tie a tie, guided by step-by-step photos:
- We throw a tie with a seam inward. We cross the two sides so that the wide part looks to the right. After that, we wrap the narrow end with it, keeping the coil intact. If everything is done correctly, then the large tip will be near the left hand.
- We slowly tighten the tie, but make sure that the narrow part is on top, and the wide part “walks” towards the right hand, forming a loop.
- We start a wide knot on top of it, and turn to the left, passing through the gap in the neck area.
- We stretch the larger side of the accessory into the ear and carefully tie it. Be sure to straighten the tie with your hands - this will help emphasize the double knot.

quarter knot
An interesting idea for those who are fed up with the “everyday” version of the node. Repeating it is not so difficult if you follow all the recommendations:
- We put the tie around the neck so that the seam looks inward. The thin part should be on top, and the wide tip is pulled from the right side.
- After that, we take the wide part to the left hand and pass it through the loop formed on the neck. At the same time, pull the tie to the top. All this time we hold the knot so as not to tighten it too much.
- It remains only to tie a business accessory so that the wide side is closer to the shirt collar, and the narrow part can be pulled down a little.

diagonal knot
The next easy way to tie a tie can be seen in step-by-step photos. It is also recommended to read additional instructions:
- We throw a tie around the neck so that its seam looks inward. After that, we put a wide part on top and form a crosshair.
- Now we stretch the wide tip from below, take it closer to the right hand and wrap it around the narrow part once. As a result, the thin part should be on the right.
- We stretch the larger side through the front side of the knot, throwing it through the loop around the neck. You need to bring it closer to the left hand.
- It remains only to pass the tip into the formed eyelet, and gently tighten the tie.

Do you often wear ties?
Vote
cross knot
This option looks very elegant and emphasizes the good taste of a man. It takes a little practice to tie a knot, but all the effort is worth the result.
You only need to repeat a few steps:
- We throw a tie with a seam inward. We cover the wide side of the accessory with a thin part, after which we take it closer to the right hand.
- We start the narrow side under the wide one to form a loop.
- We bring the larger end to the top, wrap it through the other side and gently tighten it.

Hanover
A symmetrical knot will help create an interesting image and diversify business. Step-by-step instructions will help you do everything in the best possible way:
- Throw the tie with the seam out. After, it must be crossed so that the seam of the wide part is also on the outside.
- We cover it with a thin side and make sure that it stretches closer to the right hand.
- We wind most of the smaller end and direct it to the right. We start the loop from the bottom up and stretch the wide part down, and then to the left.
- We make one circle near the knot, after which we carefully bring the large tip through the upper loop near the neck.
- If everything is done correctly, then the wide side will bend around at the base of the tie from left to right. Now we start it from behind on a loop near the neck so that it gets into the knot.
Kelvin knot
Tying a tie this way is very easy. In just a few minutes, you can add a twist to your everyday look or change up your holiday outfit a little.

For this you need:
- We put on a tie so that the seam is on the outside.
- We direct the thin part to the right hand so that it is on top. In this case, the seam should not change its location.
- Now we place the wide part on top, completing a full circle. In the end, this side should be closer to the left hand.
- On top of the knot we impose one more time most of the tie, but we “lead” the fabric from left to right. Then we pass the end through the loop and through the resulting eye.

Oriental
The easiest way to tie a tie, great for beginners. Step-by-step photos and additional instructions will tell you how to achieve a positive result:
- We throw a tie around the neck and cross its sides so that the thin side is on top, and looks to the right side.
- We wrap the smaller part once with the wide side and make sure that it is closer to the left hand.
- We stretch the large tip into the loop, pull gently down and get a neat knot.

Onassis knot
In order to tie a tie in this way, you must repeat the following steps:
- We put a male accessory around the neck so that its seam looks down. We throw the wide part on the narrower side. It should be closer to the left hand.
- We start the larger tip under the thin side, and then direct it up and stretch it through the loop formed on the neck.
- As soon as the ear appears, pull the same side down, tie a knot and give it a clearer outline.
- At the end, we take the wide part closer to the right hand, throwing it into the resulting bundle for this. Fixing the tie again.

As you can see, there are several easy ways to tie a tie. For convenience, you can use step-by-step photos or instructions with detailed videos.