Fake for the new year from colored paper. Everything for the new year. paper crafts
The celebration of the New Year and Christmas is based on the idea of bringing family members, relatives and close people closer together. The general occupation of creativity is a good opportunity to interest adults and children, and the actual occasion will be the manufacture of New Year's paper toys with your own hands. On the eve of the holidays, it's nice to spend time with your family and beautifully decorate the house before the clock strikes 12 times.
DIY paper Christmas decorations can be hung on the Christmas tree, walls, ceiling. Bright colors of toys and garlands will fill the house with a festive atmosphere, give a good mood in the last days of the outgoing 2019.
Christmas decorations made of white paper (master classes)
A simple and affordable material for creativity is white paper. The color is fully consistent with the New Year theme. Decorations are associated with fluffy snow, frosty patterns on the windows, snow-white hoarfrost. Snowflakes are cut out of white paper, funny vytynankas, figurines of angels are made, you can use decorations for decorating a room, windows, decorating a Christmas tree. The master class for making such products is quite simple, adults and children will successfully cope with the work.
Snowflakes
A classic Christmas decoration is the usual bulky snowflake. White products look beautiful on windows, especially if you make snowflakes of different sizes with different patterns. The main thing is to fold paper snowflakes correctly.
Manufacturing process:
- Take a sheet of A4 paper, fold it in half diagonally.
- Cut off the excess, leaving a triangle.
- Connect the corners, bend the paper, repeat.
- Wrap the right corner of the workpiece to the edge.
- Cut off excess paper, transfer the pattern pattern.
- Cut out a white snowflake and unfold.


It is more convenient to glue simple white snowflakes made like napkins on windows. They are easy to fold, apply a pattern pattern, cut. Ideas for schemes can be taken from the photo below or come up with your own.
 6 variants of snowflakes with different patterns
 Vytynanki
Volumetric figurines of a vytynanka with many holes can be given as a cute New Year's present, hung on a Christmas tree, or you can decorate a window with them. To create a craft, you need white paper, a vytynanka template, a clerical knife, glue, a cutting board (a cutting board is suitable).
How to make a bulge:
- You need to print a figure template from the Internet.
- For a three-dimensional figure, 2 copies are printed.
- The paper is placed on the board, all the patterns are cut out with a knife.
- At the bottom of the picture, leave a strip of paper for gluing.
- Cut out drawings are glued in the upper part.
- The lower strips are formed into a clasp ring, glued together.

The figurine turns out to be voluminous and stable, such paper decor looks beautiful in the room. As a basis, you can take the Christmas tree template in the photo below.
 Download this picture and print it out
 Angels
New Year and Christmas themes are ideally matched with paper angels. Traditionally, they are made of white paper flat or voluminous.
Several options for how to make angels:
- Print the template using a printer, cut out a figure, decorate with sparkles, rhinestones, hang on shiny threads.

- Cut out a three-dimensional angel, paper elements: two truncated cones, head, halo, sleeves, wings. The cones are folded, glued, and the remaining elements of the figure are attached to the dress.

- Craft by own drawing. The sheet is folded in half, the figure of an angel with wings, a halo is drawn on one half, the craft is cut out, unfolded - the figure is ready.

If you thread the strings through the halo of an angel and prepare several figures, you will get an interesting decoration for a chandelier.

small house
For New Year's decorations, you can prepare fabulous houses and decorate some parts of the craft with sparkles. The houses themselves can be made from old postcards, cardboard, unnecessary boxes. There are many options! A template for making Christmas decorations from paper is downloaded and printed.
 Template example
 Next, the scheme is transferred to paper. Cut out the house according to the template, bend the paper along the fold line (it turns out a box). Separately cut out the roof, smoker, windows. All elements of the craft are glued to the finished box, decorated as desired.

From such New Year's paper decorations with your own hands, you can create a whole composition, decorate a window sill with it, add figures of fairy-tale characters, Santa Claus, Snow Maiden.

Christmas decorations made of colored paper (master classes)
Beautiful and unusual New Year's decorations made of colored paper with your own hands can be made for the holiday in advance. Such bright crafts are used to decorate a room, hung on a Christmas tree. Even a small child can make a simple chain garland.
You need to prepare scissors, glue, several sets of colored paper for craft blanks, optionally choose beautiful beads, beads, rhinestones, sparkles, colored ribbons. Simple DIY paper Christmas decorations are interesting and relevant.
simple garlands
The simplest Christmas garland is a chain. For her, paper of different colors is chosen to alternate the links with each other. They cut blanks of any length and thickness, then glue all the strips - first they make the first link, thread a paper strip into it, glue it again and repeat the steps until a garland of the desired length is obtained.

Another interesting decoration option is a chain of colored hearts, and it is much easier to connect the elements with a stapler. By analogy with the previous master class, the required number of narrow strips are cut from colored paper. They take the first two strips, fasten them with a stapler, turn them inside out (as if opening them), connect the two free edges, add two new strips to them, and then fix them with a bracket. It turns out an unusual decoration, looks elegant in the decor of the room.

A more complex decoration is a voluminous garland made up of multi-colored paper balls. Additionally, to make crafts, you need a sewing machine, but if you don’t have one, you can do the work manually.
How to make a paper balloon garland:
- Cut out 6 circles of the same size from colored paper in different colors.
- Prepare several sets of circles along the length of the garland.
- Stitch a stack of blanks on a typewriter, then the next and to the end.
- Carefully wrap the fragments at the seam, forming bright balls.

For crafts, you can take wrinkled or non-uniform paper - the craft will turn out more fun. Garlands are hung from the diagonal corners of the room, they decorate the Christmas tree, walls, and ceiling.

Garland of flags
A popular Christmas decoration for the home is a garland of colorful multi-colored paper flags. On colored paper, draw the shape of a flag with a fold line in the middle and cut it out. It should be a two-sided element. In the same way, flags of a different color are prepared. Each flag is opened, glue is applied to the fold line and a strong thread is glued until the required number of paper parts for the garland is collected.

Alternatively, the flags can be made triangular by gluing the free corners of the products. Sometimes patches of colored fabric are used for such decoration. After the New Year, you can hang garlands with flags to decorate a children's holiday.

Christmas trees
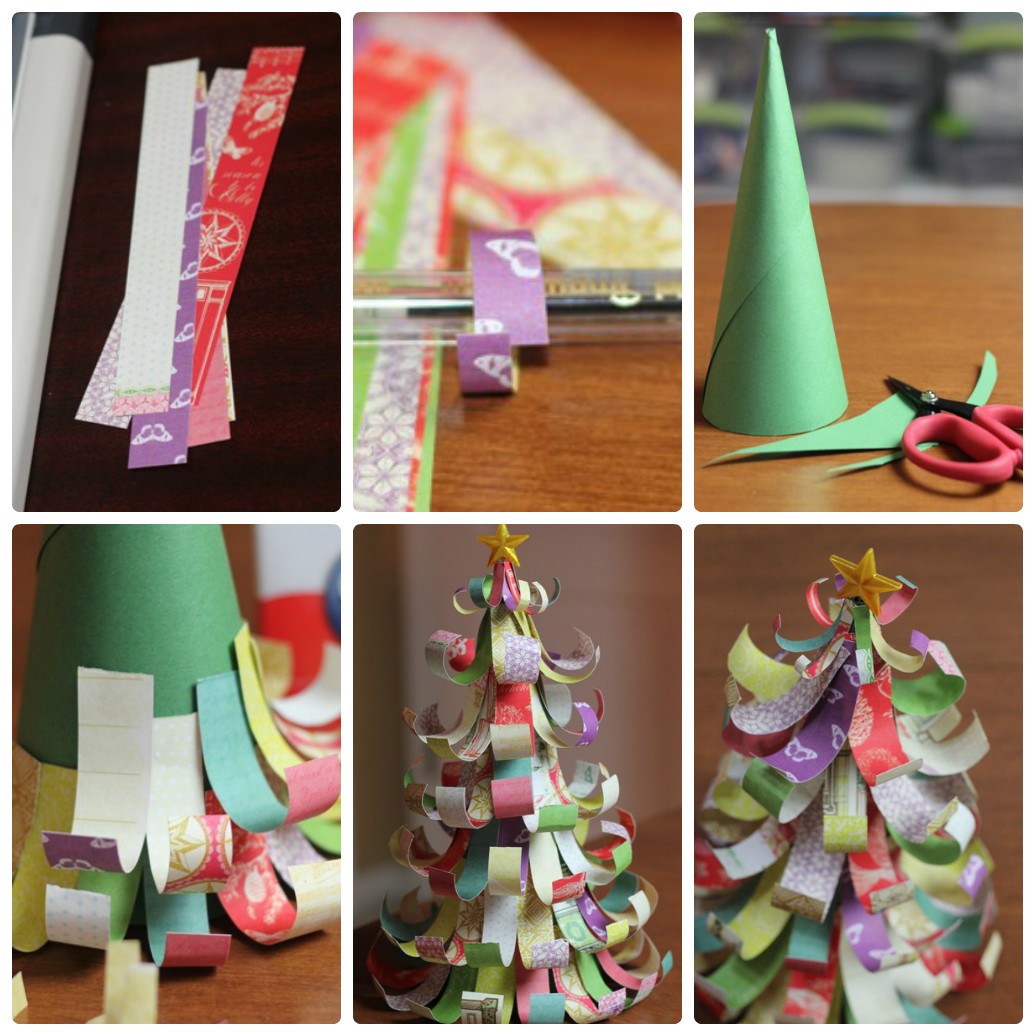
What is the New Year without a Christmas tree? You can decorate the festive beauty with your own colored paper crafts. To make a three-dimensional hanging decoration, you need to take paper, scissors, cardboard, glue and tape.
We make a Christmas tree in this order:
1. Cut multi-colored narrow identical strips and make a paper cone.

2. Glue the edges of each strip like a loop.

3. Glue the blanks to the cone starting from the bottom with adhesive tape or glue.

4. Decorate the top of the Christmas tree and loops with any decor, you can also hang decoration on the Christmas tree.

As an option, an interesting garland is assembled from paper Christmas trees - the figures are sewn to a bright ribbon or fixed above and below (chaotically) on a colored cord.
Christmas balls
Balls are one of the most popular Christmas decorations. Colorful, bright, shiny toys make the Christmas tree more beautiful and more fun. Christmas balls can be made from colored paper.
From paper strips
To make a simple ball, cut out thin paper strips (at least 18 pieces, more stripes, a more beautiful toy) and two small circles. A large bead is selected, a thread is inserted into it, and both ends of the thread are threaded into the eye of the needle.
After that, a paper circle and all prepared strips are strung on a needle over one edge. The next step is to string the second edge of each strip, the second circle and one more bead in order, bring out the loop. If the thread is loosened, a beautiful ball-shaped toy is obtained, it can be additionally decorated.

From circles
Wicker paper balls
You can use ready-made schemes for Christmas decorations to make balls and make them out of paper with your own hands or weave complex toys. Curly stripes and a small circle are cut out according to the templates. Lay out the details in the shape of a flower, glue a circle in the center. Next, the strips need to be woven like a pigtail of many strands.
So that the structure does not fall apart, and it is convenient to work, the strips are fixed with ordinary clothespins. By the end of the weaving, a ball will form, the edges of the curly strips are again fastened with a circle and a loop of shiny thread is threaded.

 Option 1
  Option 2
  Option 3
 On the video: New Year's ball made of colored paper.
magic lamps
Colored paper lanterns look unusual and original on the Christmas tree. Decorations are easy to make, even children can handle the work. Lamps symbolize warmth, wealth, prosperity and good luck. There are several simple master classes on how to make DIY Christmas decorations from paper in the form of Christmas tree lanterns.
The most popular option: they take two sheets of different colors, glue a tube from one - the middle of the flashlight, and fold the second sheet in half, retreat 1 cm from the edge, draw a line. Then cuts are made from the fold to the drawn line. The cut sheet must be opened, wrapped around the tube of the cylinder, glued the edges and made a loop-handle at the top of the flashlight.


Striped lantern
To make a beautiful toy, you need to cut a lot of thin strips of colored paper - all the details of the decoration should be the same in size, approximately 15 cm long. The strips are folded edge to edge, each piece is pierced in this place with a needle, pulling a cord or thread through them.
The free edge of the lace is pulled through the hole from the other edge of the strip and pulled lightly to form an arc - an elongated loop. The upper part of the flashlight (where the edges of the strips) is glued with a thin strip of paper in a circle, and the rounded loops will hang freely, forming a pear-shaped flashlight from thin strips.

Chinese lantern
The Chinese are the inventors of paper, they learned how to make interesting decorative products from it. New Year's Chinese lantern will decorate the festive tree. To work, they use a diagram, you can draw segments of a flashlight yourself. The size of one part is an average of 10 cm, according to the diagram at the top and bottom of each segment there are circles for fixing the flashlight.
How to make jewelry:
- Transfer the drawing to colored paper.
- A flashlight is made of six segments.
- Cut out the workpiece, glue the edges.
- Form the top and bottom of the flashlight.
- Sew the lower circles with a thread, then the upper ones.
- Make fasteners and a loop. A cute Chinese lantern is ready.

 Use this template to cut out the flashlight segments
 sky lattern
The decoration will be made on the principle of a flying lantern, but it does not need to be launched into the sky. Decoration is made of bright colored paper. It is necessary to prepare a large sheet - 24 by 60 cm. It is folded in half, and then in the form of an accordion. Next, the sheet is unfolded, triangular creases are made in the center (along the fold line). The same creases are made from above and below. A figurative-triangular cylinder is glued from the workpiece, a bright loop is glued.

Ded Moroz and Snegurochka
The New Year is unthinkable without the main characters of the holiday - Santa Claus and the Snow Maiden. It is quite simple to make them using blue (blue), red, white, yellow colored paper to cut out the elements of New Year's figurines on your own.
A circle is cut out of blue paper for the Snow Maiden, and from red paper for Santa Claus. The circles are cut to the middle, folded into a cone and glued together, getting the bases of the figures. Separately, a flat kokoshnik is cut out for the Snow Maiden, small cuts are made on the cone and the resulting element is inserted into them. Previously, the face of the figurine, drawn on a white oval, is glued onto the kokoshnik, and a yellow braid is attached to the back. For greater realism, you can make small cone arms, decorate the bottom of the Snow Maiden's coat with white fringe.

Santa Claus is painted a face, glued to the base cone. Then cut out a small red cone-cap. A mandatory element of decoration is a thick beard; if desired, you can make a bag with gifts.

To make the figures of the main New Year's characters more durable and voluminous, you can use colored cardboard instead of paper. To make a fringe or a beard, white paper is cut into thin strips, each strip is wound around a pen or pencil - it will turn out voluminous. You can decorate ready-made figures at your discretion with snowflakes, stars, pieces of cotton wool.
New Year's wreath
In decorations for the New Year holidays, a wreath is used, symbolizing prosperity, longevity, hope and happiness. The wreath serves as a kind of amulet of the family hearth from various troubles. Traditionally, the decoration is hung over the front door. To make a very simple colored paper wreath, you need more green sheets. The child must be involved in the creative process.
Master class on making New Year's door decor:
- Choose a large plate, circle its outlines on a sheet of colored cardboard (the wreath will turn out stronger) - this is the base.
- In the center of a large circle, a smaller circle is cut out under the saucer, as a result, a wreath ring resembling a donut is obtained.
- On green paper, they circle the child’s palms with a pencil and cut out many fragments - the more, the prettier the decoration.
- "Palms" are glued onto the ring, partially overlapping each other. It's not scary if it turns out randomly - it's more interesting.
- Bright decorations are glued on top of the "palms" - bells, bows, ribbons.

Volumetric paper decorations (master classes)
New Year's decor always looks more interesting if the decorations are voluminous. Making them is more difficult than flat toys, snowflakes or garlands, but everyone can do it. For creativity, paper of different colors, additional decor, bright ribbons, laces, shiny threads are used.
Volumetric crafts - stars, snowflakes, balls, garlands - are hung on a Christmas tree or on the ceiling. Having shown a little imagination and patience, you can create original toys, elegant and voluminous Christmas decorations with your own hands from paper.
Volumetric pointed balls
An interesting decoration made of white paper is quite simple. To make crafts, you need sheets, glue, a pencil, scissors, a small saucer, a coin, beads (rhinestones, sparkles), fishing line.
How to make balls:
- Attach the saucer to the paper, circle 4 blanks.
- Draw the outline of a coin in the center of each circle.
- Cut out paper circles (do not touch the middle yet).
- On each circle, draw eight lines with a pencil, not reaching the central circle.
- Insert a pencil into each sector, wrap the edges, glue.
- For each ball you need 4 blanks, they are allowed to dry.
- The elements are connected by the inner sides, a hole is made with a needle, and a fishing line is pulled through. The original Christmas decoration looks beautiful on the Christmas tree and in a garland.

3D star
A popular toy for the Christmas tree is a pointed star. It crowns the top of the tree, gives the decoration a complete look. To make the product look more realistic, you can make a three-dimensional 3D star out of colored paper.
Completing of the work:
- Two identical squares are cut out - the size and color are arbitrary.
- The blanks are folded in half twice, two more times diagonally.
- A fragment of the toy is unfolded - the fold lines are clearly visible.
- Each corner is wrapped inward to the fold (like a children's airplane).
- The edges of the corners are glued according to the principle of paper bags for volume.
- The second fragment of the toy is performed similarly.
- Connect the blanks with the inner part to each other crosswise, glue.

It turns out a voluminous star with pointed rays. A ribbon or string is attached to it and a toy is hung on a Christmas tree. To simplify the work, the loop can be laid between the fragments of the star before gluing.
In the video: a voluminous star made of paper.
Volumetric snowflakes
White snowflakes are used to decorate windows, they decorate the area near the fireplace. If you stretch a silver thread through the products, you can hang garlands of snowflakes in the room. New Year's decorations made of white paper look interesting when snowflakes are of different sizes with unequal patterns. To make snowflakes with a voluminous middle, you will need white paper, a pencil, and scissors.
Operating procedure:
- An A4 sheet is folded in half, cut into 2 parts.
- Each blank is folded diagonally, the excess is cut off.
- The resulting squares are again folded in half and diagonally.
- The core of the snowflake is made from blanks by making two cuts.
- Cuts are made from edge to corner, without cutting the workpiece to the end.
- A figured cut is made in the upper part to make petals.
- The product is unfolded, the inner petals are glued to the center.

Similarly, perform the second part of the snowflake. After that, the parts are glued together crosswise. The result will be a two-sided volumetric snowfield, on one side and on the other side there is a flower in the center.

Christmas decorations made of cardboard (master classes)
Cardboard is often used to make toys and Christmas decorations. Thick paper holds its shape well, allows you to make beautiful three-dimensional figures, four-sided Christmas trees, cones for making Santa Claus and Snow Maiden are ideally made from cardboard.
volumetric balls
Decorating a Christmas tree is not complete without decorations in the form of balls. Large and small, plain and multi-colored toys are hung on a tree in a chaotic manner.
Volumetric balls made of colored cardboard or colored paper and white cardboard look interesting. They are easy and quick to make:
- Circles of the same size are cut out of thick colored paper - 20 pieces, a radius of 3.5 cm.
- Separately, an equilateral triangle template is made so that it is clearly inscribed in a circle.
- A triangle is circled on the inside of the blanks, its sides will be the place where the circles are folded.
- Under the ruler, carefully fold on each mug, wrapping the paper on the front side.
- Five fragments are taken, the resulting valves of the circles are smeared with glue, the blanks are connected - the top of the ball.
- A hole is made with an awl, a lace is inserted into it, the bottom is made from 5 other blanks in the same way, but without a lace.
- Of the ten remaining blanks, glue the valve strip to the valve, close the ring, connect the top, bottom and middle of the ball.

For the manufacture of volumetric balls, you can use old postcards or colored cardboard. Toys are decorated with small decor, sprinkled with sparkles, chopped rain.

Cardboard fir trees
A variant of a New Year's decoration or a toy is a Christmas tree made of colored cardboard. On a dense sheet, they draw the most ordinary Christmas tree, trying to maintain the symmetry of the spruce paws. According to this blank, a second similar part is made, the Christmas tree is bent vertically, the blanks are glued together and decorated with small circles of colored paper, stars, beads, rhinestones, beads.

In order not to glue the figures, you can make cuts (cut one blank from the top to the middle along the fold line, and the second from the bottom to the center) and insert the parts into each other. Due to the density of the cardboard, the figurines will not fall apart.

How to decorate a Christmas tree with paper decorations
To make the Christmas tree, decorated with your own crafts, look beautiful, you need to properly hang paper toys and decorations. There are several options for placing jewelry - in a pyramid, in a spiral, vertically or horizontally. Each method is interesting, you need to pay attention to the shape, size and color of homemade paper toys.
New Year's beauty design options:
- The top of the spruce is decorated with a voluminous star of a golden hue - the color of the Earth Dog.

- In the coming year of the Dog, spruce is decorated with medium-sized figurines of restrained colors. Especially relevant is the use of jewelry made from natural materials - paper, wood, burlap, cones and twigs.

- In the central part of the Christmas tree, you can place a dog figurine to attract good luck and prosperity.

- Use garlands of golden, brown, yellow, green, red, purple, beige.

- Paper beads, chains, flags connected in a garland are hung in one direction - horizontally, spirally, vertically, from top to bottom.

- In a chaotic manner, medium-sized balls cling to a tree; toys can be the same or different.

- The decor is complemented with figures of Santa Claus, the Snow Maiden, angels, and several voluminous snowflakes are pinpointed.

Before decorating the spruce with paper toys and crafts, a garland with light bulbs is hung on the tree. You can use a little shiny rain or complement the design with a fluffy “snowball”.
Spruce is decorated according to your taste, but in the coming year, the decor should be chosen natural, restrained, in brown colors (all shades), with unobtrusive bright accents - a few red bows, burgundy bells, paper cones decorated with beads. Then 2019 will surely bring good luck and prosperity to the house.
Christmas origami crafts (2 videos)
Time inexorably runs forward and now white flies are flying outside the window, slowly sinking to the ground and covering everything around with a snow-white fluffy veil. However, despite the cold, the soul is warm and joyful. And all because suddenly appeared snowflakes herald the onset of the New Year. The most important holiday of the year is already very close, which means it's time to think about New Year's decor, gifts and, of course, crafts.
The days are getting shorter and the evenings are getting colder and longer. What to do with yourself, and even more so with your little fidgets, when it is already too dark for outdoor winter fun? Well, crafts, of course. New Year's crafts can be made from the most unexpected materials: cocktail tubes and much more. But there are also more traditional materials, such as paper. In this article, we have collected for you more than 60 step-by-step master classes for making paper crafts for the New Year. If you still think that only applications can be made from paper, then drop everything and carefully look at our article! Well, for those who are looking for something unusual and know what miracles can be created from ordinary paper, we can only advise you to immediately begin the process of creating New Year's paper crafts according to our schemes and templates.
One of the simplest New Year's paper crafts can rightly be considered a garland. We all remember well from our childhood how they decorated the Christmas tree with such paper garlands not only at home, but at school or kindergarten. A paper garland is made very simply: colored paper is cut into strips of the same width, the first strip is glued into a ring, and each subsequent one is threaded into the previous ring and also glued. This paper craft is perfect for 4-5 year olds.
If the task of entertaining children is not worth it, but you need to decorate the house, then here's another version of a paper garland for your note. It is made even easier than the previous one, but you will need a sewing machine. So, to create such a New Year's paper craft, you will need: a lot of circles of different diameters (the number depends on the size of the garland), a sewing machine. Sew circles through the center on a typewriter and hang a garland. From any gust of air, such a garland will “come to life”.

So, if you decide that the issue with garlands is closed and there is nothing else to think of here, we hasten to upset you - this is only the very tip of the iceberg. Simple paper garlands are an activity for beginners. Professionals prefer more complex tasks, such as voluminous paper crafts. Below is a master class on making a volumetric garland in the form of light bulbs.

By the way, you can decorate an ordinary LED garland with paper lanterns. This New Year's paper craft looks very cool, especially if you decorate the wall with this garland.

Interested in a garland? Then see more ideas:

New Year is the most beloved holiday associated with miracles and magic. The celebration of the new year is characterized by folk festivals and joyful meetings. It is impossible not to love this time of the year, when everything around is transformed, and every house or shop window becomes like scenery for a fairy tale. Everyone wants to participate in this transformation, and therefore they try to decorate their homes […]
Since we are talking about the decor of the apartment, it would be strange not to mention Christmas wreaths, or as they are also called New Year's wreaths. Everyone can make such a paper craft, in addition, a New Year's paper wreath is a reusable decoration that will not deteriorate and will not lose its appearance over time.

A very cool paper craft for the New Year is a wreath of roses. You will have to work hard to create such a craft, so if you decide to make yourself such a paper wreath on the door - stock up on patience and mood!

If you're planning a New Year's themed party, say Cuban or Hawaiian style, then you'll definitely need some kind of decoration to set the atmosphere. Here is such a simple, but very original wreath made of paper will come in handy!

Surely your child at school or in the garden was asked to make a Christmas wreath with their parents. Allegedly for a competition, but the main task of this task is to get parents to spend time with their children. But maybe you should not wait for a task from school, but spend time with your child yourself. In addition, with such a New Year's craft, you can decorate the house in a very original way, and most importantly, get a lot of positive emotions!

Need a Christmas wreath? See more ideas:

Preparing for the New Year is sometimes even more pleasant than the celebration itself. The whole family, including the youngest residents, can take part in the process of decorating the interior. You can decorate an apartment or house for the New Year holidays in a variety of ways, but recently New Year's wreaths, which are better known to us from romantic Hollywood Christmas films, have been very popular. However, trendy […]
So, we continue to decorate the apartment. There is a garland, there is a wreath. Something is missing? Oh, of course, Christmas trees! If you prefer to put a big forest beauty on New Year's holidays, it doesn't matter. By the way, read on. Small paper Christmas trees make a great addition to the decor, and they can also be used as small souvenirs for guests!
# 10 New Year's paper crafts with our own hands: we make a Christmas tree toy "Herringbone"
A Christmas tree made of paper does not have to be on the table or somewhere in the house. You can make a craft out of paper, which you can then hang on the Christmas tree itself, and if there is no Christmas tree, then you can simply hang such voluminous paper Christmas trees around the house. The scheme for making a Christmas tree is quite simple, but if you don’t quite understand what the essence is, or you just don’t have time to figure it out, then you can download a ready-made template.

A very cute Christmas tree can be made from corrugated paper. This paper craft looks very realistic, but it is done quickly and easily.

If you are still interested in a paper Christmas tree, but you want to make something unusual, then use this master class.

The tree does not have to be on the floor, it can also be hung from the ceiling. An excellent Christmas garland will turn out from plain paper.

How to distinguish the New Year's table from the usual festive one? Everything is correct! According to thematic elements of decor. And how to make a suitable New Year's dessert, see.


Do you want more workshops on making paper Christmas trees? See:

The Christmas tree is, of course, the main attribute of the most important winter holiday. It will not be possible to do without the forest beauty, the atmosphere is not the same, and where does the good grandfather put the gifts? It so happened that a Christmas tree is decorated in the house for the New Year holidays: someone puts a live one, someone prefers an artificial one, and someone paper. A paper Christmas tree can not only replace a Christmas tree […]
#17 Christmas paper crafts: making a movable card with wishes
From paper, you can make not only flat or voluminous crafts, but also movable ones. With our ready-made scheme, you can make a postcard with an encrypted congratulation or message. Such an unusual gift will please not only children, but also adults! You can download the finished scheme below.


In winter, wild flowers are not to be found, even in flower shops. But there is nothing to worry about, flowers can be made from paper with your own hands. And our step-by-step master class will help you with this.

A wide variety of flowers can be made from paper, the whole secret is cutting out the ends.


If you want to make a big Christmas star for decorating a wall from paper tubes, then this master class is especially for you!

A very themed New Year craft made of crimped paper. Such a paper cone looks very natural and is quite difficult to distinguish, especially if it is used as a decoration. With our master class, you can easily cope with such paper crafts.

There is another technique for creating paper cones with your own hands. This method is more labor intensive and will take you more time. In addition, to create such a New Year's craft, you will need: paper, a foam blank, a lot of safety pins, a ribbon and beads for decoration. However, if you have the time and desire, then pay special attention to this scheme for making a cone, especially if you want to impress.

From paper, you can make very special crafts using the Japanese origami technique. Our step-by-step master class will help you create a New Year's paper ball that can be used to decorate both a room and a Christmas tree.

A step-by-step diagram for creating an origami star with your own hands. You can decorate the top of the Christmas tree with such a star, you can simply create a festive atmosphere in the house, or you can combine it into one big garland.

You can make the base yourself, as in the first picture. Or you can download the finished pentagon blank and, depending on the size of the pentagon, the size of the finished star will change.


At your service is a step-by-step scheme for making a three-dimensional paper snowflake. Follow the instructions and you will definitely get such a miracle.

#34 We decorate the apartment with cones: do-it-yourself Christmas paper crafts
In continuation of New Year's paper crafts, I would like to offer you another scheme for making paper cones. In addition to paper circles, you will need an oval or round blank, glue and fir branches for decoration.

Another great option for decorating an apartment with your own hands is a large voluminous snowflake on the wall. A snowflake can be not one, but a whole ensemble. In addition, on such a New Year's background, you will get great photos!

New Year's gift must be in a beautiful package. In my opinion, the gift itself is not so much important as the intrigue around it. After all, it is this intrigue that will remain in the memory, this is a pleasant expectation and unfolding the paper. Use our scheme for making paper flowers with your own hands and decorate gifts for dear and close people.

It is customary to decorate a Christmas tree with toys, but these toys do not have to be purchased. Even better if they are made by hand. And what could be easier than making a Christmas tree toy out of paper. Use our step-by-step instructions and make your own paper Christmas ball.

Very simple, but incredibly cute voluminous lanterns can be made from ordinary colored paper. Even children can handle this craft, so feel free to get to work if you have little helpers. Well, if not, then you can do it yourself!

You can make completely unexpected crafts out of paper, including gift boxes. And not just boxes, but in the form of delicious sweets. For such a gift box you will need: cardboard cylinder, colored paper, glue, scissors, satin ribbon.

In continuation of the question of gift wrapping, we want to offer you another budget, but very charming option. You can make such a gift elf with your own hands using our master class.

Here is another version of the original packaging of a New Year's gift with your own hands.

Need more gift wrapping ideas? See:

On the eve of the New Year holidays, shop windows are full of gift boxes, decorative bags, wrapping paper for every taste. Smiling sellers helpfully offer to provide services for wrapping New Year's gifts. And all this seems to be great, because you must admit, it is much more pleasant to receive a New Year's trifle in a beautiful package. But on the other hand, the whole meaning of the gift is lost, the very gift that […]


Want more Christmas ball ideas? See:

Today, on the shelves of stores you can find a huge number of a wide variety of Christmas toys, so turning an ordinary Christmas tree into a real festive beauty is not difficult. However, the New Year is a special day! The day when the old year is left behind, and new adventures, new events, new victories await. But after all, the old year did not pass without a trace, […]


#55 A simple paper snowflake pattern: decorating a room for a party

#56 Do-it-yourself voluminous paper crafts: making a snowflake. Scheme


#58 Christmas paper crafts: decorate the house with diamond crystals
Download ready-made schemes and make your own paper diamond crystals.

#59 New Year craft paper ball "Mistletoe" with your own hands
Here you can make such a mistletoe paper ball with your own hands, using ready-made cutting templates. Stock up on patience and New Year's mood!


You can decorate a house not only with standard snowflakes or stars. You can make such a wonderful vase out of paper. Download the finished scheme and assemble the vase following the instructions in the master class.

A wide variety of decorative elements can be made from plain paper, just download the finished scheme, print it, cut it out and glue it. A wonderful Christmas paper craft is ready!

#64 Christmas patterns for cutting: a great photo shoot for the new year
Note! The templates are very large and of good quality, so the download may take some time.

Simple Christmas decorations can be made from paper. In our master class, an example with a ball is given, but it can be other shapes: hearts, stars, Christmas trees and much more. You can download ready-made templates below.

You can make a simple and original Chinese lantern with your own hands using our ready-made scheme.

An excellent decoration for the new year will be a composite paper star. You can download a ready-made template for gluing below.

In our time, you will not surprise anyone with ordinary paper cutters. Volumetric crafts cause much more delight. In this master class, a scheme for creating a simple volumetric star is described step by step. You can download a ready-made template with a large, medium and small star from the link below.

It is quite difficult to imagine a New Year's decor without all sorts of variations on the theme of stars. In this master class, you will learn how to make a volumetric double-sided star out of paper with your own hands. You can download the finished scheme below.

#70 Christmas paper masks
Carnival masks must be included in the list of New Year's paper crafts. Well, what New Year's party can do without masks? That's right, none! In fact, there are a lot of options for making paper masks, and if you turn on your imagination, you can make many wonderful crafts!

An insanely fun activity is to celebrate the New Year, and even more fun is to prepare for it, decorate an apartment, make Christmas decorations, snowflakes and other crafts. Such moments are especially joyful for children, because children, as a rule, appreciate hand-made crafts much more than adults. Already in kindergarten, a baby can please mom, dad and teacher with a beautiful cut-off appliqué or appliqué made of colored paper and cotton pads almost without the help of adults. And in the primary grades, the child himself can make such crafts that an adult cannot. Children, moreover, have a very developed imagination and, at times, they invent works of children's art of incredible beauty. Here are some Christmas craft ideas for kids, and most of them come with tutorials.
CLICK ON THE CRAFTS YOU LIKE TO LEARN HOW TO DO IT!
Children's Christmas tree toys made of paper
Decorating the Christmas tree with handmade toys has been fashionable at all times. After all, the manufacture of these toys unites the family, everyone helps, from young to old, even wayward teenagers, in anticipation of New Year's gifts, enthusiastically rush to help their youngest :) made with love.
New Year's toys from cones are the simplest and most original. The cone is such a magical figure that it can be turned even into Santa Claus, even into the Snow Maiden, even into the symbol of the year, and 2018 is the year of the dog.

Absolutely on the same principle, other crafts are made from cones. We glue the beard to Santa Claus on the cone, cut it and bend it. We draw a face. We attach the mustache. If you glue a rope on top, you can hang such a craft on a Christmas tree. The video master class will open after clicking on the picture with Santa Claus.

And you can make such children's crafts out of white paper and color them:

And without a Christmas tree in any way, but we will also have it from paper cones:

A little easier: stick green loops on the cone. We fold short strips of paper with a loop, glue the ends. We glue the loops on the cylinder, the tree is ready.

For the younger group of kindergarten, we will simplify the Christmas tree even more. All you need to do is to stick all sorts of different stickers on the cone, so the impromptu Christmas tree is decorated.

And let's not forget about the angels, they will look just lovely on the Christmas tree, and the realization that they are made by hand will raise the already festive mood even more.

Still quite easy-to-make toys from paper strips:


Another popular topic is to make balls from paper circles. We cut circles, bend in half, glue the halves so that we get a ball. Let's make a snowman in the same technique:

Children's origami
Well develops the motor skills of children's hands, no matter how old they are, the creation of origami figures. It’s difficult to do without a diagram, but if you print out our templates and invite your child to fold according to the diagram, he will definitely do it. And what do we have from New Year's origami? First of all, Santa Claus

And it’s even easier to fold the Snow Maiden from two squares:

Christmas snowflakes for kids
Nothing is as mesmerizing as the beauty of a snowflake in the palm of your hand. Its clear, precise geometric shapes, the same rays, but at the same time, all snowflakes are different and there is not one identical in the world.
It is still difficult for children from kindergarten to cut a smooth, symmetrical snowflake, but it is easy to make it from paper loops. We cut the paper into short strips, glue the ends - the loops are ready. Now cut out a circle of paper and glue loops on it.

Decorating a Christmas tree or windows is not complete without snowflakes, especially since with the advent of plastic double-glazed windows, children stopped seeing fancy frosty patterns on the windows of our apartments, it’s a pity ... We fill in the missing snow patterns by cutting out snowflakes from paper or napkins.
No matter how difficult it may seem, it is actually very easy to make a beautiful symmetrical New Year's snowflake. The snowflake has 6 rays, not 8 by any means, keep this in mind when you make it. Cut out a square from paper. We bend it diagonally. Then we bend the resulting triangle in half. Bend the left and right corners to the middle. Here is the preparation of a snowflake with 6 rays. See step by step: how to make the correct blank for a snowflake with 6 paper rays >> And the schemes of simple snowflakes by clicking on the picture:

Now, no matter what you cut out of this folded triangle, you will get a snowflake anyway. The kid will need your help here, and the student should already figure out how to bend and how to cut. If you are too lazy to invent yourself, here are the snowflake patterns for you \u003e\u003e

The more cuts and cuts you make, the more airy and delicate your snowflake will be.
Children's New Year's application from colored paper
Give your child a sheet of colored cardboard and many different rectangles of multi-colored paper, including white (after all, winter is outside the window), and we are sure that he will create a masterpiece application. And the secret is simple. Rectangles resemble houses. And we will tear white paper into pieces and glue it - here you have snow.

And if you add a few cotton pads to this whole set, then it will be difficult to keep you from wanting to make a New Year's application :) The disks can be replaced with paper circles, but take the trouble to cut them out for the child yourself.

Do-it-yourself children's New Year's cards
Well, the room and the Christmas tree have been decorated, now you need to think about your loved ones. It is imperative that they all make a New Year's card, but such a sincere one that on a frosty day it warms with its warmth when you admire it and remember the donor.
The child is still small - we make a postcard by analogy with the application. Already in the senior group of kindergarten? Then he can master the skill of creating a three-dimensional postcard!

First, fold a sheet of cardboard in half, this will be the base of the postcard. Now cut out 3 strips from colored paper, one smaller than the other. We bend them into an accordion. Next, bend each in half so that you get a fan. We glue. Glue the cards inside. Decorate the Christmas tree :)
And if you use unnecessary colored magazines or paper for creativity to decorate postcards, and cut them into triangles and stripes, then our Christmas trees will be very different and not a single one is the same.

Or this Christmas tree:


And if you combine in one children's postcard origami and a voluminous application of eyelets, and also remember how to cut snowflakes, a masterpiece will come out:

In any case, no matter what crafts are done with children, it is always interesting, and the result pleases. Do not scold the baby if it turned out not too neat. Praise and say that next time he will do even better :) Happy New Year!
Is rapidly approaching. And it's time to think about holiday design. Therefore, you can safely start making beautiful crafts not only for yourself, but also as a gift to relatives and friends. After all, it is so nice to make a holiday with your own hands, then it seems truly magical.
In the last article we made with you, today I offer interesting, but simple homemade ideas for kindergarten children and schoolchildren. You can make them from improvised materials or visit a needlework store. In any case, the work will be excellent if it is done from the heart.
The article offers different options for homemade products according to the level of complexity. There are easy ideas for kindergarten kids and interesting options for older kids. Choose the most interesting ideas and bring them to life!
I propose to start a selection of products in the form of pigs and pigs, because these are the main characters of 2019. Such works can be presented as a gift to relatives and friends. Yes, and the child will be very interesting and fun to create such cool animals.
Pigs made of paper
Cute flying pigs as a Christmas tree decoration will serve as a real talisman for the coming year. Making them is easy and fast. Therefore, you can involve your children in the work.
Would need:
- cardboard;
- white and colored paper;
- pig pattern;
- needle;
- threads;
- scissors.
Stages of work:
1. Draw the outline of a pig on cardboard or trace it according to the templates provided below. Cut it out and glue it on both sides.
2. We make wings from white paper and attach them with glue. We wait until they dry and bend a little at the ends.
3. We make a loop of thread on the back of the pig and hang it on the Christmas tree. Here is such a beautiful flying pig. In this way, you can make a few more pieces so that they harmoniously decorate the New Year tree.
From strips of paper, you can also make a voluminous pig that will decorate the New Year's interior.
Would need:
- colored paper;
- scissors;
- ruler;
- pencil;
- glue;
Stages of work:
1. From pink paper, cut out 4 strips measuring 21 by 2 centimeters. We mark the middle and glue them together in the form of a snowflake.
2. Then we connect the ends of the strips in such a way that we get a ball.
3. It remains to draw and cut out the head of the pig with a diameter of 6 cm. Do not forget to draw the eyes and mouth. Piglet is also cut out of paper and attached to the head. We decorate with two green hearts in the form of a bow.
4. Now glue the head to the body ball.
Piglet is ready!
Pig from a cone
This MK demonstrates in stages how to make the cutest symbol of the year 2019 out of an ordinary cone. This is a great souvenir in honor of the holiday!
The following materials are required:
- Cone - 1 pc
- Button
- Felt - a small piece of pink
- Button - future spout
- Black beads 4 mm
- Scissors
- tassel
- acrylic paint
Step by step work:
1. With pink acrylic paint, paint over the surface of the cone well so that there are no free unpainted places. First we paint over one part, then we give time for the paint to dry and paint over the rest of the cone.
If the paint is thick, add a little water and mix well.
2. While the painted body of the pig dries out, fold a piece of felt in half and cut out the ears, as a result, 2 identical parts are obtained.

3. Now we glue all the details to the bump - the button nose, ears and eyes.
Here is such a wonderful animal

Piglet from socks
You can make very cool and funny pigs out of socks. Such work will be a great souvenir for the New Year holidays. I think it's a great idea!
New Year paper crafts for kindergarten
In kindergarten, children can make beautiful postcards and give them to their parents.
Would need:
- scissors
- glue stick;
- colored paper and cardboard;
- felt-tip pen or pen;
- sheet of white paper.
Stages of work:
1. For the base, take the red cardboard and fold it in half. Iron the seam well.
2. Cut out a small rectangle from green paper. It will be needed for the inscription on the front side of the postcard. Glue it on a white rectangle, but a little larger. Don't forget to write "Happy New Year!"
3. Now we will make three accordions from green paper. We glue each in the form of a fan.
4. We cut the edges of the two fans so that they all turn out to be of different sizes, and from the remnants we make the top of the Christmas tree.
5. Cut thin and short strips from white paper. We glue them in the form of a snowflake.
6. At the final stage, it remains to connect all the details together. A beautiful 3D postcard for the New Year is ready!
And here are some more interesting options for postcards for 2019:
You can just make a Christmas tree out of paper, and cut out decorations from felt, in my opinion a cool Christmas tree is obtained and not difficult.


But what a miracle of pasta, even kids will cope with this task:

Loved the wreath

DIY craft: papier-mâché piggy bank
And of course, do not forget about the piggy bank, which is easy to make using the papier-mâché technique. It will turn out a wonderful homemade product, but also a very useful little thing in the house.
First, prepare a paste from ordinary flour:
Would need:
- 1 st. sifted flour;
- 3 art. water;
- ½ tsp salt.
Step by step preparation:
1. Pour the flour into a deep bowl. Slowly pour in 1 cup of warm water. At this time it is necessary to stir the mixture. And so on until a homogeneous mass.
2. Pour salt. Pour into saucepan, mix well. Add 2 more cups of boiling water.
3. We put on low heat and cook the paste for 10 minutes, stirring constantly. We cool.
Now you can proceed to the manufacture of the piggy bank:
Would need:
- balloon;
- newspaper;
- paste;
- tassel;
- PVA glue;
- acrylic paints;
- sandpaper;
- putty;
- water-based paint.
Stages of work:
1. We inflate a balloon of such a size as the future piggy bank will be. We tear the newspaper into long strips and glue it to the ball on the paste. Thus we make 8 layers. We are waiting for it to dry completely.
2. Carefully burst and take out the ball from the resulting workpiece.
3. In place of the hole, we install cardboard heels. Below are four legs. We also cover them with newspaper. We are waiting for the future piggy bank to dry out and glue it with a layer of foil.
4. We prepare the mass for papier-mâché. Pour boiling water over ordinary toilet paper. Wring out and mix with PVA glue.
5. We completely cover the piglet with a mixture and build ears and a tail from the same mass. We expect complete drying.
6. Coat the pig with putty. As soon as it starts to dry, we rub the surface of the piglet with sandpaper. It should become smooth.
7. Then we paint with white water-based paint.
8. Now we cover the workpiece with acrylic paints. We draw eyes and a mouth.
9. It remains to varnish, let it dry completely, and the piggy bank is ready.
As slots for money, we will use the nostrils of the pig.
And a couple more ideas for cute piggy banks:
Salt dough souvenir with the symbol of 2020
Let's make piglets in the form of pendants. They can decorate a wall or a Christmas tree. And if you attach a magnet to them, it will be a great decoration on the refrigerator ...
Would need:
- salty dough;
- water;
- tassel;
- plasticine knife;
- acrylic paints;
- foam sponge;
- various decorative elements for decoration.
Stages of work:
1. First, let's prepare the dough. Mix 1 cup flour and 1 tablespoon salt. Add to them 1 tablespoon of vegetable oil (for elasticity) and hot water.
2. Mix everything well until a homogeneous plastic consistency. We send the dough for 3 hours in the refrigerator and then you can start making pendants.
Salt dough must be stored in a plastic bag while working, otherwise it will simply dry out.
3. Roll up a ball from a medium-sized piece and flatten it in the form of a cake. This will be the body of the pig. In the same way we make heels. We make the nostrils with a pen.
We coat the joints of the parts with a brush dipped in water.
4. From small balls we make eyes. They need to be placed above the heel. We make ears from triangles. We attach them with incisions at the junction with the body.
5. Now, from the lower left edge, we glue a heart made from a circle of dough. And to make the body more voluminous, we make indentations on the sides of the entire piglet.
6. Using the rod, we make two holes for the legs and two for the suspension cord.
7. We roll up two thin sausage handles. We make at the ends of the hooves in the form of an incision. We place the handles in such a way that the pig holds the heart in its hands.
8. For the legs, roll up two small balls and bring them into a teardrop shape. On the wider side, we cut for hooves. With a narrow one, we make a hole. Since they will be attached to the body with laces.
9. We are waiting for the craft to dry completely and proceed to painting. First, color the piglet black. This is necessary for the relief of the product. As soon as the paint dries, wash it off from the convex parts of the body under the tap.
10. We are waiting for the pig to dry and now we impregnate it with white paint with a sponge in those places where the black color has washed off.
11. Now it remains to paint, let dry, attach laces and additional details.
To make the craft durable, it must be painted with acrylic varnish.
As we can see, working with salt dough is very easy. Therefore, a few more options with the symbol of the coming year:
Simple and easy felt crafts + patterns and patterns
Soft crafts made of felt will favorably decorate the festive interior. They are very pleasant to the touch. You can make both volumetric options and flat ones. We will sew these pigs.
Would need:
- felt;
- a thin piece of synthetic winterizer;
- beads;
- buttons;
- threads;
- needle;
- scissors;
- glue moment;
- pattern.
Stages of work:
1. Draw a pattern on a white sheet of paper or cardboard. We transfer the details to felt and cut them out. Also, don't forget about the ponytail. It can be made in any shape.
2. We sew two parts of the body together, between them we place a tail and a little padding polyester. We will do this on a typewriter, but you can also sew by hand.
3. In the same way we fasten the two parts of the head. Between them we insert the ears and a little filler. And two pieces of patch. Here's what we got.
4. It remains to collect all the details of the pig, and before that, decorate. Sew 2 small white buttons to the heel. And to the place where the eyes will be located - 2 black beads.
5. Glue the ends of the ears to the top of the head with glue. We attach heels under the eyes. And finally, we attach the head to the body. Piglet is ready.
For decoration, you can tint the pig with eye shadow.
Patterns for New Year's pigs from felt:
And how do you like this pig?

Here are some more interesting ideas and not at all complicated:


I share simple patterns and patterns for New Year's crafts from felt:
Santa Claus

Felt Santa Claus


New Year crafts - do-it-yourself beaded Christmas tree for beginners
Mini souvenirs for decorating the Christmas tree will look amazing. Especially if they are made of beads. For beginners, we have prepared such Christmas trees.
Would need:
- beads;
- beads;
- scissors;
- wire;
- tree stand.
Stages of work:
1. The herringbone is woven from eyelets and then twisted. We string 3 green, 2 gold and again 3 green beads on the wire. After that we twist. You will have to stock up on time and patience to make a Christmas tree.
2. Gradually, the branches from the base to the crown decrease - accordingly, the number of loops.
3. Now that all the branches are ready, we attach them to the trunk in a circle.
For those who are quite familiar with beading, you can use the patterns below:
DIY Christmas tree toy
With children, you can make a Christmas tree toy in the form of a candy, such a homemade product is not very difficult to manufacture, but the children will be happy, because they have such a sweet tooth! And then they made the sweetness themselves. They can be made in different sizes, even a large candy for a street Christmas tree can be created ...
This is the beauty you can decorate your home for the upcoming New Year holidays.
What ideas did you like? Be sure to share in the comments.
Paper crafts are something that can be done for the New Year of the Dog quickly and easily as a gift to loved ones or just to decorate the house. Paper is always in the house and making it is interesting! We offer the best paper crafts for the New Year 2018, which you can do with your own hands using step-by-step photos and videos.
In addition, consider what else you can do for the new year with your own hands at home from what you eat at hand. For such crafts, you don’t need to spend money on purchasing materials, and the result is interesting and it doesn’t look like completely unnecessary things were used. Let's look at a few master classes, from which everyone will choose what suits him.
? Important! Each description contains the colors of materials and a set of decor for those crafts that have already been made and shown in the photo. But it is not necessary to choose the same shades and the same decor. You can take those materials for the New Year's paper craft 2018 that you have at home.

PHOTO: Paper garland for the New Year
Several options for a decorative Christmas tree made of paper
Without an elegant Christmas tree in the New Year - no way. Of course, the main heroine of the holiday is a large fluffy live spruce or pine tree in the center of the room, or an artificial beauty dressed up with garlands and colorful toys. But you can also make small decorative Christmas trees with your own hands from paper and decorate them with a table or shelf in the office or at home for the New Year. The following are two master classes on creating such paper beauties.
For each of them we will need:
- A sheet of thick paper for the cone.
- Paper napkins of any color, you can combine several colors.
- PVA glue or pencil.
- Scissors.
- stapler.
- Pencil or any wooden stick.
- Christmas tree decor. Everything you can find at home: sequins, small beads, bells, ribbons, and so on.
And now, in turn, we will consider both options for Christmas trees made of paper napkins.
Option 1 - Christmas tree made of paper roses
- make a cone out of thick paper. We glue it with glue or a stapler.
- now we make roses from napkins. To do this, we fold each napkin in half and in half again, fix it in the middle with a stapler.

- cut out the circle.

- we have a multi-layer circle and you need to take each subsequent layer from above and twist it tightly. We do this with all layers.

- when all the layers are twisted, you need to straighten the rose a little. Thus we make all the flowers.
- cover the cone with roses. It is better to start from the bottom in a circle and go up.

- glue roses should be close to each other so that there are no gaps.

- after the whole Christmas tree is “dressed” in roses, you can decorate it with any decorative elements by simply gluing them randomly over the flowers.

Such a craft for the New Year 2018 made of paper with your own hands is very simple to perform, even a child, a teenager can handle it, and in appearance it turns out to be very effective and beautiful.
Option 2 - Christmas tree made of paper napkins using the trimming technique
A similar very simple version of the Christmas tree. All that is needed for it is listed above, we will prepare everything according to the list and proceed:


- you have to start from the bottom. Thus, we attach all the twisted squares tightly, as close as possible to each other.

When we glue the whole Christmas tree with twisted squares, we get a fluffy beauty that can also be decorated with any decorative elements.

Using these techniques (napkin roses and trimming), you can create postcards by gluing elements onto a base with a drawn outline of a Christmas tree or other pattern, a snowman, for example.

PHOTO: DIY paper Christmas tree
Christmas trees can also be made from paper using other techniques. By simply gluing circles of colored paper onto a cone, or cutting circled palms from green paper. And you can also make loops from strips of paper and stick them on the cone.

Very beautiful paper Christmas trees are obtained using the vytynanka technique. To do this, you need to fold a sheet of paper in half, draw a contour according to the template and cut through all the necessary places. Do the same with the second sheet. After connecting 2 sheets to each other at the fold.

In general, a paper cone Christmas tree can be decorated with anything. The idea is to make a construction paper cone and decorate it.
For decoration you can use:
- threads for knitting, simply wrapping or cone;
- buttons;
- tinsel and sweets, gluing them in rows alternating;
- crumpled paper petals;
- pasta;
- coffee beans and jute rope.
You can decorate such a Christmas tree with anything you find at home. After that, you can cover the resulting creation with golden paint or artificial snow, or set it aside as it is.
Paper crafts for the New Year in the form of a Christmas tree:
Decorative paper candles
As surprising as it may sound, you can make candles out of paper. Of course, they will not glow, but they can decorate a Christmas tree or a New Year's table.

PHOTO: Craft in the form of paper candles
Let's prepare everything that is required in the work:
- colored thick double-sided paper.
- scissors;
- glue stick;
- ruler;
- marker or marker.
When everything is ready, let's start:
- Cut strips of colored paper. Strips can be taken of any width, optimally 3-4 centimeters. To do this, you need to make marks on one and the other side of the sheet, draw lines along the ruler and cut. For one candle you need 2 strips. They can be made in one color or two shades.
- We take 2 strips and glue the ends as shown in the photo.
- Now we make weaving (see photo) and fix the tips. This is how the candle turned out.
- Cut out a circle from paper. We glue a wicker column on it.
- We cut out the flame of a candle of arbitrary shape with a rectangle at the bottom, for which the flame will be glued to the column.
- We draw a wick on both sides with a felt-tip pen, bend the rectangle and glue it to the post.

Step by step photos for making a paper Christmas candle
The finished candle can be glued to a clothespin and decorate the Christmas tree, or you can leave it as it is and place several of these candles on a shelf or on a New Year's table. Such crafts for the New Year 2018 from paper with your own hands can be made to school or kindergarten for the competition!
Santa Claus and Snow Maiden made of paper
The main characters of the New Year - Santa Claus and the Snow Maiden can also be paper. Let's try to make them with our own hands for the New Year of the Dog 2018!

Getting ready for the creative process:
- We will need colored thick paper in blue and red for the cones.
- White paper for finishing.
- Beads, any decor.
- Paints and brushes.
- Glue.
- Scissors.
- Thread (you can take cotton for knitting).
And now let's get started:
- The description will go for Santa Claus, the Snow Maiden is done in exactly the same way, but you can change the base color and decor.
- We make a cone of thick red paper.
- We cut out several (2 or 3) semicircles from white paper and cut them so that we get terry. This will be the beard. We glue in several layers on a cone. For a beard, you can also use cotton pads.
- Eyes and a nose can be painted with paints or beads can be glued: black - eyes, pink or red - nose.
- Now you can make a cap. For him, we will make a small cone of red paper and glue a strip of white on the bottom. Put a cap on Frost and fix it with a drop of glue.
- You can draw or stick any decor on the figure.
- You can glue a thread to the top of the head, for which we will hang Frost on a Christmas tree or attach a white pom-pom to the tip of the thread.
This craft is something that you can do for the New Year with your own hands and give it to your mother, friends, relatives.
Using this technique, you can also make penguins, snowmen, deer, and any figurine in the New Year theme.

Santa Claus, Reindeer and Paper Towel Snowman
For such beauties, you can use ordinary paper towel rolls or make a roll of any diameter and height yourself from thick paper.
Before starting the process of creating Santa Claus, we will prepare everything that is useful in the work:
- Roll for the base.
- Felt or colored paper in red, white, light brown, black and yellow shades.
- PVA glue.
- Eye blanks, they are sold in any needlework stores. Or you can use half beads for the eyes, buttons, in the end, just cut circles out of black paper or felt.
- Scissors.
And now let's start making paper crafts for the New Year 2018 with our own hands!
First we make Santa:
- Cut out a strip of red felt whose width is equal to the height of the roll plus 2 cm, and the width is equal to the diameter of the roll.
- Cut out a semicircle of light brown felt for the face, glue it on.
- We cut out an oval from white felt, cut off a recess for the face on one side and glue it over the face part.
- We cut out the details for shoes from black felt (two ovals connected together). Glue on the underside of the roll.
- We cut a strip of black felt, stick it in the middle of the roll - this is a belt.
- Cut out a buckle from yellow felt. We glue over the belt in front.
- Now we glue the eyes and the circle of the nose.
- Glue the cap on top of Santa.

Now we make a snowman:
- Cut out a strip of white felt whose width is equal to the height of the roll plus 2 cm, and the width is equal to the diameter of the roll.
- We glue the roll with a strip, bend the ends inside the roll from one side and the other.
- We glue the eyes, nose and buttons - circles of felt.
- We cut out a scarf from red felt and cut along the edges, we tie it to a snowman.
- We make a cap. Cut out a semicircle from red felt, glue the sides. Cut out a strip of white felt and glue it along the bottom of the cap. Glue a pom-pom to the end.
- Glue the cap on top of the Snowman.

Next is the turn of the deer:
- Cut out a strip of light brown felt whose width is equal to the height of the roll plus 2 cm, and the width is equal to the diameter of the roll.
- We glue the roll with a strip, bend the ends inside the roll from one side and the other.
- We glue the eyes and nose.
- We make a cap. Cut out a semicircle from red felt, glue the sides. Cut out a strip of white felt and glue it along the bottom of the cap. Glue a pom-pom to the end. But here we still need to cut out the horns from brown felt and glue on the sides of the cap.
- Glue the cap on top of the deer.
Thus, three figures are ready. Such paper crafts can be put under the Christmas tree.


Video crafts of Santa Claus from paper in origami style:
Christmas tree toy from strips of paper
Among the crafts for the New Year 2018 made of paper with your own hands, you must definitely make a Christmas tree toy!

We will analyze a very interesting toy from strips of colored paper step by step, first we will prepare everything you need:
- Colored paper. For one toy one use two shades.
- Scissors.
- Needle with thread. You can use fishing line, or you can use ordinary sewing thread, but thicker.
- Pair of beads.
When everything is ready, we proceed to the process of creating a Christmas tree decoration:
- Cut the paper into strips about 10-15 centimeters long and 1.5 - 2 centimeters wide. For one toy, you need 9 strips of one color and 9 of another.
- Cut out 2 circles with a diameter of 1.5 centimeters.
- Pass the thread through the needle and fasten the bead at the end.
- Now add all the stripes, alternating colors in a pile. We put on the thread over the bead 1 circle and a stack of strips from one edge.
- Then we fold the strips in half and thread the entire pile from the other edge onto the thread.
- On top of the second circle and bead. We make a loop and the toy is ready.

You can make several of these multi-colored Christmas decorations and decorate your Christmas tree or room with them. This is just one version of a Christmas tree toy made of strips of paper, and you can make a great many of them.
New Year's paper garland - video:
Ideas for New Year's crafts for the New Year 2018:
And they will be very cheap in cost, and in beauty they will not be inferior to the purchased ones. Moreover, this year the trend is the naturalness and naturalness of materials in decorating the Christmas tree and the room. So the forest beauty, dressed up with paper toys, will be not only beautiful, but also stylish and fashionable.

Snowman with a whisk
Another craft is a snowman, which we will try to make out of paper, simply folding it in a certain way.
Getting ready for work:
- take paper in white, black, orange and blue;
- scissors;
- paper glue.
And now we start:
- We make two circles for the snowman's body. To do this, we take 2 sheets of a larger format and 2 sheets of a smaller one. We fold them with an accordion.
- We bend the accordions in half. On the one hand, we glue the ends with each other, we get a semicircle. We glue together 2 large semicircles and two smaller semicircles. We glue a smaller circle on top of a large one. This is the body of a snowman.
- In the same way, we make small circles for pens and glue them to the snowman.
- Cut out circles for eyes and buttons from black paper and glue them on the snowman.
- We make a cone of orange paper and attach it to the snowman in place of the nose.
- We cut out a hat from black paper, decorate it with a strip of white paper and glue it on the snowman's head.
- We cut off a long strip of blue paper, cut it along the edges and tie it to the snowman as a scarf.
- It remains to make a whisk. We fold the white paper with an accordion and fasten the ends.
- We make an accordion out of orange paper and fold it in half, attach it to a strip of white paper and attach it to the snowman's handle.

With this snowman, you can decorate the wall in the room by attaching it with pins and needles or double-sided tape to the wallpaper.
And if you make such a snowman in a smaller format, then it will be a great decoration for a postcard. Complement the card with paper snowflakes or a Christmas tree made using the same technique, that is, from sheets of paper folded like an accordion and glued in layers.
To create beautiful crafts for the New Year 2018 from paper with your own hands, use the tips given in the article and add an important “ingredient” - imagination! Then you will get unique crafts that you can decorate your home with and give as a New Year's present to friends and family, or send the product to school and kindergarten for competitions!
Video craft options:
Happy New Year! ?


