How to make beautiful flowers from papier mache: a master class on making. Making papier-mâché from egg trays: instructions step by step Crafts papier-mâché paper flowers
This article will focus on one unusual and original technique for creating crafts - papier-mâché. With the help of simple techniques and simple materials, very beautiful gizmos are created - vases, caskets, masks and theater props, interior decor items such as lamps, dolls, photo frames and much more.
From French, papier-mâché can be translated as torn paper. Actually, the meaning is already revealed in the title. All crafts are formed from paper fibers with the addition of various adhesives.
Although the name of the technique is French, it came to us from ancient China, the birthplace of paper. During the excavations, archaeologists discovered armor with a multi-layered lacquer coating, dated to the 3rd century BC. These original products were strong enough to withstand a sliding cutting blow and had a very low weight, which was an advantage in combat. Later, this art appeared in Japan and Persia, where various crafts for the holidays, such as masks, were made in this way. From the middle of the 17th century, this technique became very popular in Europe.
For those who are just learning papier-mâché crafts, it will be important to learn three ways to create them.
To begin with, you will need a base for crafts. It can then be removed from under the layers of paper or left.
The first method is as follows: the first layer - wet paper pieces are covered with glue, another layer of paper is applied to it and covered with glue again. There may be more than a hundred such layers. This process is called mashing. You can choose a special glue, it is sold in needlework stores or you can make it yourself from starch, flour and PVA. If, according to the plan, the form needs to be removed, then it must first be lubricated with a fat cream or petroleum jelly.
The second way - the product is created from paper pulp mixed with glue. There are several recipes for creating such a mixture. The main principle is to soak paper pieces in water and mix them with glue. The resulting mass can be cast into a mold or applied to the base.
The base form can be wooden, plastic, glass or plastic products.
The third option for creating papier-mache crafts is similar to making plywood. Pieces of cardboard are treated with glue and pressed.
After drying, the products can be covered with putty, sanded, primed and, after final drying, painted, glued various decorative elements or painted.
Vases in papier-mâché technique
Such a wonderful element of room decor as a vase is underestimated by many and considered unnecessary. But a vase that is correctly selected in color and shape will certainly become an exquisite touch in the design of the room, and will make an additional emphasis on the style of the room. According to the teachings of Feng Shui, vases accumulate positive Qi energy, which has a beneficial effect on the energy of the house. A handmade vase will not only decorate the room, it will carry a piece of the positive creative energy of the creator.
Vase papier-mâché in the technique of mashing
To create a papier-mâché vase you will need:
- Basis for a vase (in this master class, a glass vase);
- Newspapers;
- Paper bags (you need rough paper, you can use packing paper);
- PVA glue;
- Sharp knife;
- Artificial (synthetic) brush;
- Acrylic paint or primer;
- Finishing paints;
- A piece of sponge;
- Decor elements;
- Petrolatum.
So let's get started. First you need to lubricate the glass base with petroleum jelly, this will prevent the layers from sticking to the base.
We cut the newspaper and paper into pieces. Can be broken. Now we take the glue, if necessary, dilute it a little with water so that it is not too thick. We cover our base in layers, alternating a layer of newspapers and a layer of wrapping paper. This is necessary in order for the coating to be uniform. You will see if you miss a section somewhere. You need to make at least 6 layers.

Now we are waiting for complete drying. Patience is needed here - it can take a long time to dry.
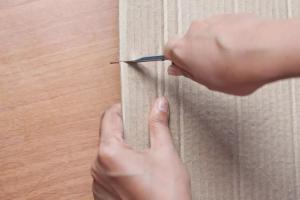
When you finally wait, make several cuts along the workpiece with a knife (see photo).

Carefully pull the base out of the paper cocoon. We glue the places of the cuts with masking or ordinary tape. Now the workpiece needs to be pasted over with paper in one layer and again wait for complete dryness.
We cover with a primer or white paint. When it dries, paint again, this time in the color that you like, well, or corresponds to the idea. Dry again.

Let's get to the decor. In this master class, the lower part of the vase is decorated with a coarse rope. Do not forget to glue part of the vase under the decor.

Now we paint the winding of the rope with a sponge. Our vase is ready.
Papier-mâché vase in clay technique

You will need:
- Flour ¾ cup;
- Toilet paper 1 roll;
- PVA glue;
- Mixer;
- food film;
- Balloons (for the base).
Unwind the toilet paper, put it in a container and pour plenty of water for about 20 minutes. Then we drain the water, tear the paper into pieces.
We prepare the adhesive solution. It is necessary to mix 1 part of glue, 3 parts of water (it will be about 1 cup) + ¾ cup of flour. Add this to the paper and mix until smooth. It is more convenient to use a mixer.

We form a cake from the obtained raw materials. Inflate a balloon or fill it with water. Now we cover with our cake no less than half. Leave the tail of the ball free of mass. Of course, the ball must be lubricated so that the mass does not stick tightly to it. Use cream or Vaseline.

We put our workpiece on cling film and wrap it tightly. Now you need to twist the ends of the film. We make the shape more spherical.

Leave the workpiece to dry completely. We blow off the balloon, paint as desired and make beautiful compositions with small vases.
In the next craft, two types of arts and crafts were combined - papier-mâché and decoupage.
papier mache plate

This craft will be a great decorative element for the kitchen or dining room. Just choose colors and pictures that match the decor of the room.
You will need:
- Glass plate base;
- Toilet paper 1 roll;
- PVA glue and wallpaper (already liquid);
- A piece of gauze;
- Vaseline or something greasy (to lubricate the base);
- Putty;
- White gouache;
- Watercolor paints;
- Napkin with a pattern (to your taste);
- Gold-colored gel contour (or any other decorative elements);
- Clear nail polish.
Advice! If you need putty in your work, it will be cheaper to buy it at a hardware store, and not at a needlework store.
Tear toilet paper into pieces and soak in warm water. Need a couple of hours. The resulting mass must be thoroughly mixed and filtered from excess liquid. You can use gauze.
Add both glues and stir again. For convenience, you can take a mixer. The mass should be very elastic. Roll up a ball to test. If the form holds, then the mass is ready. You can add 1-2 tablespoons of putty.
Lubricate the base plate from the outside with something greasy. Suitable hand cream, petroleum jelly or vegetable oil.
We cover the plate with our mass and leave it to dry completely. Be patient, as this will take quite a long time - up to several days.

If there are irregularities at the edges after drying, cut off. We putty our workpiece and again leave it to dry completely. We cover with white gouache, thanks to this, watercolor paints will lie better. Glue the selected picture from the napkin.

When everything dries again, we mix paints with gouache and paint our plate. In this master class, a golden border is applied along the contour of the plate.

We cover with varnish (use a car aerosol). The plate is ready.
Papier-mâché photo frame

Very often you can find crafts from old car tires or plastic bottles. For this beautiful frame, garbage was also used - cardboard egg trays.
You will need:
- Egg trays (4-5 depending on how big you want the frame)
- PVA glue;
- Foil or cling film;
- Board base (you can take a regular cutting board);
- Mixer;
- deep capacity;
- Gauze;
- Cutter for internal contours;
- Laces (to create texture);
- Gouache.

We take our trays and tear them into small pieces. We put it in a deep bowl and pour boiling water over it. The water should completely cover the paper pieces. Let it swell until the next day. Of course, the time is relative, since the amount of paper you have may differ. Just after a couple of hours, try it, if the pieces are spreading under your fingers, then the mass is already ready.
Drain off half of the liquid. Then take the mixer and mix everything until smooth. The more we spend on mixing, the better the texture will be. If you want a rough structure of the product, beat with a mixer for a short time. In the process of whipping, add a few tablespoons of PVA glue.
We again need to get rid of excess fluid. To do this, put the mass in gauze and put it under the press in a colander. Cheese or cottage cheese is made in a similar way. To find out if the mass is ready, you need to form a small piece. You can pinch it with your fingers or roll it up. If it holds its shape, then it’s enough to squeeze out moisture, you can create a frame.
We take our base and cover it with foil or cling film. This is necessary so that the mass does not dry tightly to the board.
We roll out a layer of about 1 cm. The main thing is that the layer is equal over the entire surface.
Let's start building the frame. In the center you need to make a recess for the photo. Choose any shape you like. For example, a box of cotton swabs. Now we place it in the center of the workpiece and gently press it 2 - 3 mm. Without removing the mold, cut off the edges of the frame, you can use a ruler and a sharp knife.
Now we need to make our frame textured. To do this, take the cord, fold it and squeeze out the spirals on the frame. Depth is about a couple of millimeters. You can draw strokes with a toothpick or a needle.
Now leave for a while for the frame to dry. As usual, it takes from several hours to several days.
When the craft is completely dry, paint it. In order to emphasize the texture, it is better to use gouache for painting. When the paint is completely dry, all that remains is to stick the photo in the center, you can use double-sided tape. On the reverse side, you can glue the mount-leg.
From papier-mâché, you can make hundreds of various vases, caskets, plates and other elements of room decor. But you can decorate with crafts from this raw material not only rooms. In the next master class, we will offer to make a mask in the spirit of the Venetian carnival. Due to the sufficient plasticity and harmlessness of the mass, it will be easy to create a mask just for yourself, according to your own standards.
Venetian papier-mache mask

You will need:
- Toilet paper and newspapers;
- Fatty glue or Vaseline;
- PVA glue;
- Acrylic paints;
- Elements for decor (lace, feathers, rhinestones, beads, beads, etc.).
We cut or tear the newspaper and toilet paper into strips.

Now the most important thing. Your face will serve as the basis for your future mask. It must be lubricated with a greasy cream or petroleum jelly. In order for the mask to turn out well, it is very necessary not to express emotions on your face - not to move your eyebrows, not to smile. Keep calm.
We begin to glue a layer of newspaper pieces smeared with glue. If necessary, they can be moistened with water so that they lie as tightly as possible to the face. Alternate between a layer of newspaper and a layer of toilet paper. Thanks to this, you will see if you miss a piece somewhere. You need about 5-6 layers. Try to immediately lay out the form in which you want to get the mask.
When you're done with the layers, take a hair dryer and dry the workpiece right on your face. Once the mask dries, remove and dry naturally. Trim the edges carefully with scissors. Lay the workpiece with the convex side up. Do not forget to make holes for rubber bands or other fasteners.
When the mask is completely dry, cover with acrylic paint on both sides. You can decorate the mask with any details to your taste: feathers, lace, beaded strings, rhinestones or beads.
The papier-mâché technique is in great demand not only as a way to create the most beautiful crafts, interior items, but also as one of the types of recycling of outdated newspapers and egg boxes. This skill is now very common, used in educational institutions, including kindergartens. The created products are durable, smooth and resistant to weather conditions, so they can be placed in rooms, left on the street, as an element of decoration of the courtyard of a private house or garden.
How to make papier mache out of egg cartons
The technique involves the use of two methods - pasting a certain base with newspaper pieces or modeling from a special mass. In this case, egg trays are often used. Having collected them, you can make a fairly large sculpture for a winter or summer garden. And all you need is egg trays, water, glue.

A feature of the technique and the main key to success is the accuracy of the modeling. One of the important factors is to let each piece of the craft dry well. In this case, it will not fall apart and will not change over time.
Papier-mache master class: flowers
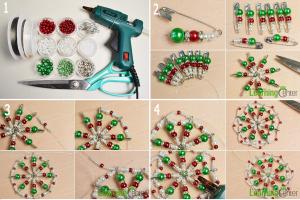
Using glue and egg trays, you can make beautiful flowers.
This will require:
- 5 egg trays;
- Water;
- Scissors;
- PVA glue;
- White acrylic or gouache;
- Thermal gun;
- Thick wire (will act as a stem for a flower);
- Paints, brushes.
- Colorless nail polish.
The craft is covered with acrylic and painted in the appropriate color. Eyes, nose are drawn with a marker.
Dwarf. Thanks to the papier-mâché technique, the masters make the most interesting compositions. And in the event that artistic talent is present, then there is an opportunity to create large sculptures for the garden, for example, a gnome. Of course, it will take much more time to make, because street gnomes are quite voluminous sculptures. And here it is important that every detail dries well for the strength and durability of the structure.
Need:
- 5 liter empty plastic container (torso);
- Balloon or ball (head);
- 30-40 egg trays;
- Water;
- PVA glue or paste (about 1.5 l);
- Paints and brushes;
- White enamel;
- The coating varnish is colorless.

Catalog: Paper works
materials
- Papier-mâché, PVA glue, copper wire (for stems), thread, semolina
Preparation method
- She promised to tell about papier-mâché flowers. I made a basket from old magazines (description is detailed in my works), painted with blue gouache and realized that something very sunny and bright was missing. So there was an occasion to talk about flowers.
- Cut out flower petals from colored papier-mâché. We arrange the paper so that the direction of the corrugation is vertical. If you want bells, then the petals are elongated, more oval. If roses, then round and 2-3 sizes, small, medium and larger.
- We form the petals. In the center, we stretch the corrugation with our fingers, straighten it, giving volume. We carefully clamp the tip of the petal with a ruler or the blunt side of the scissors and stretch it to the end. Thus, the petal bends, curls.
- Next is the pestle. From the wire at the end we form a loop, lubricate it with glue and wrap it in a thin strip of papier-mâché (I have brown). Next, grease the pestle again with glue and sprinkle with semolina. The pestle is ready.
- Collecting a flower. Alternately around the pestle we lay the petals-blanks, grabbing them with wire or thread. The more petals, the more magnificent your flower. We fix with the same thread or wire.
- Now you need a thin strip of green papier-mâché. We glue it to the base of the bud, wrap it several times (hiding the junction of the petals) and smoothly wrap the stem wire in a spiral to the bottom, glue the tip.
- Leaves. Not wise. I cut off a thin strip of green papier-mâché, collected it with a fan, wrapped the stem and secured it with glue (you can use thin wire)
Traditionally papier-mâché is used to make masks. Material created from improvised means takes absolutely any form. Papier-mache in the interior began to be used quite recently. The material was associated only with children's creativity and the creation of fakes, and yet from "wet paper" you can make an author's bas-relief, three-dimensional panel, an exclusive vase, and even artificial brick or stone. Papier-mache decor is easy to create, but at the same time it has incredible hardness and strength. Unlike glass ones, such jewelry will not break, and it is better to keep silent about how much high-quality imitations of natural stone cost. Let's take a closer look at several papier-mâché workshops and get inspired by the creative ideas of other decorators.
Origin story
The name papier-mâché means "chewed paper" in French. Although the fancy name for the original modeling dough was actually invented in France, China was its real home. Back in ancient times, when paper was invented here, they simultaneously developed a simple way to create a special material that was malleable during work, but had strength after drying. Papier-mache was given additional rigidity by applying several layers of varnish to the finished product. The Chinese preferred to create combat helmets from paper pulp, which really well protected their heads, and even elements of armor. It would seem that it could be more stupid than to trust your life to soaked and glued paper, but the ammunition was popular. Arrows did not pierce it, and the glancing blows of swords could not be feared at all. In addition, papier-mache, in comparison with metal uniforms, was light as a feather, which allowed Chinese warriors to move with greater speed and agility.
The next to take over were the Japanese. Having obtained the recipe for papier-mâché, they adapted it to their culture, creating original decorations from paper dough for holidays and traditional ceremonies for this country - masks. Products were polished with sandpaper to a waxy shine and covered with additional protective layers, painted. It turned out great and easy to make decoration. From Japan, the papier-mâché recipe came to Europe, where the French called it a well-known name, and the British improved it. A certain John Baskerville, a former printer, opened the production of papier-mâché decor. At first, he used Japanese models, and then began to implement his own ideas. Plates, caskets, figurines of people and animals, decorative masks and even watches enjoyed unprecedented popularity. Assistant decorator Henry Clay experimented with the compositions, trying to find the original recipe, which would gain even greater strength. And, ultimately, he succeeded. He dried the soaked mass in the manner of clay under the influence of high temperatures, and it turned out to be incredibly hard, not inferior in strength even to wood. Clay patented his recipe.
Subsequently, several more companies were opened for the production of original papier-mâché jewelry, but “paper dough” eventually migrated to creativity and hobbies. It was kneaded at home and made dolls for children, baskets for sweets, decorative saucers, vases, lacquered jewelry boxes. The material is especially popular as a cheap imitation of expensive surfaces: metal, wood, ceramics, stone. To give a resemblance to the original, it is enough just to choose the right colors and create a genuine texture, which is easy to achieve by removing a cast from a real surface. The technique of making papier-mâché came to Russia during the time of Peter I. When working with paper pulp, it should be borne in mind that products shrink heavily after drying. The volume loss can be up to 5-8%. Therefore, it is necessary to make the decor obviously larger in size, given this feature of the mastic.
Papier-mâché products will last a long time if the room maintains an average level of humidity. Constant "soaking" will greatly reduce the operational life of jewelry.
Manufacturing technique
As for the manufacturing technique, two main methods are used:
- Mixing mass in a container.
- Overlaying paper layers on the prepared mold.
The first option is suitable for those cases when the product will be molded by hand or poured into the molds. The process itself resembles working with plasticine or clay. The second method is useful if molds are used that cannot be filled from the inside, but the master cannot repeat their shape. Usually we are talking about balls, that is, such products that are difficult to make perfect on their own.
Mass recipes
Although the basis in any technique is paper, it can be “cooked” in completely different ways using unusual additional ingredients. Depending on the recipe, chalk, rosin, flour, drying oil, gypsum, starch, paste, and even crushed oatmeal are added to the compositions. Sometimes quite unusual ingredients are used, but we will look at two traditional recipes that papier-mâché masters advise beginners.
Recipe #1
For the first recipe, you will need paper (toilet, office, newspaper), liquid soap, PVA glue, hot water and construction putty. Work begins with kneading the dough. About 8 rolls of toilet paper (this will be enough to get about 2 kg of finished mass) are crushed and placed in a clean container. It is filled with hot water. The paper is allowed to "rest" for several hours. Now it is placed in gauze folded several times, cloth (not very dense) or mosquito net. The mass is squeezed out, but not dry. The paper is then shredded again. For these purposes, use a mixer or blender. The result is a fibrous dough, to which add about 1 tbsp. a spoonful of soap (even the usual Fairy dishwashing detergent will do). Stir. Now PVA glue is gradually poured into the mass. Add it in portions so that the composition is evenly mixed. There is no exact dosage of glue. Here the master decides for himself how thick papier-mâché he needs. After the glue, add 4-5 tbsp to the dough. spoons of putty. The mass is kneaded again. Papier-mâché is ready to use.
Recipe #2
To prepare the composition according to a different recipe, you will need:
- 0.5 kg of toilet paper.
- 0.5 kg of PVA glue.
- 2-3 tbsp. tablespoons of flax oil.
- 1.5 liters of warm water.
The paper is shredded and filled with water in a clean container. The future dough is left for a day. After the paper swells, it is placed in portions in cheesecloth and squeezed out. Now add glue to the bowl. It should be divided into five parts and gradually poured into the paper mass, mixing thoroughly each time. Now, flax oil is added to the almost finished papier-mâché, which will allow you to get more elastic products. The mass is mixed again and the dough from modeling paper is ready.
Vases, small sculptures, bowls, chests, caskets, boxes, dolls are made from papier-mâché. With the help of paper pulp, you can create a bas-relief or a three-dimensional panel on the wall. Pebbles, pebbles, bricks are molded from the material, which, after painting, differ from the real ones only in weight. Unusual decor is fixed on walls, fireplaces, around doorways or archways. This option is ideal for budget repairs, if the designer has free time to work on the creation of numerous elements.
Vases
Vases are easiest to make using the technology of laying pieces on a mold. The basis can be old or cracked ceramics that you want to recreate anew. Newspaper sheets are crushed, moistened in glue and put on a vase in layers. After drying, the resulting product is cut in half, separated from the sample, and then re-fastened with wood glue. Use a balloon to get a round vase. After the papier-mache has hardened, it is pierced with a needle and removed through a small hole, which is also subsequently glued. The pliability of the material allows you to create complex, openwork surfaces. Additionally, the decoration is decorated with eggshells, threads that form patterns, accessories, beads, buttons.
wall decoration
In wall decoration, papier-mâché is used to create complex artistic compositions and to make cheap decorative finishes. In the first case, a plywood sheet is required, on which a drawing is applied. Then the paper-glue mass is bred, from which separate fragments of the picture are formed. After they dry, the parts are glued to the base strictly along the contours of the pattern and painted. If you make enough effort, you can get fantastic panels with images of fairy princesses and unrealistic creatures. This decoration is ideal for the interior of a children's room. The bedroom or living room is decorated with paintings depicting three-dimensional flowers, birds, animals, trees. A still life or an embossed vine will look spectacular in the kitchen. To make bricks or stones from material, molds must be prepared. To do this, select a suitable sample (or rather a couple), place it in a container and fill it with plaster. When you need to decorate a large section of the wall, several molds are used, as this will greatly speed up the laborious stamping process. Instead of toilet paper, it is recommended to soak egg trays. Alabaster must be added to the composition for greater strength. Products are well dried and fixed on the wall with wood glue. If you need a smooth surface, then artificial stones are polished with sandpaper.
Panels will look unusual, where part of the drawing is made with paints, and only accent details are decorated with papier-mâché.
Decor elements and crafts
From papier-mâché, you can make door handles or knockers, decorative wreaths, which are additionally decorated with twigs, burlap, cones and ribbons. The material is often used to create jewelry boxes, pirate treasure chests, piggy banks, candle holders, and fake fruits. In the latter case, it is better to sacrifice the original treat in order to create a form. By the way, after drying, papier-mâché will be easier to separate from the mold if it is pre-lubricated with petroleum jelly. From paper pulp, complex decorations are also obtained. For example, the product is a decorative hand, on the fingers of which bracelets and beads are hung. Furniture is decorated with paper stucco. Curls from papier-mâché are obtained no worse than from gypsum. The solar system of miniature planets, which are created using the same balloons, will decorate the room of a young astronomer.