DIY snowflake made of wire and beads. Three do-it-yourself beaded snowflakes
The most logical New Year's decoration made of beads will be a snowflake. There are an incredible variety of bead snowflake patterns: from the simplest for beginners to incredibly complex ones, consisting of several tiers. As a connecting element, you can use fishing line, wire, thread, as well as pins and the most common glue.
# 1 Snowflake from beads in a hurry: do-it-yourself Christmas decorations
For those who have absolutely no time to prepare, a snowflake made of wire and beads would be an ideal option. To create such a masterpiece you will need: wire, glue or thread (for fastening the wire), beads or beads. Cut several identical pieces of wire (3 or more), fasten them in the middle (with glue or thread), string beads on the free ends. Snowflake is ready!
#2 Quick snowflake made of pins and beads: DIY Christmas craft
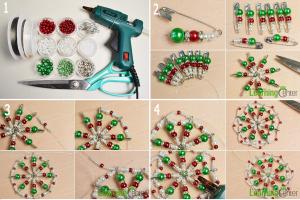
For such a snowflake, it is best to have in your arsenal not only beads, but also other beads of different sizes. You will need: pins, fishing line, beads of different sizes, scissors and glue. See step-by-step photo instructions below.

# 3 Master class from beads: do-it-yourself snowflake for the New Year
So, we complicate our product. This snowflake has its own manufacturing scheme, which must be followed. You will need: fishing line, scissors, beads and beads. See the detailed snowflake diagram below.

#4 Snowflake from beads: a master class with a step by step photo
For beginner craftswomen, this New Year's snowflake pattern will be a great start. Of the tools you will need: fishing line, scissors, needle, beads. It is better to take beads in two colors, so the craft will look more spectacular.

# 5 DIY beaded snowflake for the New Year: scheme
To make such a craft, you will need several types of beads: this way the snowflake will look incredibly realistic. See below for a detailed bead size chart.

#6 Beaded crafts for beginners: snowflake pattern for the New Year
To make such a snowflake, you will need beads of different sizes and colors, as well as a fishing line. A detailed beading scheme is described below, the diagram also shows the sizes of beads that should be used in the manufacture of this New Year's craft.

#7 Christmas bead craft: DIY snowflake pattern
And one more unusual scheme of the New Year's snowflake, which you can bring to life with your own hands. A detailed diagram is painted below, indicating the sizes of beads needed for crafts.

# 8 Beaded snowflake pattern: making New Year crafts from beads
Another fairly simple, but at the same time charming snowflake pattern of their beads. You will need fishing line and beads of different sizes and colors. A detailed manufacturing scheme is shown in the photo below.

#9 Beadwork: Snowflake Pattern
This is such a charming craft that any needlewoman can do. Unless it will be difficult for beginners, but nothing is impossible. Below is a detailed diagram that will help you master the technique of beading.

New Year's Angels from beads
Another symbol of the New Year and Christmas is considered to be an angel. Cute angels can be made from beads, and then decorate a Christmas tree or a house with these beautiful crumbs. An angel made of beads can be made as a gift to people close and dear to you so that it protects and helps.
#1 A simple angel made of beads and wire: a master class with a step by step photo
A very simple angel, which even beginners can handle. It will take you about 10 minutes of time and a cute beaded angel for the New Year is ready! Step-by-step photo master class, see below.

# 2 New Year's angel from beads: do-it-yourself crafts for the New Year
Another variation of beadwork on the theme of angels. The scheme is quite simple, you will need: wire, scissors, beads and beads of different sizes, a chain or ribbon. See below for step-by-step photo instructions for making crafts.

#3 Beaded angel: do-it-yourself Christmas crafts
A more complex version of the Christmas beaded angel. You will need patience and experience in creating masterpieces from small glass beads. See the step-by-step master class with the photo below.
#4 Cute angel made of beads and beads with your own hands: scheme
Here is another diagram of an angel made of beads and wire. It is very similar to option number 1, but there are slight differences that make the craft more realistic. See the diagram in the photo below.

Christmas tree made of beads
The most important attribute of the New Year holiday, without which it is simply impossible to imagine, is the New Year tree. If for some reason you do not have the opportunity to acquire a large green beauty, you can replace it with a miniature beaded Christmas tree. Here you will find master classes on making Christmas trees from beads for both beginners and beading professionals.
#1 Simple Beaded and Wire Christmas Tree: Christmas Beaded Crafts for Beginners
Even a child can cope with such a New Year's craft. By the way, beads develop fine motor skills well, which is useful not only for children, but also for adults! Step-by-step instructions with a photo are given below.

#2 Beaded Christmas tree: do crafts with the kids
Another version of a simple New Year's craft that you can do with your children. The Christmas tree will turn out bright and cheerful if you use beads of different colors and sizes. See the step by step tutorial below.

#3 We make a Christmas tree for the New Year with our own hands from beads and glue
Such a craft can become a very original decoration or even a gift. You will need glue, thick paper and scissors. Draw on paper the silhouette of the future Christmas tree. Then carefully glue the bead along the contour. wait for it to dry and cut the finished product. The work is painstaking, but if everything is done correctly, an indescribable beauty will turn out!

#4 Tree from beads: a master class on making a Christmas tree
An excellent element of decor will be a miniature Christmas tree made of beads. To create it, you will need two types of wire, a lot of green beads and red beads of a slightly larger diameter. Step-by-step master class, see the photo below.

#5 Beading: Christmas Tree Masterclass
You can make such a cute Christmas tree pendant from beads, which, by the way, can be hung like a toy on a Christmas tree. You will need wire, green beads, white and orange beads. Step-by-step master class with a photo, see below.

# 6 We make a Christmas tree from beads with our own hands: a diagram
A small Christmas tree can also be made in this way: You will need a toothpick or other thin stick, beads and fishing line. According to the scheme, weave several cruciform bases with a round hole in the center. The bases must be of different sizes. Next, string them on a stick, starting with the largest. The top can be decorated with beads of a different color.

# 7 Christmas tree made of beads: master class + photo
We complicate the task. In this master class you will learn how to make a Christmas tree from beads with wire. For crafts, you will need wire and beads of two colors (green and white). You make each branch separately, and then twist them together and get a fluffy Christmas tree. Detailed photo instructions are below.

# 8 Do-it-yourself Christmas tree scheme from beads: making New Year's crafts
Another diagram of a Christmas tree made of beads and wire. Additionally, you can use multi-colored beads of different sizes, which will look like Christmas balls. The scheme is detailed in the photo below.

#9 DIY mini Christmas tree made of beads and beads
Miniature Christmas tree made of beads and beads. Suitable for more experienced craftsmen. A detailed diagram is shown in the picture below.

# 10 Christmas tree from beads: a master class with step by step photos and a diagram
Another version of the Christmas tree made of beads and wire. At first glance, some of the Christmas tree making workshops in our article are similar. And indeed it is. They are similar, but the techniques are different. Experienced craftsmen will immediately notice the difference, and for beginners we recommend that you follow the instructions carefully and carefully study the manual.
#11 Christmas tree with beads: a master class with a photo
This version of the green beauty is a little simpler than the previous one, but in general the manufacturing scheme is similar. You will need fishing line, green and white beads, and step-by-step instructions for beading.

#12 Christmas tree from beads: a step-by-step master class
For the most experienced needlewomen, we offer a master class on making a Christmas tree from beads. A very painstaking work awaits the craftswoman when creating such a masterpiece. Each branch is made separately, and then wound onto the main stem. See step by step photo instructions below.

See also:
Other New Year crafts from beads
For the New Year, you can make other crafts from beads for which you have enough imagination. Well, what are the New Year holidays without gifts, Santa Claus, cones, sweets, wreaths, stars? All this and much more can be made from beads with our step-by-step master classes.
# 1 New Year's beaded bell: a master class with a photo
An excellent New Year's decoration will be a beaded bell. To create it, you will need wire, beads and beads, scissors, a safety pin, a chain or ribbon. Step-by-step MK with a photo, see below.

# 2 Mint beaded lollipop: doing beadwork for the New Year
You can also decorate the New Year tree or the interior with themed beaded mint sweets, which we are well aware of from Hollywood films. The weaving pattern and a step-by-step master class are shown in the photo.

#3 New Year's gift from beads: do-it-yourself crafts
A craft gift will look very symbolic as a decoration. You will need wire, beads and beads of different sizes. Master class with step-by-step photos, see below.

#4 Santa Claus from beads: scheme and master class
Well, what is a holiday without a kind old man who delivers gifts? Here we will make a bourgeois colleague of our Santa Claus. The scheme is simple, suitable for beginners. You will need red black and white beads.

# 5 Master class on beadwork: do-it-yourself New Year's cone from beads
Well, what is a Christmas tree without cones? Now we will tell you how to make a cone of beads with your own hands. To do this, you will need a foam oval blank, brown or golden beads, fishing line. For beginners, such a craft will be difficult: you will have to spend a lot of time and effort. But experienced craftswomen will like the New Year's beaded cone. See the step by step tutorial below.
#6 Master class: beaded Christmas wreath
Usually, the front door is decorated with Christmas wreaths, sometimes it is also hung on the wall to create a festive atmosphere. But you can make a small beaded wreath and use it as an element of New Year's decor. MK beading see below.

# 7 DIY beaded wreath: MK with photo
There can be a great variety of variations on the theme of a beaded Christmas wreath. Having gained a little experience, you can independently generate ideas for schemes, but for now, take note of our crafts and schemes.

#8 Beaded wreath for the New Year: beading master class
Well, the most difficult version of a beaded wreath. You will have to try, but the result will exceed all expectations. With such a craft, it is not a shame to go on a visit, taking a wreath as a New Year's souvenir.

You may be interested in:
# 9 Beaded star: do-it-yourself New Year's crafts master class
You can make such a cute bright star with your own hands using our step-by-step master class. You will need wire and beads of different colors and sizes.

Bead jewelery
It is worth preparing thoroughly for the new year: you need to decorate not only the Christmas tree or the house, but also your beloved one. You can make incredible themed jewelry from beads with your own hands and illuminate everyone around with a good mood. By the way, you can make the same jewelry for friends, sisters or for mom and daughter. In general, turn on your imagination and go ahead - create!
# 1 New Year's pendant snowflake: do-it-yourself decorations, MK
It is relevant during the New Year holidays, and in general with the beginning of winter, to wear handmade themed winter decorations. Here you can make such a beaded snowflake pendant with your own hands following the instructions in our master class.

#2 New Year's pendant Christmas wreath: a master class on making
A pendant in the form of a Christmas wreath will also look relevant on the eve of the Christmas holidays. You will need beads of two colors and a fishing line. You can hang the pendant on a string or on a chain.

# 3 DIY Christmas snowflake earrings made of beads: a step-by-step master class with a photo
New Year's holidays are just around the corner, which means it's time to think about an outfit for the holiday itself. It would be nice to appear at the gala evening in a unique handmade jewelry. With the help of this MK, you can create beautiful themed winter earrings with your own hands.

#4 Simple beaded earrings in haste: scheme + step by step photo
If there is no time, and you really want a handmade themed jewelry, you can make these simple earrings in the shape of snowflakes. You will need: wire (6 identical pieces), beads or beads. For one earring, take three pieces of wire, twist them in the middle to get a one-piece six-pointed design. String beads on the ends and fasten. Add a hook and the earring is ready!

# 5 DIY beaded earrings for the New Year: step by step instructions with a photo
You can make such cute earrings in the form of spruce twigs yourself with the help of our detailed photo instructions.

#6 DIY beaded Christmas deer earrings: mk with photo
Funny deer-shaped earrings can be made from beads with your own hands. The scheme is very simple, even beginners can handle it. But such a product looks very funny, and most importantly - thematically!

# 7 Do-it-yourself earrings in the shape of a New Year's wreath: weaving pattern
Beaded jewelry can be diluted with additional decorative elements, such as a ribbon, as in this master class. The result is an original product, according to which you can’t say at all that the production took a little more than 10 minutes!

#8 Beaded Jewelry: DIY Flat Earrings
To make gift-shaped earrings, you will need three types of beads and wire. From square flat beads weave the base. And glass beads and small beads will be needed for a bow. See the step by step tutorial below.

#9 DIY beaded jewelry: MK for weaving earrings
And here is another variation on the theme of beaded earrings in the form of a Christmas wreath. You will need beads of two colors (green for the base, red for decor), fishing line and our scheme.

#10 Beaded earrings: do-it-yourself mistletoe leaf, MK + photo
Earrings can also be made in the form of mistletoe leaves. The scheme is simple to disgrace, so that novice craftswomen can safely get to work. Step-by-step master class, see the photo below.

A beaded brooch will also become a themed New Year's decoration. In this master class you will learn how to embroider a beaded bullfinch brooch. You will need beads of four colors, pebbles for the eye and chest, rhinestones for decoration.

#12 Beadwork: do-it-yourself New Year's mask
You can embroider a New Year's mask with beads. To do this, you will need a blank openwork mask. And then embroider it to your taste with beads of different colors.

Beaded crowns
Little princesses can make chic beaded crowns for the New Year. Small glass beads look like real gems on New Year's holiday, a small snowflake or a princess will look unique. In addition, a beaded crown can be made together, and the child is busy and mom is happy!
#1 Master class on how to make a beaded crown: the crown of the Snow Queen
You can make a real crown of the Snow Queen with your own hands from beads and beads. The work is painstaking and will require a lot of time and effort from you. However, the result is worth it: a step-by-step master class with a photo, see below.
#2 Beaded snowflake crown: MK + photo
You can make a small snowflake headband with a snowflake that will look like a real crown. See the detailed diagram and step-by-step master class below.

#3 How to make a crown of beads and beads: MK princess crown
A detailed scheme for making a princess crown from beads and beads. Treat yourself and your little princess with a handmade product.

Help us become better: if you notice an error, highlight the fragment and click Ctrl+Enter.
1. Making a snowflake from beads and glass beads.
New Year is a wonderful holiday! Both adults and children look forward to it. We all want to decorate our home as beautifully and unusually as possible. I bring to your attention a master class on the step-by-step production of snowflakes from beads and glass beads. Such snowflakes will certainly add magic and a sense of celebration.
So let's get started!
To make such a snowflake we will need:
- - wire with a thickness of 0.24-0.25;
- - beads 6 mm;
- - beads 4 mm;
- - beads 3 mm;
- - glass beads 12 mm.
We cut off a wire one meter long, bend it on the tail so that our beads do not roll.
We collect beads in the following order: one bead 6 mm, one bead 3 mm and so on until we have 16 beads on the wire (8 beads 6 mm and 8 beads 3 mm).
We close in a ring.
The long end of the wire should come out of the 6mm bead.
We string two 3 mm beads on it, one 4 mm bead and again two 3 mm beads.
We return the end of the wire back into the 6 mm bead, thread it through the 3 mm bead and again bring it out into the 6 mm bead.
Having reached the short "tail", I twist the wire. Thus fixing the circle.
Weave the whole circle. We bring the wire into a 4 mm bead.
Now we will make "bridges" between our arcs. To do this, we collect 5 beads of 3 mm and connect our tops through 4 mm beads.
We draw the wire through the third bead of our "bridge". We collect beads in the following order:
- - 4 mm - 1 pc;
- - glass beads - 1 pc;
- - 3 mm - 1 pc;
- - 4 mm - 1 pc;
- - 3 mm - 3 pcs.
We return the wire to the 4 mm bead, thereby forming the tip.
Again we collect on the wire a bead of 3 mm, glass beads, a bead of 6 mm. We thread the tail into the third bead of our "bridge". Similarly, we repeat seven more times. We tangle the wire in weaving and cut it off.
Everything, the snowflake is ready!
According to this scheme, you can weave completely different snowflakes, you just have to turn on your imagination! Replace the beads with glass beads, change the colors of the beads, and here is a brand new snowflake in front of you!
Don't be afraid to experiment! Good luck with your work and Happy New Year!
2. Snowflakes from red beads
Weaving patterns:
Weaving patterns:
3. Winter snowflake
This snowflake is made of white shiny glass beads, white mother-of-pearl beads with a diameter of 2 and 4 mm, as well as white mother-of-pearl beads. It is desirable to choose a wire of white color.
Weaving in a cross is the basis of weaving this snowflake.
1st row - take 14 beads with a diameter of 2 mm and 14 beads and weave a chain, as shown in fig. 51. Close the chain into a ring by crossing both ends of the wire in the first bead (Fig. 52, a).
The ring must lie in the plane of the table.
Each new row is woven with a new wire with two working ends. At the end of each row, carefully hide the ends of the wire. For those who have mastered the basics of this method, it is possible to weave all the chains with one wire with two ends, transferring them from row to row (Fig. 52, 6).
2nd row - string on the right end of the wire (P) a glass bead and a bead, with the left end go through the bead of the first row and string the glass bead, in which you cross both ends of the wire. For those who continue to weave with one wire from row to row, string a bugle and a bead on the right end of the wire, and only a bugle on the left (JI) and also cross the ends in it (Fig. 52, c). Next, string one bead on the right end of the wire, and on the left bugle (Fig. 52, d). Pass the right end through the bugle located on the left end of the wire. In this row, the glass beads are the connecting link, where both ends of the wire are crossed. Now pass the left end of the wire through the bead of the first row and string the glass beads, and string the bead on the right end (Fig. 52, e). Continue to work, guided by figures 52, e.
3rd row - string a glass bead and a bead with a diameter of 2 mm on the wire, pass the left end of the wire through the bead of the second row (Fig. 53, a), string the glass bead on one end of the wire and cross both ends in it. Continue to work, guided by figures 53 (b-e). Before completing the row, you pick up a bead on the right end of the wire, and with the left pass through the bead of the second row, cross both ends in glass beads, which is the connecting link. At the end of the work, carefully hide both ends of the wire, but only if you use a new piece of wire for each subsequent row.
Each row of snowflakes must necessarily lie in the plane of the table.
4th row - string a glass bead on the wire, one small bead, one large bead with a diameter of 4 mm and again one small one (Fig. 54, a), with the left end of the wire go through the small bead of the third row and string the glass bead on the left end (Fig. 54, b), in which cross both ends of the wire. Now type one small bead on the right end of the wire, and go through the bead of the third row with the left (Fig. 54, c). Cross both ends of the wire in glass beads (Fig. 54, d) and string one small bead and one large bead on the right end of the wire, then again one small one, go through the bead of the third row with the left end of the wire and again cross both ends of the wire in glass beads. Continue to work, focusing on Fig. 54, a-f.
At the end of the row, carefully hide the ends of the wire, this also applies to those who weave all the rows with one wire.
The 5th row consists of 7 petals, each of which is woven separately. To weave one petal, take a piece of wire and thread it through 3 small beads, as shown in fig. 55 a.
Weaving is also carried out at both ends. String glass beads on the right end of the wire and cross both ends of the weed in it (Fig. 55, b).
Then type one small bead on the right end, and one bead on the left end, cross both ends of the wire in glass beads (Fig. 55, c).
Continue to weave and each time pick up a bead on the left end, and a small bead on the right end, the connecting link, as before, will be a glass bead, in which both ends of the wire are crossed. When there are five such links, type one bead on the left end of the wire, and make a pico on the right end of four large beads (Fig. 55, d).
Then cross both ends of the wire in glass beads. Proceed as shown in fig. 55, e, f. As soon as you cross both ends of the wire in the 10th bugle, if you count from the beginning of the weaving of the petal, pass both ends of the wire through 3 small beads towards each other (Fig. 55, g). With the end that will be closer to the middle of the petal, go through all 9 beads inside the petal (Fig. 56). Next, pass the same end of the wire through 3 small beads lying nearby and draw both ends of the wire towards each other from the edge of the snowflake to its middle.
Then cut off the excess wire (Fig. 57). All subsequent petals are woven in the same way.
On fig. 58 a. 6 shows options for weaving petals, which will give you the opportunity to weave a few more new ones based on the snowflake described above.
Many different snowflakes and their weaving patterns


Flat snowflakes
Snowflake number 1
The snowflake is made of gold and pearl-pink beads with a diameter of 4 mm. Carry out the product in accordance with fig. 21. When weaving the last rows of snowflakes, you can use a needle, since the hole in the beads is quite large. Be careful not to twist the wire, as small knots form and the wire breaks easily in these places. It is advisable to go through the last row twice so that the product is rigid enough and keeps its shape. When finished, the snowflake has a diameter of just over 7 cm. You can also use fishing line for weaving.

Finally, thread the gold thread through any of the outermost gold beads, tie a small knot, after which the snowflake can be hung on the Christmas tree.
1st row dial 16 beads, alternating through one gold and pink beads. Close the beads in a ring (Fig. 21, a).
2nd row - consists of 8 beams, 3 gold-colored beads in each beam (Fig. 21, b, c, d).
3rd row - also consists of 8 rays and each with 5 pink and 3 gold beads forming a pico (Fig. 21, e, f, g, i, i).
4th row - just like the second row, consists of 8 rays but 3 gold beads in each (Fig. 22, k-l).
Snowflake number 2
This snowflake is made of gold beads with a diameter of 4 mm and 2 mm and pearl pink with a diameter of 4 mm. How to make a snowflake is shown in fig. 22. In finished form, this product has a diameter of 9 cm.

1st row - type 4 gold beads and lock them into a ring (Fig. 23, a, b).
The 2nd row consists of 4 pink beads (Fig. 24, a, 6).
The 3rd row has 4 rays, each of which consists of 5 pink beads (Fig. 25, a-c).
The 4th row also consists of 4 rays, 3 gold beads each (Fig. 26, a. b).
The 5th row is formed by eight beams, each of which has a pico of three large beads and three small beads. In this? / 1 row, all the beads are golden (Fig. 27, a-e).
The 6th row has 8 rays, 3 pink beads each (Fig. 28, a-c).
Large selection of snowflakes, 9.9 out of 10 based on 31 ratings http://biserok.org/bolshaya-podborka-snezhinok/
Christmas snowflakes

For work you need to take:
Gold and blue beads
- blue crystals 5 mm
- golden beads 2 mm and 4 mm in diameter
- golden glass beads
- fishing line
Snowflake weaving pattern:

small snowflakes
To make a snowflake (Fig. 11) you will need about two low beads, here you can combine artificial beads with gems. You will also need brass or copper wire.
Work description
Put eight beads on a wire about 50 cm long, leave a piece of wire about 10 cm long on the left side. Connect both wires together so that a loop forms from the beads, and twist the wire around the beads by 1-2 mm.
String 6 beads on the working end of the wire. Pull the wire in the opposite direction through the first of the 6 beads and pull it tight. Pass the wire through the next bead of the inner ring and string 6 beads again (fig. 12).

Continue in this way until you have eight heifers (Fig. 13). Finally, connect both ends of the wire together, twist them and cut off the excess. Such a snowflake, like all subsequent ones, can be used as an independent decoration and as an element of pendants and garlands (Fig. 19).
On the basis of this snowflake, a number of new ones can also be made if the size of the beads is partially changed (Fig. 14, 15) or the number of beads is increased (Fig. 16, 17). You can combine snowflakes into one garland and decorate a window or a Christmas tree with it (Fig. 18, 19).

Several options for weaving snowflakes
Such beautiful and uplifting snowflakes that will perfectly decorate and prepare your home for the new year. They will create a mood and fill the place around them with a fairy tale!

To weave these snowflakes you need to take:
White matte beads #10 or 12
- blue matte beads of the same number
- blue matte beads for the middle of the snowflake and accents
- fishing line, wire, depending on what is more convenient for you to weave
Snowflake weaving pattern:

Each of these snowflakes starts from the center. You need to weave a round base, the same for three, and then complete different branches and snowflake crystals for each. The diagram clearly shows the movement of the thread, the number of strung beads is not always indicated, but you can peep it on the photo of the finished snowflakes.
Some more beautiful snowflakes
Unlike previous snowflakes, this one already uses a more diverse material.

What you need for weaving:
white bugle
- pearl beads 3 mm, 4 mm and 5 mm in diameter
- white beads №10
- blue beads or beads No. 10
- gold beads or beads No. 10
- blue bicone crystals 4 mm in diameter
- wire and line
Snowflake weaving patterns:

All four of these snowflakes are woven differently. Following the pattern, you can repeat the weaving process. And decorate the Christmas tree with them.
Winter has already come into its own with might and main, so today we will make another winter-themed product - a snowflake.
For her we need:
- bugle size No. 3; I took blue glass beads;
- beads of size No. 10; I took beads of light green color with a mother-of-pearl tint;
- beads of size No. 8 (you can take even larger beads); I took blue beads;
- wire with a diameter of 0.3 mm.
So, let's go directly to the master class. First, we make the middle part of the snowflake.
We take a wire 160 cm long, we collect one large bead and four pieces of glass beads on it and place the set on the wire so that the tip of the wire about 10-15 cm long remains on the side of the glass beads.

We take the short end of the wire and pass it through the bead from the other end of the wire.

We tighten the wire, trying to keep the short end of the wire about 10 cm long. We got a loop of glass beads, at the base of which there is a bead.

All further weaving is carried out only at the long end of the wire. We will no longer need the short end of the wire; we will fasten and cut it at the end of the weave.

and pass the wire through the nearest lower segment of glass beads from the previous loop in the direction from top to bottom (that is, to the base of the loop) and then immediately through the bead from our last set.

We tighten the wire - next to the first loop of glass beads, a second loop is obtained.

Next, weave three more loops in the same way, so that in total we get five such loops. Let me remind you that for each loop we collect one large bead and three segments of glass beads.

We connect the loops in a circle. To do this, first we collect one large bead on the wire

and we pass the wire through the nearest lower segment of the bugle from the very first loop in the direction from the bottom up (that is, from the base of the loop outward).


Then we collect two pieces of glass beads on the wire

and pass it through the nearest lower segment of glass beads from the last woven loop in the direction from top to bottom (that is, to the base of the loop) and then immediately - through two beads: the last dialed bead and the bead from the very first loop.

We tighten the wire - we got the middle part of the snowflake, consisting of six loops woven in a circle.

Next, weave the rays of the snowflake. Before that, we pass the wire through the nearest piece of glass beads, that is, we bring it to the outer border of the middle part of the snowflake.


First weave a small ray. Let's break it down into 3 steps.
Step 1. We collect two pieces of glass beads and one small bead on the wire

after which, holding this bead, we pass the wire in the opposite direction through the piece of glass beads closest to it.

We move the set close to the product and tighten the wire.

Step 2. We collect one piece of glass beads and one small bead on the wire.

Again we hold the bead and pass the wire in the opposite direction through the piece of glass beads.

We move the set close to the previous one and tighten the wire. We straighten two pieces of glass beads with beads so that they look in different directions from the very first piece of glass beads in this ray.

Step 3. For this snowflake ray, it remains for us to make the tip, and then bring the wire to the base of the ray. We collect on the wire one piece of glass beads and one small bead,

we hold the bead and pass the wire in the opposite direction through the piece of bugle from the last set, after which we immediately pass the wire through the very first piece of bugle in this ray.

Gently pull out the wire - the first ray of the snowflake is ready.

To continue weaving, we pass the wire through the nearest piece of glass beads, located along the perimeter of the middle part of the snowflake,


and then we begin to weave the second ray of snowflakes. This ray is made similarly to the first, only it will be larger in size. We start weaving in the same way as in the case of a small ray - we perform the first two steps. We have the first tier of a large ray.

Then we repeat the first two steps again to get the second tier of a large ray - exactly the same as the first.

It remains for us to make a tip for this ray, and then bring the wire to the base of the ray. We use the same technique as in the 3rd step when weaving a small ray: we collect one piece of glass beads and one small bead on the wire,

we hold the bead and pass the wire in the opposite direction through the piece of glass beads from the last set, after which we immediately pass the wire sequentially through two pieces of glass beads that make up the axis of this snowflake ray.

Gently pull out the wire - the second ray of the snowflake is ready.

Again, to continue weaving, we pass the wire through the nearest segment of glass beads, located along the perimeter of the middle part of the snowflake, in the direction of its free part.

Several master classes on weaving snowflakes. By making snowflakes of various types, as well as using beads and glass beads of different colors for them, you can create a real fabulous snowstorm!
P.S. Don't want to miss our new master classes?
A large selection of snowflakes with beads.Many different snowflakes and their weaving patterns
Flat snowflakes
Snowflake number 1
The snowflake is made of gold and pearl-pink beads with a diameter of 4 mm. Carry out the product in accordance with fig. 21. When weaving the last rows of snowflakes, you can use a needle, since the hole in the beads is quite large. Be careful not to twist the wire, as small knots form and the wire breaks easily in these places. It is advisable to go through the last row twice so that the product is rigid enough and keeps its shape. When finished, the snowflake has a diameter of just over 7 cm. You can also use fishing line for weaving.
Finally, thread the gold thread through any of the outermost gold beads, tie a small knot, after which the snowflake can be hung on the Christmas tree.
1st row dial 16 beads, alternating through one gold and pink beads. Close the beads in a ring (Fig. 21, a).
2nd row - consists of 8 beams, 3 gold-colored beads in each beam (Fig. 21, b, c, d).
3rd row - also consists of 8 rays and each with 5 pink and 3 gold beads forming a pico (Fig. 21, e, f, g, i, i).
4th row - just like the second row, consists of 8 rays but 3 gold beads in each (Fig. 22, k-l).
Snowflake number 2
This snowflake is made of gold beads with a diameter of 4 mm and 2 mm and pearl pink with a diameter of 4 mm. How to make a snowflake is shown in fig. 22. In finished form, this product has a diameter of 9 cm.
1st row - type 4 gold beads and lock them into a ring (Fig. 23, a, b).
The 2nd row consists of 4 pink beads (Fig. 24, a, 6).
The 3rd row has 4 rays, each of which consists of 5 pink beads (Fig. 25, a-c).
The 4th row also consists of 4 rays, 3 gold beads each (Fig. 26, a. b).
The 5th row is formed by eight beams, each of which has a pico of three large beads and three small beads. In this? / 1 row, all the beads are golden (Fig. 27, a-e).
The 6th row has 8 rays, 3 pink beads each (Fig. 28, a-c).
Large selection of snowflakes, 9.9 out of 10 based on 31 ratings http://biserok.org/bolshaya-podborka-snezhinok/
Christmas snowflakes
For work you need to take:
Gold and blue beads
- blue crystals 5 mm
- golden beads 2 mm and 4 mm in diameter
- golden glass beads
- fishing line
Snowflake weaving pattern:
small snowflakes
To make a snowflake (Fig. 11) you will need about two low beads, here you can combine artificial beads with gems. You will also need brass or copper wire.
Work description
Put eight beads on a wire about 50 cm long, leave a piece of wire about 10 cm long on the left side. Connect both wires together so that a loop forms from the beads, and twist the wire around the beads by 1-2 mm.
String 6 beads on the working end of the wire. Pull the wire in the opposite direction through the first of the 6 beads and pull it tight. Pass the wire through the next bead of the inner ring and string 6 beads again (fig. 12).
Continue in this way until you have eight heifers (Fig. 13). Finally, connect both ends of the wire together, twist them and cut off the excess. Such a snowflake, like all subsequent ones, can be used as an independent decoration and as an element of pendants and garlands (Fig. 19).
On the basis of this snowflake, a number of new ones can also be made if the size of the beads is partially changed (Fig. 14, 15) or the number of beads is increased (Fig. 16, 17). You can combine snowflakes into one garland and decorate a window or a Christmas tree with it (Fig. 18, 19).
Several options for weaving snowflakes
Such beautiful and uplifting snowflakes that will perfectly decorate and prepare your home for the new year. They will create a mood and fill the place around them with a fairy tale!
To weave these snowflakes you need to take:
White matte beads #10 or 12
- blue matte beads of the same number
- blue matte beads for the middle of the snowflake and accents
- fishing line, wire, depending on what is more convenient for you to weave
Snowflake weaving pattern:
Each of these snowflakes starts from the center. You need to weave a round base, the same for three, and then complete different branches and snowflake crystals for each. The diagram clearly shows the movement of the thread, the number of strung beads is not always indicated, but you can peep it on the photo of the finished snowflakes.
Some more beautiful snowflakes
Unlike previous snowflakes, this one already uses a more diverse material.
What you need for weaving:
white bugle
- pearl beads 3 mm, 4 mm and 5 mm in diameter
- white beads №10
- blue beads or beads No. 10
- gold beads or beads No. 10
- blue bicone crystals 4 mm in diameter
- wire and line
Snowflake weaving patterns:
All four of these snowflakes are woven differently. Following the pattern, you can repeat the weaving process. And decorate the Christmas tree with them.