Watch how to make crafts from rubber bands. Crafts: Rubber band bracelets (Looming Bracelet)
Products created from multi-colored rubber bands for weaving amaze with their beauty. This article will tell you how to make crafts from elastic bands for weaving with your own hands. The master classes provided will tell you in detail how to weave products using various techniques and materials.
rainbow miracle
The appearance of rainbow elastic bands and a loom for weaving was facilitated by the desire of the father to support the creative impulses of his daughters. Chong Chun Ng wanted to help his daughters weave colorful baubles, but the men's hands were not suitable for this activity. Then the father decided to use his technical education and made a little thing that helped him to weave a lot of beautiful bracelets for his daughters. The idea consumed the inventor, and he invested all the family assets in the production of the first batch of Rainbow Loom sets, which consisted of multi-colored elastic bands, a hook, a loom and a slingshot for weaving.
However, people did not appreciate the invention and were in no hurry to buy kits. They just didn't know what to do with it. Chong asked his daughters to make several master classes on how to weave on his loom and upload videos to the global network. After that, the rubber boom began. Sets began to sweep off the shelves of stores.
While Rainbow Loom was originally conceived as a toy for children ages 7-12, adults couldn't resist either. Now masters have learned to make amazing things from this material. Various toys, key chains, souvenir figurines of animals, doll things and, of course, bracelets that everyone loves - this is not a complete list of handicrafts made. Some even make exclusive outfits that are sold at auctions for insane prices. For example, the dress in the photo was sold for 170 thousand pounds.


Work techniques
In the Rainbow Loom set, in addition to rubber bands, there are accessories for weaving - a hook, a slingshot and a rainbow loom. However, needlewomen are often not stopped by the lack of necessary materials, and they have come up with new ways of weaving.
For example, lumigurumi has its origins in crochet. With this type of weaving, you can create wonderful voluminous toys, clothes and accessories. You just need to follow the scheme and everything will work out. And a short video tutorial will tell you how to make crafts using this weaving technique.
In addition, you can weave:
- On fingers;
- On pencils;
- On a comb;
- On table forks.
As you can see, the presence of a machine is not at all a mandatory item on the list of those who want to learn how to weave from rubber bands.
"Fishtail" on the fingers
The simplest pattern for weaving is the fishtail, and it can be performed without a loom, with the help of fingers. The length of the chain depends on what you are weaving it for. You can use such chains as a bracelet, belt for a dress, a cord for hanging keys. So, for work you need to take:
- Rainbow rubber bands;
- S-shaped clasp.
This master class will tell you how to make a bracelet with a fishtail pattern. Twist the elastic band into a figure eight and put it on the middle and index fingers. Add a second iris, no need to twist it. Now you should alternately throw the bottom row into the center. Take the bottom loop on your middle finger and drag it through the elastic and through your finger, repeat with your index finger. Further, weaving continues by adding one elastic band and dropping the bottom row of loops in the middle. Having reached the desired length, you should carefully remove the loops from your fingers and fasten the fastener on them. The lightest rubber bracelet is ready.


Bracelet "Caramel"
This bauble is woven using a special tool - a slingshot for weaving. Using a step-by-step lesson, you can easily repeat this work. For the bracelet you will need:
- Rubber bands in two colors;
- Clasp;
- Slingshot;
- Hook.
Fasten an elastic band of color A in the form of a figure eight on the slingshot. Throw an elastic band of color B straight. Then, again straight iris color A.

Pry the lower elastic band from the left horn and throw it off to the center.

Transfer the upper iris from the left column to the right.

Move the lower rubber band of the right pin to the center.

Return the top elastic again to the left column.

Place the color B rubber band on both pins of the slingshot

On the right tooth, you need to crochet the bottom loop through the middle one.


Transfer the upper iris from the right column to the left and lower the lower rubber band. Don't forget to put the top rubber band back in place.


Alternately repeating the steps, weave a bracelet of the desired length on the slingshot. To complete the weave, put one elastic band on the pins of the slingshot and lower the lower loops to the center. Pass the clasp through the remaining two loops.


Bracelet "caramel" is ready.

Intricate weaving
The loom for weaving is a small platform with removable posts mounted on it. They can be swapped and moved. There is a small notch on each column of the loom designed for easy insertion of the hook.
On the machine, as a rule, complex and voluminous work is weaved. But you should adapt, and even this tool you can master.
We invite you to study a few video tutorials to visually see how to work with the invention of Chong Chun Ng.
Video on the topic of the article
At the end of this article, you can watch several videos with workshops on making various crafts from rubber bands for weaving.
Rainbow Loom Bands, or weaving from elastic bands, is a newfangled trend in children's creativity. It is so fascinating that many adults liked it. On sale you can find a lot of similar sets from which you get bright and unusual crafts from rubber bands with your own hands. Let's look at the most original and easy master classes of this amusing creativity.
The simplest bracelet
First of all, we will consider the basic master class in stages without a machine in order to understand the principle of work and learn the basics of this type of needlework.
Necessary materials:
- Multi-colored rubber bands;
- Hook.
Work process:
- We put three elastic bands on the index and middle fingers of the left hand. The first is twisted into a figure eight, the other two are simply dressed.
- Now, with the help of a hook, we remove first from one finger, and then from the other part, so that it hangs on the top two.
- Continue weaving further and you will get a wonderful craft.
Step by step video tutorial of a simple rubber band bracelet
Simple bracelet "French braid"
Such weaving on a slingshot has already become a classic. It is simple enough for a beginner. And the combination of colors gives full scope to fantasy and imagination.

Necessary materials:
- Rubber bands. The most interesting are variations consisting of two concisely combined colors;
- Slingshot;
- Hook;
- S-shaped clamp.
Work process:
- We take our miniature machine with recesses towards us, put an elastic band on one ear, twist it and put the second part on the second ear. So we got weaving in the form of a figure eight.
- We put on two more, different colors. Weaving will be more beautiful if the colors in it alternate alternately.
- We hook one part of the first twisted one, and remove it to the center. We do the same with the second part. We put another one on top of it.
- In a similar way, we remove one part of the blue on the right side, and on the left pink, put on another one.
- Now we remove the bottom blue rubber band on the left and on the right of the same color to the center, and add another one.
- Move the third to the center right and the second to the left.
- In this way, continue weaving until you get a wrist-length bracelet.
- Fasten the clasp. Your craft is ready.
Video instruction on how to make a rubber band bracelet for beginners
Bracelet "rainbow stairs"
Let's look at another workshop on weaving a bracelet on a loom - it can become beautiful. But now we need not a slingshot, but a large collapsible machine. It will also need black rubber bands for the core and multi-colored ones for the sides. A more interesting option is if you take rainbow shades.

Work process:
- Correctly position the machine. We turn the concave part to the left side, and push the middle row forward one column.
- We take the red one and put it on the first columns of the central and side rows. We do the same with the second one.
- Now we take an orange elastic band and dress it. We do the same on the opposite row. Thus, we dress them to the end of the machine. It is important to observe the color sequence of the rainbow.
- We complete the weaving in the same way as we started.
- Now we form the central transverse color row, for this we put on elastic bands. It is important to keep the color consistency.
- We turn to the beginning of weaving, and we put black on the central columns, to the very end. We twist the last two times.
- With a hook, gently move it aside, pull the second one out from under it and pull it onto the front column. We do this until the end of weaving.
- On top of the resulting black loops, we put on colored elastic bands again.
- We return to the beginning of work. We pry off the red part, which is dressed on the central column and move it to the side. We do the same with the second red.
- We hook the colored ones, and throw them on the front posts. You should get the same droplets as black.
- We take the black one and string it in this way on all the elastic bands of the first central column so that both ends of it are on the hook.
- Fasten the clasp and remove from the machine.
- Leave the last weaving loops from the other end on the hook. So we got the main pattern. Now you need to add another pigtail to it so that you can wear it with a bracelet.
- We dress 7 black ones and move our weaving to the loom.
- Weave a chain similarly to the basic pattern. We change clothes from the previous column to the front. When the work is finished, we fasten the clasp, and that's it, the craft is ready.
Bracelet with beads

To make such a simple bracelet you will need:
- Solid rubber bands;
- beads;
- Clasp.
Work process:
- We pass the rubber band through the bead.
- We put it on our fingers, twisting it with a figure eight.
- We put on an elastic band with a bead and move both parts of the bottom to the middle.
- We put on an elastic band with a bead and move it to the middle. Thus, we complete the crafts to the end and put on the clasp. The bracelet is ready.
Fork bracelet

To make such an accessory you will need:
- Colored rubber bands;
- Fork.
Work process:
- We twist the folded elastic band into a figure eight on the middle teeth.
- We also put on the second, but only on the two extreme cloves.
- The third is also only on the second extreme teeth.
- Crochet the bottom move up.
- We dress folded in half on the central teeth.
- We throw the extreme rubber bands up.
- We continue weaving in the same way with other colors to the desired length, attach the fasteners. The craft is ready.
Crocheted Butterfly Earrings

To make such beautiful earrings you will need the following materials:
- 2 colors of rubber bands;
- Hook;
- Accessories.
Work process:
- We put the elastic band of the base color on the hook, making four turns.
- We hook two elastic bands to the tip of the hook and carefully change the first one onto them.
- It turned out two loops, which we put on the hook.
- We perform the previous operations and get exactly the same component.
- We put two elastic bands on the head of the hook and throw both fragments on them.
- We dress both loops on the hook. Got some wings.
- Do the same for the second wings.
- We put one on the head of the hook, on which we move the wings. We put the loops on the hook and drag one through the other.
- Take a different color and wrap the middle on both sides.
- Butterfly is ready. It remains to put on crafts for accessories.
Another option for weaving butterflies
gold fish

To make a goldfish with your own hands using a hook, you will need:
- Yellow elastic bands and 2 black ones;
- 2 forks glued with adhesive tape;
- Hook.
Work process:
- We put the first gum on the two extreme teeth in three turns. We dress the second one in the same way.
- We also dress the next one in three turns, but already for two forks.
- We hook the bottom three rows and drag them to the middle of weaving. So we get the first bow.
- We put on two more cloves on the same cloves, and move them to the center of weaving.
- Repeat on the other side of the fork.
- We put it on all the teeth of the front fork.
- We repeat the previous steps.
- For the body of the fish, you will need to weave four more rows.
- We take black ones, and put them on four turns on the middle teeth for each fork.
- We repeat the weaving, but first we throw the yellow ones in the middle, and then the black ones.
- Weave another row.
- Now we take one elastic band, but we perform the same actions, as a result, the last two loops will remain. We transfer all the loops to the central teeth of the rear fork and complete the work. The original craft is ready.
Weaving from rubber bands at the peak of popularity. Sets with colorful rings are sold everywhere, girls' hands are hung with intricate bracelets, and backpacks are decorated with dangling figurines. It's all rubber.
Where did rubber weaving come from?
Loom Bands (rainbow loom) literally translates as a rainbow on a loom. Indeed, the bright bracelet resembles a rainbow, and the weaving process echoes the weaving skill. The newfangled hobby came from America, where it is difficult to seat children for needlework. They needed to be interested and show how interesting it is. American children quickly became imbued with the ideas of weaving and began to fantasize with might and main, inventing unusual combinations. Most importantly, rubber bands could be worn, decorate clothes, dress dolls, and finally give to bosom friends and girlfriends. Gradually, weaving from rubber bands took root with us, bright posters could not go unnoticed by young fashionistas. The low price, excellent training for the development of motor skills, perseverance, and most importantly, the child’s sincere passion for the process itself made weaving from rubber bands popular with us.
Who is it suitable for?
This hobby is suitable for everyone, especially for elementary and middle school students. Both boys and girls enthusiastically invent new patterns of weaving, sitting out the changes and free time in quiet negotiations with friends engaged in the same business. The optimal age for weaving crafts from rubber bands is from 7 years old.
What are the machines for weaving rubber bands
In order to weave various baubles and figures, several devices are needed. Firstly, this is a set of multi-colored silicone rubber bands, which are different both in texture and in properties (glowing in the dark, wavy, dense, thin, with openwork edges). The simplest weaving tools are a plastic slingshot with two or more teeth and a crochet hook. 

The role of a slingshot can be performed by improvised devices - these are two pencils, a table fork and just two fingers. The hook can be replaced with an ordinary knitting hook, although experienced craftswomen say that a plastic one is more convenient. For more complex weaving options, there is a special machine, this is a transparent plastic base with several rows of posts.
 Additional materials are various pendants, beads, key chains that are woven into the craft.
What bracelets can be made from rubber bands
According to the level of skill and the number of rubber bands used, bracelets are simple and complex. It is better to start weaving training with light bracelets, the most elementary option is a single-loop bracelet that can be crocheted with one hook: the rubber band is bent in half and the next elastic band is threaded into the two loops formed and again bent in half and so on. Having mastered this weaving, you can move on to the “French braid” or “” patterns, which are woven on a loom or on a slingshot.
 In order not to get confused at first, it is better to take rubber bands of two contrasting colors and arrange them in order: 1st eight, 2nd straight, 3rd straight, then both ends of the 1st rubber band are removed and crocheted to the middle. The 4th elastic is put on, and the ends of the 2nd are removed in the middle. In weaving "", the removal of rubber bands goes in the following order: both ends are removed to the middle, and then the lower elastic band is removed in turn from one edge, and the middle elastic band (of a different color) from the other edge, then a new elastic band is put on and so on.
Complex patterns are woven on the loom. Here you can use both just two rows, and all the rest. The favorite pattern of all fashionistas is a bracelet made of rubber bands "hearts". The essence of weaving is as follows. The 1st rubber is dropped to the middle, the 2nd moves to the right, the 3rd to the middle, the 4th to the left, the 5th is put on. For such a bracelet, it is better to use red or pink elastic bands.


How to weave animals from rubber bands
To create funny figures, you need a machine. It is enough to learn how to weave one figure according to the scheme in order to understand how the rest are made. And then only your own imagination works. For example, a three-row loom is used to weave a snake, you can add a few rubber bands on the side to create a cobra hood, and make the eyes separately from a dark color. 
It is more difficult to make a turtle - this is a laborious process, but you can be proud of the result. The turtle can be woven on the loom, arranging the rubber bands in shape, highlighting the paws, head and shell with separate colors, or you can crochet, ordinary circular knitting, knitting all parts of the body with a solid pattern on the hands. 
To create a panda, you will need black and white and a three-row loom. We collect the silhouette of the panda, making the head and paws black, and the middle white. Then we crochet the second and third layers, thickening the figure and making it more voluminous. 
On our website there is a detailed master class on how. This wise bird is very popular among young needlewomen. 
How to weave key chains and toys from rubber bands
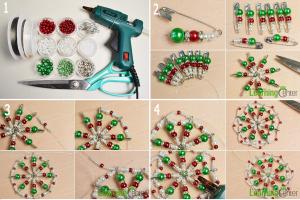
For weaving jewelry, one technique is used. With a simple crochet, rubber bands are strung with ordinary rings and fastened in the center, the more flowers, the more colorful the decoration resembling a flower will turn out. Such an accessory can be used for a hairpin or for a bracelet. 
The popular hobby for weaving bracelets from rubber bands has already captured many countries, and finally Loom rubber bands have reached Russia.
This article is a visual photo instruction on the main parts of sets of multi-colored rubber bands and accessories for weaving, as well as instructions for weaving a simple fishtail bracelet.
So, for weaving such bracelets we need:
1) multi-colored rubber bands.
2) frame for weaving.

This is also a frame for weaving. On it you can make a variety of bracelets, and even several bracelets at the same time.

But you can get by with a mini-frame (such a turquoise tube in the photo)
Still need 3) hook. It can be either metal or plastic.
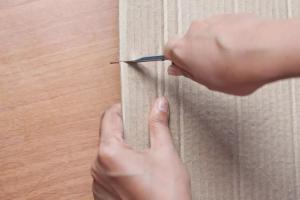
So, let's make a bracelet as in the first header photo in the bottom photo. It's called "fish tail", but I prefer to call it the Christmas Tree.
To do this, we need a mini-frame (you can even use your fingers or just a fork! I’ll show you how below), elastic bands (you can use 1-2-3-4 and so on, the number of colors. I will weave a 2-color bracelet), hook.

We put a rubber band on a mini-frame in this way - a figure eight.


And we put on the 3rd gum (I have the same color as the first gum).


Raise this loop up:

Then we take the lowest rubber band on the other side.

And we also go up:

Now we put on another new elastic band (I have a green one) - we alternate the color all the time to make it look beautiful. If you weave a monophonic one, then it doesn’t matter.

And again we take the lowest gum on one side, we wind it up.

And on the other hand, we do the same.
http://www..jpg
Again we put on a new elastic band and repeat all the steps again (we bring the lowest one on one side up and let it go, then on the other hand, again add a new elastic band and so we continue to weave).


When we have made the bracelet of the desired length, it must be fixed. Of course, you can just tie and tighten the elastic bands tightly. But these rubber bands come with such C- and S-shaped hooks:

We hook such a hook on one side of the bracelet. We take out the extra rubber bands:


Here's what happens:

On the other hand, we pull off one ring and find a full-fledged loop. For it we hook our C-shaped hook.

Like this:

And cut off the extra ring:

This is what the connection will look like:

Rubber band weaving is a new type of needlework. It appeared quite recently, however, quickly gained popularity among children and adults.
From small multi-colored elastic bands, which are easily purchased at a stationery store or where they sell hairpins, beautiful and bright decorations are easily and quickly obtained:
- bracelets;
- pendants;
- necklace;
- belts;
- rings, etc.
Thanks to a wide range of shades, elastic band accessories are unique, and each needlewoman will be able to find a color scheme to her liking.
There are various techniques for weaving rubber bands:
- Weaving on the fingers.
- Weaving on a loom or a small loom.
- Weaving on a fork.
In these techniques, both simple patterns are woven, which even a child can handle, and more laborious ones.
What is needed for weaving rubber bands?
For weaving, in addition to the elastic bands themselves, you will need the following tools:
- .hook (take a simple crochet hook No. 3-4 differs from the special one in head size and rounding);
- .weaving machine - can be of various modifications with 2 or more rods for fixing elastic bands;
- .usual table fork;
- rubber bands, they are in bags and a plastic hook comes with them, sometimes with a slingshot - this is a small machine, as in the photo below.
The set of tools may vary, depending on the chosen technique.
On the Internet, it is now easy to find a huge number of workshops on weaving rubber bands. Many of these lessons are provided with detailed descriptions and video instructions in Russian.
Basic weaving pattern
In order to learn how to weave from elastic bands, it is best to start with the simplest basic pattern that does not require special tools. One of these patterns is the chain pattern.
The chain weaving process consists of the following steps:
- We put on an elastic band twisted in the form of a figure eight on the index and middle fingers;
- We do not twist the next elastic band, but simply pull it next to the first one;
- We remove the first elastic band from the fingers, threading it onto the last one;
- So we continue until the product of the desired length is obtained;
- At the end of the weave we attach an S-shaped fastener.
Rubber bracelet "flower"
This model of the bracelet is also woven without using a loom. For work you will need:
- pencils - 3 pcs.;
- hook;
- clasp;
- colored rubber bands green-36, orange-12, pink-24, purple-12 and red-7.
Weaving a bracelet with a flower takes place in two stages:
- Flower making. Weave 6 petals from orange, pink and purple elastic bands. The weaving of flower petals is based on the “chain” pattern discussed above. We connect the petals of the flower, stringing them on a red elastic band and fixing them with green.
- Making the base of the bracelet. Weave a tourniquet with a fishtail pattern, starting with the first green elastic band of the flower.
For such weaving, we put on two pencils a twisted elastic band, and on top we string two more not twisted. We remove the first elastic band and stretch it through the last two. So weave until the desired length is reached. We connect the ends of the bracelet and fasten them with a clasp.
For more details on the process of making a bracelet with a flower, see the next video tutorial in Russian.
Bracelet made of elastic bands on the machine
Such an original decoration is not difficult to make. We will need:
- weaving machine;
- hook;
- elastic bands of two or three colors (imagine a bracelet in what order you want to see it, so spread out the rubber bands);
- clasp.
The first step is to decide on the sequence of colors in the picture. For a sample, lay out the rubber bands in the desired order and refer to it as you work.
- To start weaving, we will stretch three elastic bands on the adjacent columns of the machine: twist the first elastic band with a figure eight.
- We put on the next two as is.
- Next, crochet the bottom elastic band and thread it through the other two.
- Then we put on one new rubber band, and remove the bottom one in the same way. So we will continue until the end of the work, and then we will connect the ends of the resulting bracelet with a clasp.
Bracelet made of rubber bands on a fork
The iris bracelet is a classic version of weaving on a fork. For work you will need:
- fork;
- elastic bands of all colors of the rainbow;
- thin hook.
- At the beginning of weaving, we fold the first elastic band in half and, twisting it with a figure eight, we put on the two central cloves of the fork.
- We pull the next two elastic bands in pairs on the left and right teeth in the same way.
- Now we remove the initial rubber band, while stretching it from above the central loops. To prevent the rubber bands from slipping, we move the entire canvas down the fork.
- Then we place the folded in half, but not twisted elastic band on the middle pair of teeth, and remove the previous row on top of it.
Thus, we alternate:
elastic band in the center;
rubber bands on the sides.
For each color, repeat two or more rows.
To complete the weaving of the product, we throw the loops from the extreme cloves of the fork through the central ones, and then the lower ones through the upper ones. On the remaining 2 loops in the center, we put on the last ring folded in half and stretch the loops through it. It remains to throw one loop over the other and fasten the weaving with a clasp. The bracelet is ready!
Panda rubber band decoration
In addition to bracelets, other accessories are also woven from rubber bands. The next video tutorial details how to weave a keychain in the shape of a funny toy. Weaving a panda keychain requires initial training, so it should be taken after training on simple jewelry.
Panda
In this article, a variety of patterns and techniques for weaving rubber products were considered. However, this is only a small part of the whole variety of options. By using different color schemes and applying a creative approach to the process, you can easily master or come up with more complex patterns yourself. an article with photos and videos will illustrate in detail different products and options for their creation.
Insects and animals, birds and rings, necklaces and amphibians. How to weave such things and on what: a loom, fingers, without a loom is easy to repeat in a video.
Weaving from elastic bands will be interesting for both teenagers and adult lovers of needlework. In addition, this hobby is exciting and useful for children, contributes to the development of fine motor skills and perseverance.
Happy crafting!!