How to make a beautiful quilling postcard? Master class on making postcards in the style of quilling. Christmas quilling balls - a piggy bank of ideas! New Year's cards in quilling style step by step instructions
New Year's card in the technique of quilling "Herringbone".
Master class with step by step photos.
Ovchinnikova Svetlana Alexandrovna, teacher of OGKOUSh No. 39, Ulyanovsk.Appointment. Making a gift with your own hands.
The master class will be useful for children of senior preschool and primary school age, educators, teachers. The material will be of interest to everyone.
Target: creating a New Year's card with your own hands.
Tasks:
- continue to introduce the quilling technique, create elements - “drop”, “triangle”, “washer”;
- development of fine motor skills of hands;
- formation of interest in creative activity;
- cultivate aesthetic taste, accuracy in work.
New Year, garlands shine
And the balls are swinging
Let both adults and children
They will be happy and kind.
May good gifts
Santa Claus will bring everyone
And let the whole year be bright
What a fun round dance!
(Author: Stepnova Arina)
Postcards are always a great addition to a gift. And if these postcards are made with your own hands, then the value of the gift rises to heaven, because the soul of the donor, his good mood and sincere wishes are invested there.
Materials:
- blue pastel paper 15x30 cm (density 160 g/m2);
- scrap paper - a square with a side of 15 cm (you can print a beautiful background on watercolor paper);
- a piece of paper for watercolor or drawing paper;
- green quilling paper width 2-3mm, red, light and dark yellow, stripes width 5 mm;
- quilling tool;
- a simple pencil;
- scissors manicure and curly;
- figured edge puncher;
- ruler-stencil with circles of different diameters;
- PVA glue carpenter;
- creasing (you can use a non-writing core of a ballpoint pen);
- half beads;
- silver-blue ink pad and "Congratulations" stamp;
- cutting - frame;
- and most importantly ... good mood!

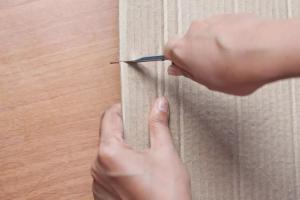
Cut a 15x30 cm rectangle from a sheet of pastel paper. This is the basis of the postcard. For an even fold in the middle, go through the creasing and fold in half.

Pass a square of scrap paper with a side of 15 cm with a figured edge hole punch. If it is not there, then a beautiful edge can be created using curly scissors. In this case, the size of the square will be 14.5 cm.

Glue scrap paper on the front side of the card with PVA glue, placing it in the center. And put under pressure. You can use double-sided tape when sticking scrapbook paper. This glue is thick, quickly and firmly glues.

From a sheet of white office paper, measure a square with a side of 13.5 cm.

Cut off a 13.5 cm square with curly scissors. Thus, you get 2 even edges and 2 curly ones.

Glue on the inside of the back of the postcard. This will be the place to write your congratulations. You can decorate a branch with a stamp (as a gift while I was preparing the MK, so it is not in the photo with the material).

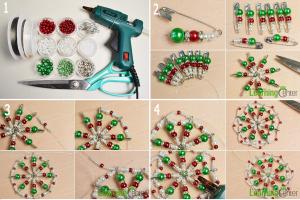
To create bells, you will need 6 strips, 5mm wide for each. Glue the paper tape in this way: 2 dark yellow + 2 light yellow + 2 dark yellow.

Using a special tool, twist a tight roll, glue the tip. Roll the second roll in the same way.

Gently extrude the roll, giving the desired shape. Fill with plenty of glue. And leave to dry. I used the ruler to take pictures.

For a bow, you will need 3 red stripes 5mm wide. Using a quilling tool, twist a roll from one strip and dissolve to 12mm. Make 2 parts.

Give the roll a “drop” shape, and then, holding the tip with your fingers, press the base of the tool (brush) on top. You get a triangle shape.

Twist a tight roll from the third strip, pour plenty of glue. This will be the knot of the bow.

To create a Christmas tree, you will need 36 strips 2-3 mm wide. (I had strips cut from office paper 5 mm wide. I cut them in half along the long side.) Roll a roll from a 30 cm long strip and dissolve it to 12 mm. Glue the end.

Give the roll a drop shape.

Lubricate all parts with plenty of PVA glue joiner and allow to dry. A transparent film is formed from the glue, which prevents the roll from crumbling. And gives flexibility.

Christmas tree assembly. Decide on a location for the tree. Glue the bottom row of 8 parts first, in the form of a small arc. Glue is applied to the workpiece. For preschoolers, you can draw the top line of the row to make it easier to navigate.

Then glue the second row of 7 parts, placing them between the details of the first row, sticking a little on top of the lower parts. Like this.

Each next row will be one piece less. Glue them in the same way as before. Thus: 8-7-6-5-4-3-2-1.

Continue assembling the postcard. Glue the bells on the PVA glue joiner, placing them side by side.
F21

Decorate the bells with a bow by gluing the details, corners to each other. Glue a "knot" over the joint.

Trace the “frame” cutout on a piece of paper for watercolor or whatman paper using a creasing tool. Cut out with nail scissors.

Go through the edges of the cutting with a stamp pad of a suitable color. The ink pad can be replaced with watercolor paint by applying it to a sponge or foam rubber.

Stick to the chosen place.

Pass the ink pad over the stamp "Congratulations".

Place an imprint on the cutting. Be careful with this!!! You can put an imprint in place for congratulations.

Supplement the decoration with half beads using PVA glue joiner: in the corners of scrap paper and above the Christmas tree.
Crafts for the New Year always bring joy. And it does not matter whether you make a large panel with a beautiful landscape or present a miniature postcard with an embroidered picture - all the same, the recipient will be incredibly happy that you paid attention to him.
Everyone understands that a homemade present is much better than a store bought one. In any case, it is several times more pleasant. Today we want to introduce you to one interesting way that allows you to make amazing New Year's gifts in just a few minutes.
Crafts in quilling technique for the New Year 2017 will allow you to feel an indescribable calming effect, and will also be able to please all the guests gathered at the celebration.
What is quilling?
For those who do not know what the quilling technique is, I would like to take a short digression. This type of needlework is considered very simple, but at the same time, very beautiful. Quilling does not require expensive tools and materials. All you need for work is a good mood, an interesting idea and time.
During the creation of compositions, paper strips with a width of 3, 4, 6 and 10 mm are used. There may be several twisting devices.
There are professional twisting machines, which are sold in specialized stores, as well as improvised tools, such as a tapestry needle with a large eye and a round wooden stick 10 cm long.
It is also advisable to stock up on tweezers with flat tips. It is needed in order to hold the paper blank, apply glue to it and stick it to the surface.
As for other devices that are necessary for working in the quilling technique, they can be found in any home. These are scissors (preferably with sharp ends), a ruler, toothpicks, PVA glue.
If you decide to seriously engage in this type of needlework, then whole sets are sold in stores, which include all the necessary tools and you do not have to collect them separately.
Quilling craft ideas for the New Year
When deciding to make such a New Year's surprise for someone close to you, you must understand what or whom you will glue from strips of paper. There are a huge number of thematic crafts on the Internet and sometimes it’s hard to understand which one you like best.
Among such an abundance, you can choose the main "figures" that you might like - these are Christmas trees, snowflakes and cockerels. The last craft will be not only a wonderful, but also an appropriate gift, because 2017 is the year of the Fire Rooster. So your Petya, made using the quilling technique, will become a pleasant Christmas tree.
"Bright Cockerel"

It would seem impossible to create such wonderful pictures and figures from ordinary strips of paper. But as practice shows, the main thing is perseverance and a little imagination, and the rest is up to the small. If you decide to make a cockerel for the New Year 2017, then choose the perfect example for yourself (the photos are presented below), stock up on all the necessary materials and get down to business.
Examples of how to make a New Year's rooster can be found in any format and size. It can be both free-standing figures and the silhouette of a bird.


There are quite a few basic quilling shapes that help you create real paper masterpieces. The picture clearly shows how this or that curl should look.
Dare! You will succeed, and after a while you will be able to present a cute panel or a wonderful picture with a cockerel in the title role.
original snowflake

The most common decoration at the New Year's holiday are snowflakes. We hang them on the Christmas tree, draw or sculpt them on the windows, make garlands out of them. Why not go beyond the usual limits and create wonderful winter compositions based on the quilling technique?! Put in a little effort, and you will have beautiful openwork snowflakes at home, which, moreover, you can give to friends as a keepsake.
To create a Christmas snowflake you will need:
- special paper for quilling;
- scissors;
- ruler;
- stationery knife;
- toothpick.
Step 1. Cut strips of quilling paper 25-27 mm long, 3-5 mm wide.


Step 2 Take a toothpick - it will be your main tool in this work. Cut off the sharp tip on one side and make a small incision with a clerical knife - about 1 cm.
Step 3 Insert the first paper strip into the notch and slowly twist it into a spiral. Make sure that the paper is curled, and not just a toothpick. In this case, there is no need to rush, because then the craft may not work out.
Step 4 The finished spiral must be removed from the toothpick and placed on a flat surface so that it unwinds slightly.
Step 5 Apply a little glue to the end of the strip and glue the spiral.
Step 6 To make one snowflake, you must follow the same principle to make several similar curls of different shapes and sizes.
Step 7 Fold the resulting spirals into a snowflake, carefully gluing each part.
Volumetric Christmas tree

This bright New Year's composition can be an excellent table decoration, as well as a wonderful gift for a loved one, colleague or relative.
To create a voluminous Christmas tree you will need:
- scissors;
- quilling paper;
- ruler-pattern with circles of different diameters;
- PVA glue;
- toothpick;
- tweezers.
If you don't have a quilling tool, an ordinary toothpick with a cut end can easily replace it.
Step 1. To work, take special green paper and cut it into several dozen strips 3 mm wide, and also cut brown paper into strips 7 mm wide.
Step 2 Brown stripes need to be wound into loose curls, for example, on a regular marker. Lubricate their ends with glue and glue. Brown "barrels" are ready!
Step 3 Now you need to make green blanks. Wind the paper around the awl (toothpick) and insert it into the ruler of size 16. Let me loosen up. To remove the curl from the ruler, you need to insert a toothpick into the center, slightly move to the center and remove.
Step 4 Glue the end of the spiral with PVA glue. Squeeze the curl lightly so that it takes the form of a droplet. Prepare 10 such drops. Wrap each curl with a white strip of the same width and glue it. This is the first row of the Christmas tree.
Step 5 We make the second row according to the same principle, only insert it into a circle at number 15. Twist 10 such curls. Glue the first two rows, as shown in the photo.
Step 6 Now make spirals for the third row by inserting them into the hole at number 14. Glue.
Step 7 For the fourth row you will need a circle, size 13. The same size must be taken for rows 5 and 6. Glue all the details carefully to each other, as you can see in the photo. Glue another "drop" to the top. Decorate the Christmas tree with beads, and it's ready!
Quilling is the true art of paper twisting. The word quilling comes from the English word quill, which means a bird's feather. Paper rolling is liked by creative people who can create a real masterpiece from ordinary multi-colored paper.
The quilling technique is based on the use of paper strips that are wound onto a thin rod, needle, or tube. Previously, a goose feather was used for this, now inexpensive and affordable materials are on sale. Beginners can quickly and easily learn the paper rolling technique, the main thing is diligence, accuracy and imagination.
Tools you need to master quilling
To learn quilling, you do not need to invest in expensive equipment and materials. Stock up on colorful paper and learn a simple twisting technique. Simple manipulations of the hands will allow you to make beautiful figures and patterns.
For quilling you will need tools:
- Paper. It is cut into long strips of different widths. There are also machines designed for cutting. Keep in mind that regular paper on the rib side gives white, so you will need special paper for quilling;
- A pen. Instead, you can use a needle, a match, a drinking tube, a rod;
- Sample. It is represented by a ruler with circles of different diameters;
- Tweezers. It is recommended to give preference to tweezers with a sharp end. It is designed for gluing individual elements that are difficult to grab with your fingers. It is advisable to buy a set to move and glue the figures;
- Glue. It is best to use PVA glue or a pencil for work. The glue must be transparent. Apply it a lot is not worth it, so as not to deform the paper.
The basic elements of technology for beginners
The technique of creating different elements in the direction of quilling involves the manufacture of simple blanks from multi-colored paper. To do this, you need to wind the strip on the base. After that, a tight spiral is dissolved. After that, the resulting element is given the desired shape, and the edge is fixed using glue.

The main figures of paper twist are:

Also, using the quilling technique, you can create objects in the form of a square, rose, oval and rhombus, and other elements. Simple figures allow you to create cute compositions for children.
To master quilling, there is no need to rush, all movements must be clear and accurate. Carefully study each element, creating a new figure. Thus, you can become a real craftsman and make wonderful crafts from multi-colored paper.
Using the quilling technique, you can create crafts of amazing beauty, decorate holiday cards, gifts and much more. With the approach of the New Year, interest in paper rolling is growing not only among beginners, but also among experienced craftsmen.
In this article, we have collected for you the coolest New Year crafts using the quilling technique, which can be done not only by experienced craftsmen, but also by beginners.
Snowflakes
Perhaps the most relevant New Year's quilling craft will be a snowflake. Twisted paper snowflakes can decorate windows, interiors, use them as Christmas decorations and even decorate a gift. In general, there are a lot of options for using a snowflake in the quilling technique, and there are even more ways to make it.
#1 Snowflake for Beginners
A simple quilling craft for beginners. Even kids can handle it. For manufacturing, you will need three basic elements: a tight spiral, a free roll and a drop. Ideal for those who just want to try their hand at paper rolling.

# 2 New Year's quilling craft: a snowflake from basic elements
The quilling technique is perfect for creating fancy snowflakes. Moreover, it is not necessary to use complex elements and curls, you can completely get by with the basic ones. The main thing is to turn on the fantasy.

#3 Snowflake in quilling style for the New Year
In this craft, in addition to the basic elements, open curls are also used. See photo assembly instructions below.

#4 Simple snowflake quilling for beginners
For beginners, a simple snowflake using eye elements, horns and a tight spiral will be an excellent option. We assemble a star from the “eye” elements, insert the “horns” element into the gaps between the rays, on top of which we glue a tight spiral. Voila! Snowflake is ready!

#5 Openwork quilling snowflake for more experienced crafters
And this version of the snowflake is suitable for more experienced craftsmen. along with the basic elements also various curls. See the detailed assembly below.

# 6 DIY snowflake for the new year
An openwork quilling snowflake can be made from basic elements (eye, drop) with the addition of horns. See below for detailed assembly instructions.

#7 Snowflakes from basic quilling elements
And another version of the snowflake using the quilling technique from the basic elements for beginners. You can find three options for crafts at once in the template.

#8 Christmas snowflake craft
To create such a snowflake, you will need: a tight spiral, an eye, a heart or an arrow, horns. See the sequence of connecting elements below.

#9 Quilling snowflake step by step tutorial
For such a snowflake, you will have to master the following elements: a tight spiral, an eye, a drop, horns, a heart. See the assembly sequence of the elements below.

#10 MK with a photo on creating a snowflake from twisted paper
To make such a snowflake, you will need the following elements: an arrow, a crescent, a heart, horns, a V-shaped element. See the connection sequence in the master class.

#11 DIY snowflake quilling
To create such a snowflake, you will need elements: a rhombus, horns, an eye. See the photo below for the assembly sequence.

#12 Fluffy snowflake: quilling master class
And here is the version of the fluffy snowflake. Of the elements you need to master: a rhombus, an arrow, a tight spiral, horns in different variations, a horseshoe. How to make elements and assembly diagram, see below.

#13 Easy Snowflake Quilling for Beginners
This is the kind of snowflake that a beginner craftswoman can make. Although not quite basic elements are used for creation, they should not cause any particular difficulties. Step-by-step MK with a photo, see below.

#14 Snowflake quilling: scheme for beginners
This snowflake is very similar to the previous one, but with the addition of a few simple elements. The more elements, the more openwork your snowflake will be.

#15 Snowflake in quilling technique
A more complex version of a snowflake for experienced craftsmen. The snowflake is made from a variation of the leaf element. See the detailed master class below.

In general, there can be a huge variety of varieties of snowflakes using the quilling technique. Having mastered the basic elements, as well as various curls, you can create your own masterpieces by combining elements with each other.
Christmas trees
Perhaps the most relevant New Year's craft using the quilling technique will be the Christmas tree. The forest beauty will look spectacular as a voluminous craft or as an element of decor for a New Year's card.
#1 Volumetric quilling Christmas tree
A simple voluminous quilling Christmas tree for beginners. For manufacturing, you will need to master two basic elements: a tight spiral and a drop. A tight spiral is used for the trunk, as well as decorative elements. The drop is used as spruce branches. Step by step MK look at the photo.

# 2 Christmas tree in quilling technique: do-it-yourself New Year's cards
To make such a craft, you will need: a long stick (for winding paper) and strips of paper in the shape of a triangle. You need to wind the strips starting from the wide end. Triangular strips should be of different sizes, so that in the end the craft resembles a Christmas tree.

#3 Volumetric craft tree quilling
And here is another version of a simple New Year's quilling craft for beginners. You will have to master only one basic element - a drop. The drop is not simple, but with a decorative white stripe along the edge. Additionally, the tree can be decorated with beads.

#4 Quilling spruce branches: making crafts for the New Year
If you belong to the category of those people who prefer to put not a Christmas tree, but spruce branches on New Year's Eve, then this craft will be an excellent alternative to real spruce paws. It looks very realistic, and even novice quilling masters can make such a masterpiece. See the detailed master class below.

# 5 Christmas tree quilling for children: making cards for the New Year
Here is such a simple craft you can make with kids on a cold winter evening. Grandparents will be delighted, and parents and children will have fun. How to do it - see below.

#6 Christmas tree with quilling decor
Minimalist lovers can try making a simple Christmas tree with quilling decor. For manufacturing, you will need: a cone (the base for the Christmas tree), a “bow” element and a cone. Look for a step-by-step MK with a photo below.

# 7 Volumetric Christmas tree a la quilling: doing New Year's crafts with children
It will be difficult for very young people to master real quilling. But we can simplify the task and make such a beautiful Christmas tree. Paper strips need to be cut

#8 Herringbone in quilling technique for experienced craftsmen
Complex Christmas tree in quilling technique for experienced craftsmen. For beginners, we recommend trying other works from our selection, because. You can spoil your whole impression of the new technology. See step-by-step instructions with photos below.

# 9 Herringbone quilling: do-it-yourself New Year's card
Quilling professionals will be interested in such work. Spirals and curls of multi-colored stripes fastened in different proportions to each other. See the step by step tutorial below.

#10 Christmas tree decoration in quilling style
Here is such a cute craft quilling Christmas tree can be hung on a forest beauty. Glue loose rolls together. We decorate the Christmas tree with multi-colored tight spirals and rhinestones. We fasten the rope and you can hang it on the Christmas tree!

#11 Quilling herringbone earrings
Fashionistas can make their own Christmas tree earrings. We make cones from paper strips (these are our Christmas trees). We decorate the top with a star, and the Christmas tree itself with beads or rhinestones. Instead of a hook, you can attach strings, then you get a New Year's toy.

# 12 New Year's quilling craft: making a voluminous Christmas tree
A simple quilling herringbone from a drop element. We make drops of different sizes, and then glue them in layers on top of each other. As a decoration for the top, we use a flower made from the elements of the "eye".

#13 Do-it-yourself voluminous Christmas tree made of twisted paper
Another kind of Christmas tree using the quilling technique from the “eye” element. We glue the flowers from the basic parts, and then assemble them into a pyramid, shifting each next layer so that the petals of the previous flower are between the petals of the top flower.

# 14 Herringbone quilling for beginners: do-it-yourself Christmas crafts
But the option of quilling Christmas trees for beginners. We will make the Christmas tree itself from spirals with a displaced center, we will use the “triangle” element as a leg, and a tight spiral for decoration.

#15 Do-it-yourself voluminous Christmas tree made of twisted paper
A voluminous Christmas tree made of paper spirals strung on a thread can be made even by the smallest. For manufacturing, you will need elements of different diameters and a thread. For greater strength, we recommend covering the spirals completely with glue so that they become frayed over time.

#16 Herringbone from paper spirals: step by step MK
Another version of the Christmas tree made of paper spirals. Unlike the previous crafts, we will string the pyramids at a certain distance from each other using ordinary knots to fix the elements.

#17 Christmas tree made of paper cones: do-it-yourself Christmas crafts
A decorative paper Christmas tree can be made using the quilling technique. For manufacturing, you will need tight spirals of different diameters. Next, we make cones from the spirals by squeezing out the core and string them on a thread starting from the smallest, i.e. from the top.

#18 Herringbone quilling for postcard decor
A New Year's card can be decorated with a Christmas tree from simple quilling elements: a drop and an eye. For a larger volume, the Christmas tree is assembled in two rows.

#19 Herringbone quilling with comb elements: master class
An ideal New Year's craft for those who want to learn new elements in the quilling technique. You need to wind the paper not on a thin rod, but on a comb. See the step by step tutorial below.

Snowman
Along with Christmas trees and snowflakes, a snowman will become an equally relevant quilling craft for the New Year. And indeed, who, if not a snowman, appears on the streets in winter. By the way, and if it just so happens that the New Year is about to come, and there is no snow on the street, paper snowmen will help create a New Year's atmosphere!
#1 Step by step snowman quilling tutorial
A simple New Year's quilling craft for beginners is a snowman from the basic “tight spiral” elements. For the manufacture you will need 13 tight spirals of different sizes, a cone for the nose and a semicircle for the hat. You can also additionally decorate the snowman with beads.

#2 Christmas quilling snowman craft
And here is another option for making a snowman using the quilling technique. You will need two off-center scribbles, beads for the eyes, and fluffy wire for a scarf and warm headphones. The kids will be delighted, and cute snowmen can be sent to the New Year tree.

#3 DIY quilling Christmas craft: making a snowman
And one more uncomplicated version of a snowman using the quilling technique. For a snowman, you will need a curl element (2 pcs), for a hat - a curl and an S-shaped curl, for a heart - 2 drops. Such a snowman can be used as an independent element of decor or you can decorate a postcard with it.

Christmas wreath
Although our Christmas wreaths are not a traditional New Year's decoration, lately, they have become more and more like the Western world, and our needlewomen want to make such a simple craft. Of course, you can’t hang such a wreath on the door, it’s too much effort you have to spend on making it. But decorating a postcard with such a craft or making a themed Christmas decoration is the very thing!
# 1 New Year's quilling wreath: a step-by-step master class
More experienced craftswomen can handle this quilling craft. For manufacturing, you will have to complete several elements: an eye (the base of a wreath), a tight spiral and a square (for decoration). Additionally, you can decorate the craft with a cord with small bells.

#2 Quilling wreath for beginners
A very simple craft for those who do not like to spend a lot of time on needlework. Despite the ease of manufacture, the craft looks very impressive. For manufacturing, you will need an element of the “eye” type, only without torsion. Collect a flower from the resulting ovals (1 flower \u003d 5 ovals). Next, collect 9 flowers in a large wreath and 6 flowers in a smaller wreath. Glue the smaller wreath on top of the larger one and voila! quilling craft for the new year is ready!

#3 DIY quilling wreath
And this craft is suitable for those who are ready to work hard. There are no complex elements in the craft, to create you will need standard details: a drop (16 pcs), an eye (7 pcs), a tight spiral (8 pcs).

#4 Quilling wreath earrings with photo step by step
A very simple craft, the creation of which beginners can easily cope with. The craft uses two basic elements: a tight spiral and an eye. The finished wreath can be used to decorate a postcard, and if you glue a loop from one of the edges and thread a hook for earrings, you get an excellent themed decoration for a New Year's party.

#5 Christmas quilling door wreath
Well, for the most diligent - a large New Year's wreath on the door using the quilling technique. Take note of this idea only if you have time to spare. You will have to work hard! You will need: wreath base, colored paper, scissors, glue and perseverance.

Christmas decorations
A special place in quilling is occupied by Christmas decorations. A Christmas tree decorated with handmade toys will create a special atmosphere. For those who have children, making Christmas decorations can become a real tradition, and after 15-20 years, you and your child will be able to look at the Christmas tree and remember with warmth every year you have lived, which you will be reminded of by those very homemade Christmas tree decorations. .
#1 Christmas quilling toy: Christmas candle
A simple quilling Christmas tree decoration can be made in the form of a candle. To do this, you will need simple elements: a tight spiral, an eye and a drop. See the step by step tutorial below.

#2 DIY quilling caramel Christmas decoration
And here is another simple quilling decoration for beginners. The basic elements of a tight spiral must be glued together in the form of a candy stick, decorated on the sides with “drop” elements, attach a thread and the decoration is ready!

# 3 DIY Christmas tree decoration: New Year's quilling for beginners
And one more option for a simple, uncomplicated quilling-style craft for the New Year. Of the elements you will need: a base circle, a tight spiral for the core, 6 drops for the petals, 4 eyes for the leaves. See step by step guide below.

#4 Christmas flower quilling
A very simple, but no less interesting New Year's craft using the quilling technique. To create, you will need 8 "eye" elements, which must be glued together in the shape of a flower. As a core, you can glue beads, thread a thread and you can hang on a Christmas tree!

#5 Christmas quilling ball
And here is the more difficult work. You will have to spend a little more time than on the manufacture of previous works. From the elements you will need: a base circle, curls, a curved eye and a tight spiral. See the step by step tutorial below.

#6 Twisted paper ball with your own hands
You can make a real volumetric paper ball with your own hands. Depending on the desired size, you will need strips of different widths. The manufacturing scheme is simple: we wind so many strips until the ball acquires the desired shape.

#7 New Year's quilling toys for experienced craftswomen
If the basic elements have already been mastered and you want to try yourself in more complex work, it's time to make a difficult Christmas tree toy. To make it, you will have to master a new element - a cone. See step by step photo instructions below.

#8 Christmas quilling ball for professionals
Well, for professionals, we have prepared a special master class on making a three-dimensional openwork Christmas ball. For the manufacture you will need a foam base. We make a paper frame (we do not glue the strips to the base), then we glue the elements only to the strips of the frame and glue them together. When the frame is fully decorated with quilling elements, it must be removed from the base and the second half of the ball made in the same way. After that, carefully glue the two hemispheres and voila! New Year's volumetric ball in quilling technique is ready!

Postcards
Most often, the quilling technique is used to decorate postcards. And indeed, a postcard with voluminous details will be an excellent New Year's gift.
#1 Simple quilling postcard: New Year's sock
If there is no time for complex crafts, then an excellent option for a New Year's card will be

#2 New Year card with quilling balls
A slightly more complex decor option is Christmas balls with curls. For manufacturing, you will need to master not only the basic elements, but also curls and zigzags. Step-by-step master class with a photo, see below.

#3 Postcard with a New Year's ball in quilling technique
And another version of the New Year's card with a Christmas ball using the quilling technique. Various spirals will be used in the manufacture: tight, loose, with a displaced center. Even kids can handle this card.

#4 Postcard for the New Year in quilling technique for experienced craftswomen
For more experienced quilling craftswomen, we offer a master class on making a New Year's card with more complex elements. The craft will use tight spirals, free, with a displaced center, a drop, a curved eye, curls, a semicircle. A detailed master class with a photo, see below.

#5 Simple New Year's card quilling for beginners
A small decorative element made of twisted paper will turn a simple postcard into an original New Year's gift.

#6 We make a New Year's card using quilling technique with children
With kids, you can make such a fabulous unicorn. For manufacturing, you will need simple elements that children can handle without problems. You will find a step-by-step MK with a photo below.

#7 Christmas quilling card for beginners
A beautiful postcard using basic quilling elements will be a great option for beginners. Step-by-step master class, see the photo below.

# 8 New Year's bells using quilling technique: do-it-yourself postcard
Craft for more experienced craftsmen who are already familiar with the basic elements of the quilling technique. First you need to make the base of the bell, and then fill it with elements of various shapes: an eye, a square, a free spiral. Additionally, we decorate the bells with rhombuses and a satin ribbon bow. Postcard is ready!

#9 New Year card decorated with bells
A beautiful three-dimensional postcard for the New Year can be decorated with bells using the quilling technique. The bell is made from a tight spiral by squeezing out the core. Step-by-step master class with a photo, see below.

#10 New Year's card with bells: step by step MK
And another version of the New Year's card with bells. You can also come up with your own stories, because the bell making scheme has already been mastered.

#11 Postcard Owl in quilling technique
Difficult job for experienced paper-rollers. Although mainly basic elements are used for manufacturing, the work requires special perseverance and accuracy. See step by step guide below.

#12 Postcard for the new year "Mitten"
You can decorate a New Year's card with a mitten using the quilling technique. The work is not easy: it requires perseverance and accuracy. It is better for beginners to try their hand at simpler crafts, but experienced craftsmen should definitely master it!

#13 New Year's card "gift"
With a “gift” using the quilling technique, you can decorate a postcard or a gift tag. If you do not glue the elements to the base, the craft can be used as an independent decorative element, for example, as a Christmas tree toy.

#14 Postcard with fluffy Christmas tree in quilling technique
You can surprise your loved ones with a postcard made using the quilling technique. It will take a lot of time, but it's worth it. You will need: thick base paper, quilling paper strips, scissors, glue, toothpicks.

Angel
Cute paper angels will be an excellent decor element for both the interior and the Christmas tree. A paper angel will protect you and your loved ones all year long, and getting a guardian angel as a gift is very nice.
#1 Simple quilling angel
Beginning craftsmen can safely take on this work. Three simple elements will be mastered in the shortest possible time, and the craft itself will take no more than half an hour.

#2 Difficult angel for real professionals
Professional masters of paper quilling do real miracles. We found a master class on making a three-dimensional angel on the website of Paperwork. It will take a lot of time for this miracle, but the result will really delight even the most biased critics. See below for step by step instructions.
Animals
According to the Eastern calendar, each year belongs to one of the 12 animals. That is why crafts in the form of an animal host of the year will be most welcome.
#1 Deer in quilling technique
Although the deer is not included in the list of animals of the eastern calendar, it is this animal that we associate with the New Year. And not without reason, because overseas Santa travels across the sky on a reindeer team. By the way, friends, the domestic Santa Claus rides on a trio of horses.

#2 Another deer…
And one more deer in quilling technique. Choose Rudolph according to your taste and hurry up to make New Year's crafts.

#3 New Year's quilling piggy
Well, finally, the year of those who do not know how to eat neatly has come! In the year of the pig, you can safely put on all the stained T-shirts, so to speak, the pig approves! Jokes are jokes, and a cute pig can be made right now. Even beginners can handle this craft.

#4 Decorate a postcard with a quilling pig
A postcard with a pig will come in handy. For good luck to accompany all year round, everyone should have a talisman pig. Well, the kids will love decorating the card with a cute piggy.

#5 Pig-stand in quilling technique
A themed gift for the year of the pig will be a cup holder in the form of a cute pig. Long cold evenings are ahead, which means that more than one cup of hot tea or even cocoa will be drunk. And in order not to damage the furniture, the pig-stand will come in handy.
#6 Volumetric quilling dog
The outgoing year, according to the eastern calendar, belonged to a dog. If you still do not have the symbol of this animal, it is quite possible to make it out of paper. Well, maybe you or your child have been dreaming of a four-legged friend for a long time? It's time to make your dream a reality!
Miscellaneous
In this section, we have collected crafts that did not fit into the previous ones. Here you can also find interesting ideas and try out your quilling skills.
#1 Christmas quilling cross
For real connoisseurs of Christmas, a quilling cross will be an excellent gift. It can be hung on the Christmas tree as a decoration or attached to the main gift.

#2 Christmas candle
You can make many different original crafts from twisted paper. For example, a Christmas candle.

#3 Quilling earrings “Gift”
Don't know what to give your friend for Christmas? Present handmade quilling earrings. If everything is done correctly, the recipient will not immediately determine that the earrings are paper.

#4 Quilling earrings
New Year's earrings in red and green colors will be a great addition to your festive look. By the way, you can not only put on such a piece of decor, but also make a nice gift for a friend or sister.

#5 Santa hat hairpin
At the New Year's party, you can look stylish by complementing your look with homemade hairpins. A simple themed option is a Santa hat.

#6 Quilling hair clip
And one more variation on the theme of New Year's quilling hairpins. See step-by-step instructions with photos below.

#7 Hairpin in the shape of a traditional Christmas plant
Holly or holly is considered a traditional New Year's plant in Britain. Often these red berries with sharp leaves can be seen on New Year's cards. In this MK you will learn how to make a hairpin in the form of this plant.

#8 Quilling crown
For a New Year's party, a small snowflake can be made a crown. You will need a wire base, ribbon, flowers from simple quilling elements, glue. Wrap the wire base with ribbon, glue the quilling flowers on top. Decorate the place where the wire ring is attached with a bow. The crown is ready!

Help us become better: if you notice an error, highlight the fragment and click Ctrl+Enter.
Many are now fond of this type of needlework, like quilling. It consists in the ability to create beautiful decorations from wound strips of paper. with their own hands will not go unnoticed. Even a child will be able to cope with some of the options for work, in addition, it will be interesting for him to master new skills.
in quilling techniqueIf the child has never encountered this type of creativity before, then he should be offered a simple version of the product. You can prepare an elegant picture on a winter theme. There is no need to run to buy special tools, it is better to start acquaintance with creativity using the materials at hand. So, for work you will need:
- xerox paper;
- scissors;
- glue, pencil, ruler;
- special tool or wooden skewer;
- glitter, paint.

You can prepare such crafts from quilling for the new year for friends and relatives. Snowflakes can decorate a room, a school office.
Christmas tree in quilling techniqueFor this toy you need green and brown paper, glue. Let's get started:

The result is excellent paper crafts, quilling for the new year can be used to decorate any room. Even preschoolers can handle such Christmas trees.
DIY quilling craft ideas for the new year
By twisting paper, you can make many options for holiday products. It is important to take into account their degree of complexity so that the child is interested in participating in the creative process and he can cope with the work.

Introduction to quilling techniques. Detailed master classes with photos.
Quilling is the creation of various beautiful paper compositions by twisting. It should be noted right away that quilling is not an activity for restless people. Such a hobby requires perseverance, accuracy, patience and boundless imagination.
Usually postcards are made using the quilling technique. If you have a desire to try yourself in something new, pay attention to quilling. With the help of this fascinating hobby, you can please your friends and family with chic postcards.
How to make a quilling postcard? Quilling postcard step by step
Important: Before you start making a postcard, try to make elementary shapes. Once you can easily learn how to do the basics, you can master any scheme.
Special kits are sold for quilling. You can choose the necessary tools yourself. To create a quilling postcard you will need:
- Multi-colored strips of medium-weight paper
- Scissors
- Tweezers
- safety pins
- Quilling template (ruler with holes in the form of geometric shapes)
- PVA glue
- Cardboard for the base of the postcard
- The main quilling tool is an awl with a forked needle.
You may also need:
- Curly scissors
- Comb for creating special shapes
- Utility knife and paper cutting mat (if you are using regular colored paper)
A strip of paper rolled into a roll is called roll. Their roll consists of a pattern. After twisting the roll, shape it with safety pins, fingers or a comb. Fix the end of the roll with glue. Some bends are also fixed with glue.

 The main element is a roll
 Step-by-step creation of a postcard:
- Prepare the basis for the postcard: make a frame, think about how your rolls will be placed
- Wind a lot of rolls of different colors and diameters. How to make a roll: grab the tape with a special awl, wind it around its axis to the required diameter, fix the end with glue. You can loosen the roll a little after twisting, it will not be very tight
Use a toothpick to gently stick the end of the tape.
- When the required number of rolls is ready, glue them on the base of the card in the form of a crown
- Form a pot out of fabric
- Add your own decor elements to the card. In this case, the card is complemented by a cute butterfly.
Video: Quilling for beginners
Ideas for quilling postcards
It is impossible not to fall in love with charming quilling postcards. Below are ideas for creating postcards.

 birthday card idea
 Floral motif
 Silver wedding card
 Quilling postcard
 Birthday card
 Children's card in quilling style
For the holidays, children often make postcards with their own hands. Together with parents, you can master the quilling technique. Children's cards should be simple. Simple figures can be performed by the child himself with little help from adults. At the same time, the plots of postcards should be interesting for children, then the child will make a postcard with great inspiration. For example, it can be postcards with animals, cartoon characters.


 Simple and cute patterns
 As for the postcard intended for the child, there are also a lot of great ideas. Even if now the child cannot yet appreciate your efforts, at an older age he will certainly rejoice at your gift.

 Postcard for a child
 Card Ideas for Kids
 Quilling postcard for March 8
It is impossible to imagine March 8 without flowers. It is customary to decorate postcards for the holiday of March 8 with flowers of various shapes and colors. There are many ideas on this topic. Your mother, grandmother, girlfriend, sister will be very happy with such a postcard, many women appreciate and love manual work.

 Flowers on a postcard for March 8
 Postcard from March 8
 Postcard in quilling style for February 23
You can choose a gift for your husband, dad, brother, grandfather for every taste, color and wallet. But it is much more pleasant to receive gifts made by oneself. Give your men a quilling card for February 23rd. They will be very pleased with your attention and diligence.
 Happy Defender of the Fatherland
 Postcard for February 23
  Ideas for unusual cards for February 23
 Quilling card for Valentine's Day
The most romantic day of the year is Valentine's Day. On this day, thousands of declarations of love sound, hearts are filled with love. The symbol of Valentine's Day is a Valentine in the form of a heart. You can make a card in the shape of a heart.
 Valentine's Day card
  valentine
 But the idea for creating a postcard can be not only a heart. You can come up with another plot of love. In quilling, you can give freedom to your imagination.

 Valentine's Day Card Ideas
 Quilling birthday cards step by step
The card will be a great addition to a birthday present. You can make a simple, but very cute postcard.
We will need:
- Quilling paper
- Quilling tool
- Double-sided colored cardboard
- White paper
- Glue, scissors, ruler
Let's start making:
- Fold a piece of cardboard in half
- Prepare a white sheet of paper with the inscription “Happy Birthday” in advance, cut out the inscription beautifully, glue it to the base
- Make colored or plain rolls, form flowers out of them, glue them to the postcard
- Decorate your card with beads
- Write a beautiful wish inside the card

 Birthday card
 How to make a quilling wedding card?
A wedding card can serve not only as a congratulatory card, but also as an invitation to a wedding. You can glue the postcard in the form of an envelope, and you get a postcard for money.
For work you will need:
- A sheet of white thick paper
- Sheet of thin white paper
- Sheet of colored paper of the desired shade
- Decor elements: beads and a small ribbon
- Scissors, glue, ruler, pencil
- Quilling tool
Master Class:
- From thin white paper, cut thin long strips about 0.5 cm wide. They will be needed for rolls
- From thick paper, form a rectangle - the basis of the postcard
- From colored paper, make a smaller rectangle, flowers will be placed on it, glue it to the base
- Roll up the rolls. Make the number of flowers and petals as you wish
- Press each roll with your fingers so that it takes the form of a petal.
- Glue the petals on the card, decorate the middle of the flower with a bead
- Make some loose rolls for the flower stems
- Add small beads
- Decorate the card with a satin bow
- You can add an inscription

 Step by step creation of a wedding card
 Simple postcards quilling step by step
Quilling cards can be a real art, but if you are just learning, try making simple cards first. Simple postcards consist of elementary rolls assembled into simple patterns, such as simple flowers. Try to make a postcard according to a ready-made template.
To make simple postcards, you will need all the quilling materials listed above.
The postcard making technique is as follows:
- We prepare the basis
- Making rolls
- We form a pattern
- We decorate a postcard
- We write wishes

 Simple postcards in quilling style
 How to make a beautiful and unusual quilling postcard: tips and reviews
Pauline: “I mastered the quilling technique by accident. I surfed the internet and saw beautiful curls. Immediately the thought arose that it was not mine. But then I came across a detailed master class, and mastered the technique on it. Now I already have a quilling kit, I am happy to make postcards. A very interesting and exciting activity."
Valeria: “My daughter at school makes such postcards. It turns out very beautifully, and I was especially struck by the work of their teacher. I myself have not tried to make such postcards, but I think that this is a very laborious process.
Irina: “I have already been familiar with quilling for 3 years. I want to say that everything is not as difficult as it might seem. I just saw beautiful flowers and wanted to make the same ones. Buying plain colored paper and cutting your own strips is cheaper than buying ready-made kits, but you need to get used to cutting the strips. Now I delight my loved ones with postcards and paintings.
If you like quilling postcards, and you have free time, if you are a creative person with a rich imagination, try to make the same. We will be glad if you share your creativity with us.
Video: Master class on creating a quilling postcard