Master class on the basics of making kanzashi. Kanzashi petals from satin ribbons (photo) Materials and tools
You may have seen the delightful hair and clothing decorations made from silk flowers more than once. This beauty has a name - KANSASHI TSUMAMI.
Hairpins and combs are traditionally used in Japanese hairstyles, but nowadays Kanzashi jewelry has gained its popularity far beyond the borders of Japan. The so-called "kanzashki" now serve not only as an ornament for hair, they are used to make brooches, used as interior decor, etc.


Kanzashi candlesticks

Box in Kanzashi technique
If you figure out how to do Kanzashi, it becomes clear that this is not at all difficult.
Materials and tools
In order to make products using the Kanzashi technique, you will need the following materials and fixtures:
You can cut fabric or ribbons with scissors, as well as with a soldering iron. To do this, you need a surface on which we will cut. It may be an old unnecessary kitchen board, but I preferred the usual wall tile (remained after the repair), its soldering iron does not burn through and it is easier to clean. Some petals can be burned with a candle or a lighter.
Glue is better to use thick and transparent, so that after drying it does not leave marks. I opted for "Moment-gel": transparent, does not flow, glues well.
Many advise using tweezers when folding the petals.
I use tweezers when I fire the fabric over the candle.
- satin ribbons of any size, optimally 5 cm and 2.5 cm, but you can take any fabric: silk, satin, organza, etc.
- ruler
- pencil or chalk for marking even squares
- scissors (any, most importantly - sharp)
- lighter and candle or soldering iron (if you know how to use it)
- glue "Moment-gel" or glue (hot) gun
- tweezers (preferably long)
- long and not thick needle
- strong thread (such as monofilament)
- beads, sequins and any beautiful trifle
I think over time you will decide for yourself how and with what it is more convenient for you to work.
Types of Kanzashi petals
The Kanzashi technique is as follows: many small even squares of fabric are folded in a certain way and gathered into a flower. The petals themselves are sewn together or glued together.
No matter how strange it may sound, but there are only 2 types of kanzashi petals: round and narrow, and the rest is room for your imagination.
Using the example of such a flower, we will learn how to fold narrow and round petals:

Narrow kanzashi petal - master class
We use the same materials and tools as listed above.

We cut with a soldering iron or scissors even squares. I have a satin ribbon 5 cm wide, which means the squares are 5 by 5 cm. Their number depends on the size of the flower that you will collect. There are 7 yellow and 5 green.

Very often it is advised to fold the leaves with tweezers. To be honest, it’s more convenient for me with my fingers, but who likes it better.
We fold into such an even triangle. The fold itself is on top.

We apply the right corner of the triangle to the left.

And fold it again, from right to left. Align the fold points.

We cut the ends of the fabric evenly:

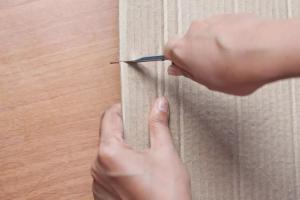
And we burn a little over the candle, fastening the edges at the same time. This is done as follows: holding the edges with tweezers, quickly draw a petal over the flame.

It is better to burn at the very bottom of the fire, then the fabric will melt, and not burn.
The bottom edges are also cut off and melted. Here you can not glue them together, but simply melt the fabric so that it does not crumble.

Here's what we got:

Back view
By the same principle, we fold the rest of the green leaves.

For clarity, watch the video tutorial on narrow Kanzashi petals:
Front view
Round kanzashi petal - master class
Fold the yellow square into a triangle.

And now we collect the side edges in the middle, to the bottom corner. Folds are obtained from the top, on the sides.

We take the side corners back, check that the edges are evenly folded.

We also cut off the ends and melt them.

The bottom edge is also cut off evenly and melted.

Only here the edges must be burned and be sure to glue together.
While the fabric is warm, I simply pinch the edges with my fingers.
Here's what we got. On this side, drip a little glue inside and glue the sheet.

Back view

Front view
Here are the blanks we got. Here you can clearly see where the yellow petals stick together.

In the video master class, you can once again see how round petals are made, and also learn how to collect beautiful hair ties:
How to make kanzashi flowers
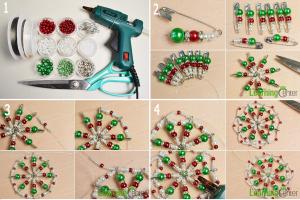
Let's start collecting the kanzashi flower. We string yellow petals on a needle and thread. I prefer monofilament because it is not visible.

And we knit in such a flower:

We cut out circles from cardboard and tape, put a cardboard circle on the tape, grease it liberally with glue.

And, turning the edges, glue the fabric to the paper. Let the glue dry a little and smear the surface with glue again.

Then glue the workpiece to the flower on the reverse side.

It is better to use glue here, and not a glue gun. Since our flower is voluminous, it is very difficult to immediately glue it evenly. And while the glue dries, you can correct the leaves to make it even. It is difficult to do this with a glue gun - the glue hardens very quickly and it is quite problematic to peel it back.
Here's what we got:

We apply glue to the tip of the green leaf (here I already use a glue gun)

And we connect it with the second leaf.

We make two double leaves.

We also grease a single leaf with glue and glue it between two already connected leaves.

In the same way, we glue already three leaves to the double.

This is what the thread should look like:

Lubricate the tip of the branch with glue

And glue it between the leaves of the flower.

Glue a bead or rhinestone in the middle of the flower.

With this kanzashi flower, you can decorate a brooch, a hairpin, and an elastic band for hair. And if you dream up a little, then you can create a lot of things from the 2 simplest kanzashi petals!
Categories Kanzashi petals from satin ribbons (photo)Kanzashi petals from satin ribbons (photo)
Surely, you have often seen the types of products using the kanzashi technique, which adorn accessories, clothes and hairstyles. This traditional needlework, which came to us from distant Japan, has taken a worthy place in the hearts of craftswomen. Now kanzashi products are used in different directions.
Before making a beautiful flower of any shape or with a curl, you need to master the knowledge of how to make kanzashi leaves and kanzashi petals. This master class (mk), which is also suitable for beginners, will clearly show you new ideas and types that are done by hand. 


Required material

In order to properly make leaves from ribbons with your own hands, you need to choose the necessary accessories:
- several shades of satin basses;
- ruler;
- simple pencil;
- small scissors;
- the flame of a candle or matches;
- glue;
- tweezers;
- needle and thread;
- beads for decoration.
We will look at several ways to create a kanzashi petal from satin ribbons. There are only two of them, these are round and pointed petals. Of these, we will make an elegant flower with our own hands.
We make a narrow petal from ribbons
Prepare all the new materials on the desktop. We start by cutting satin ribbons into small squares. We should get seven pieces of yellow and five pieces of emerald color. 
If you feel uncomfortable grasping the flap with your fingers, use tweezers. Fold the piece of tape so that the fold is at the top, as in the photo. 
Connect the right corner to the left. 
Do it again like this. Align the folds. 
With small scissors, cut off the ends, as shown in the photo. 

Scorch this edge with fire, we do such manipulations very quickly so as not to burn our future petal for beginners.
The edges that are below, also pour over with fire. This is not done for gluing, but so that the threads do not fray. 

Look at the photo, such a blank, you should get it too. 
In exactly the same way, we create the subsequent elements.
In order to learn in detail the technology and types of creating a kanzashi petal, you can study the video master class (mk) on our portal.
Video: Making a narrow petal
Round kanzashi petal
Kanzashi round petal, do step by step, almost the same as in the previous master class.
Fold the yellow patch in half. 
Attach the ends that are located on the sides to the bottom. You will get all the side folds, as in the photo. 
Pull the edges back and make sure they are even. 
Trim the edges and burn.
The bottom edge is also removed and fired. In this case, the edges are not only singeed, but also glued together. While the cut is still hot, press the ends with tweezers. 

Here is the inverted petal we got, look at it from both sides. 

The photo shows the blanks that are the result of our work. So the master class (MK) is going right and what we do with our own hands is working out. A detailed lesson and a master class can be viewed on the video. 
Video: Round petal master class
Assembling a flower from different petals
Now all our blanks from satin ribbons, which we made with our own hands, need to be put together.
Dial petals, yellow
on a thread. 
Build such a product. 
From thick cardboard, you need to cut a small circle. Lay it on the fabric, while smearing it with textile glue.
After tucking the ends, glue the tape to the cardboard. Wait until this element dries, and re-saturate it again. 

Glue a sewn flower to our element. 
While the textile glue dries, you can straighten the round kanzashi petals with your own hands. Our master class (mk) continues. Let's start doing the craft. Look what happens after we made the inverted petal. 
We take a green kanzashi petal and drip a drop of glue on it. 
Attach the next sharp petal to it. 
We make sharp petals, in the amount of two pairs, two in each pair. 
We impregnate another sharp petal with glue and attach between the two primary crafts. 

In exactly the same way, we attach three things to a double petal.
The photo shows a twig and sharp petals on it. 
Put a drop of glue on a branch. 
Attach it between the round yellow petals.
The core of the flower can be decorated with any decorative material, such as a bead or rhinestones. This master class (mk) is also completed, you can watch it on the video located on our portal. 

Such petals are useful, in the form of decoration, for any accessory.
kanzashi petals with swirl
Our small master class will show you how to make a sharp petal with a curl. We need not much material, namely:
- pink and black satin ribbon;
- glue;
- scissors and tweezers;
- fire of a candle or lighter.
You need to cut satin ribbons into small squares, this procedure will be understandable even for beginners. Their size will be equal to five centimeters. 
Fold the piece of ribbon in half to make a triangle. Then one more time, roll it up. 

Do the same with the black color of the blank. Insert one element into another so that the pink blank is inside the black one. 
Using tweezers, wrap the end of the triangle in the middle, capturing two colors of the tape at once. 
Connect the edges of the product together. And spread the top of different colors on the sides. 
Cut off the excess edge and singe with a flame of fire. Thus, we got an interesting petal with a curl in the middle.
Such sharp petals with a curl will make an ordinary headband or bandage an exquisite evening accessory. This kanzashi technique is becoming more and more popular with all fashionistas who prefer handmade things. These flowers are also used to make hairpins and brooches that adorn beauties. It is important, before starting work, to watch a video of some types of petals that other needlewomen make in order to decide which accessory you want to make.
Video: Petals with curls
Methods for folding the main petals, a couple of small tips, examples and diagrams. Nothing global, but for beginners, I hope it will help. In no way claims to be the ultimate truth, just the methods that I use.
Materials and tools.
Real kanzashi tsumami are made from natural silk, but, in principle, you can put pieces of almost any fabric on them that fell into your hands.
I usually use crepe satin, satin ribbons, nylon and organza.
At crepe satin a wide range of colors and, accordingly, it is easier to find a certain shade, the squares of the desired size are cut independently - there are no problems with petals of the same color and different sizes. It is soft - round petals are more tender and easier to give the desired shape. To create sharp petals, the softness of crepe satin is rather a minus - the blanks will have to be ironed when folding. However, it all depends on what petal you want to get. Of the obvious disadvantages - it turns black when singeing, so there are problems with light shades. If you gape - it does not melt, but burns.
Organza- melts well, does not change color when melted. But it frays more than crepe satin and is easily deformed, so it will have to be handled very carefully.
Kapron, has the same advantage as organza - it melts superbly. However, unlike her, it does not crumble and does not deform at all. It is very easy to work with, but it is very hard, the round petals from it look awkward. But for the spicy, it's fine.
Satin ribbons- well scorched, almost not deformed, easily cut into squares. Harder than crepe satin, but softer than nylon. However, finding the right shade and, especially, ribbons of the same color but different widths can be problematic.
If you are just starting to do kanzashi, I advise you to take a 5 cm wide satin ribbon. The wider the tape, the larger the petal and the easier it is to work with. But, I repeat, any fabric that does not crumble too much will do.
beads, fittings, rhinestones, sequins and beads add to taste :)
You will also need needle and thread, scissors and tweezers- any long tweezers with an extended clamping area at the ends will do. For example, medical, which can be obtained at the pharmacy. Or sewing - from needlework stores.
A ruler, a pen, a white tailor's pencil or a bar of soap (for dark fabrics) will come in handy for marking the fabric.
Also you need candle to burn the edges pins and glue. The original kanzashi uses rice glue, it is not difficult to weld it, but it takes a VERY long time to dry, and some skill in communicating with it is required. And mega-accuracy, so as not to breed a pigsty during its preparation and use, which I have never been able to :)
Most often I use Gütermann creativ fabric glue - it has been tested many times in the rain and in the wash, it sets quickly, holds firmly and remains transparent after drying. It glues fabric well to metal and plastic, sequins, rhinestones, etc. hold tightly. When you try to tear off a glued bead, the bead itself often breaks. And the tube is convenient - it is easy to apply little by little. Sold in craft stores. You can also use Moment Crystal, it is cheaper and easier to find. But it is not so convenient to use it, and when it dries, it sometimes turns white.
Sometimes, to make the flower hard, I use hairspray. Over time, however, the rigidity will disappear, but to fix the shape before assembly, before subsequent fixing with glue, this method is perfect. You can, of course, pre-gelatinize the fabric, but then you will get a hard fabric, which is not good for round petals. It’s easier to spread the soft petal with your fingers and spray it with varnish.
On the other hand, the “shelf life” depends on the fabric itself and the varnish used. I've been wearing a kanzaka made of satin ribbons sprinkled with blue Taft for half a year now - and it still holds its shape and is noticeably tougher than the others.
By the way, first try the varnish on a piece of fabric and let it dry completely - some fabrics change color after the varnish.
Many people advise to store the fabric already cut, but it’s more convenient for me to cut the right number of squares for each specific job. Some fold the pieces with tweezers, others with their fingers.
In general, do what you feel most comfortable with :)
If the fabric frays a lot, the edges of the squares can be carefully melted. Keep in mind, natural fabrics will burn, not melt! Singing, if you use a candle, should not be at the tip of the fire, but closer to its base - where the flame is orange, quickly passing the edge of the square through the fire, and in some cases - nearby, without lowering it into the flame - it depends on the fabric itself and it is found out by a poke method.
Sometimes, for the same purpose, I use a fabric cut glue, Prym Fray Check for example. But it stiffens the fabric and sometimes causes it to change color.
There are two main petals - sharp and round. On their basis, most of the khan-kanzashi is made.
Let's start with a sharp petal.
Fold the square in half:
And again in half:
If you have a soft fabric, and you want the petal to be very sharp, with a narrow edge, you can iron the folded workpiece with an iron.
And then, you won’t believe it, you need to fold it in half again:
If we now look at the folded square from the diagonal side, we have a sharp petal:
The tip of the petal "b" is cut and scorched.
What kind of flower you want to get - high, low, with or without a slope - determines the position of the line "a" along which you need to cut the petal.
Flower with whole and cut along the line "a" petals:
You can leave a hole in the middle of the petal, you can solder it tightly, you can not cut it along the “a” line at all - it depends on the desired type of flower.
Here, for example, this one has a hole left on the outer petals, and on a small, inner flower, the petals are tightly sealed:
If the fabric does not fray, it can not be scorched. But the singed edges usually fuse and stick on their own, and in order to prevent the unscorched petal from unfolding, you will have to secure it with a pin. Set the finished petals aside.
Having made the required number of petals, we collect them on a thread and tighten them into a ring:
Disguise the middle with a sequin or a cup for a bead - and the flower is ready. The number of petals and their sizes can be varied, getting different color options. Here, for example, three rows of trimmed petals are glued together, in a pyramid, each next row consists of smaller petals:
And here, just petals of different sizes and colors:
To make a two-tone petal, before the last bend, lay one blank on top of the other, slightly shifting down, and fold for the last time:
To make it easier, the square for the inner petal can be made 5 millimeters less than for the outer one.
Round petals.
Fold the square in half:
Now add the extreme corners of the triangle to the middle:
The folded corner can be stitched so that it does not fall apart during subsequent manipulations:
Turn the workpiece over and fold the side corners to the center:
Fold in half so that the corners you just folded are inside:
Straighten the petal, secure with a pin and put a little glue on the corners. Set aside, let dry. You can sprinkle it with varnish, so that it retains its shape better. But then you have to wait until the varnish is completely dry.
After making the desired number of petals, making sure that the glue / varnish is dry, cut off the hemmed corners and collect the petals on a thread. Decorate and the flower is ready.
To make a double petal - lay the second blank on the first after you bend the square in half, and then fold their corners as one. As in the case of a sharp petal, the “inner” blank must be moved down a little, or made from smaller squares than the squares for the outer petal.
That's all.
Create, combine and create.
Good luck to you.