Crocheted sunflower. Crochet a bouquet of sunflowers
A positive sunflower in a pot will decorate any room and make every day radiant! This is a great holiday souvenir or just a sign of attention to loved ones, which they will certainly appreciate. Agree, such a present is not only original, but also very attractive!
crochet process is not long and not laborious. Every craftswoman can knit a sunflower, even if this will be her first experience with a crochet hook.
Prepare for knitting:
thin hook (1.6 mm);
dense threads (due to this technique, the petals and leaves will keep their shape) of green, yellow, brown and black colors;
white thread as an addition to black eyes.

For fastening and finishing:
a flat pencil or any tube (from a ballpoint pen, for example) as a barrel;
small flower pot;
synthetic winterizer;
alabaster.

Each petal consists of 10 rows of single crochets (st./b. n). Knitting them is quite difficult, because the thread is thicker than the hook. But this is a prerequisite, otherwise all the details will simply sag. In addition, after knitting 2-3 petals, you will “get involved” and things will go faster.
Dial 6 air loops (ch) and knit 4 rows of st./b. n.

From the 5th, add 1 column along the edges of the petal (knit two from one) 4 rows in a row.

After that (already in the final row) you knit 3 double crochets from one point in the center of the row: 1st - with one, 2nd - with two and 3rd again with one. This will help sharpen the top of our petal.

At the end, tie it all along the contour of the article / b. n.

Now the petal has become even and more dense.

In total, you need to create 12 such instances.

At the end of the thread on each, tie and cut, and hide their edges in work.

We will arrange all these petals in two rows: inner and outer.

But first, you should tie two central circles that will hold the petals and become the middle of our flower.


Already to the finished mug, first sew 4 yellow parts, and then the remaining 8 (placing them under the first four).


Now sew a second brown circle to this flower and leave a small unsewn slit at the bottom.


Through it, fill the middle with synthetic winterizer, which will make the center of the sunflower voluminous.

Next, draw in small eyes and a smile.

Embroider this cheerful face with black thread, making small white inserts on the eyes.


According to the height of the trunk, adjust the number of air loops that will serve to create its landscaping. From this chain, tie a single piece of st./b. n of 10 rows.

The edges of this strip should be tied or sewn together to get a tube.

Now knit green leaves from this yarn as well. Dial 20 in. n, knit 20 rows of st./b. and start reducing them.

To do this, from each edge, close the last 3 columns with one loop, making a common top. After the 4th row, we will have only 3 loops left.

Then go back to the bottom edge of the sheet and start lengthening it. This time, you need to close the extreme triples not in every row, but after 1. The last row should not end with three loops, and in general, not be sharp.

Good afternoon!
And again about sunflowers. I have long wanted to crochet a sunflower.
Although I never thought before that I would be doing some kind of crafts, I knitted only pullovers and vests, sometimes napkins, I almost didn’t have to knit.
But it turns out that at home for wealth and happiness you need to have sunflowers (and also)! So you have to link.
Seriously speaking, since the creation of the blog, thanks to the vast possibilities of the Internet, I now want to embody many interesting ideas, especially since I really like sunflowers in the interior. I have already tried to decorate a small cabinet in the kitchen with images of sunflowers. And knitting for the home is especially a great pleasure.
I thought for a long time how to crochet a sunflower, either in the form of a potholder or a napkin, then I began to lean towards the idea of a fridge magnet with coffee beans in the center, this idea is now very popular.
But as always, one but - time! Every day I hear from everyone, where to get the time? Why is it so lacking?
Once I saw on the Internet a photo of an interesting panel in the form of a simple bright flower. And here it is - inspiration! And there was time! True, just a little bit, so knitting stretched for a long time, but now I want to show what almost real crochet sunflower flower I got.
Sunflower crochet master class
I specially bought yarn for crocheting a sunflower in the store - my favorite semi-woolen yarn for needlework in yellow and green.
Hook number 2.
For the panel you will also need:
- seeds
- glue Moment
- cardboard
- scissors
- some ribbon for the loop.
Knitting the central part of a sunflower
Everything is simple here, you need to tie a regular circle with single crochets. We collect 6VP with yellow yarn, close it in a ring. I decided to make the central part yellow - this is the color of a sunflower in nature. Of course, you can also knit it with brown or black yarn with lush columns that imitate seeds. But I acted differently.
In the first row - 12 columns, in the second we add one column to each column of the previous row, in the 3rd row - we make increases through one column, in the 4th - through two columns and so on according to the rule of knitting a circle to the required size.
The size of my circle is 14 cm in diameter.
Knitting sunflower petals
For the petal, we collect 16 VP.

We knit single crochets on this chain (we knit the first column on the 5th loop of the chain).

We reach our circle, 1 connecting column under the loop of the circle.
We turn the work, we continue knitting on the other side of the chain as follows:
1VP, 1СБН, 2С1Н, 6С2Н, 2С1Н, 2СБН, at the end of the chain - 5 СБН in one loop.

2СБН, 2С1Н, 6С2Н, 2С1Н, 1СБН, 1 connecting post under the loop of the circle (the central part of the sunflower).

We stretch the thread with connecting columns through two loops of the base of the petal and 3 loops of the last row of the central part of the sunflower.

On the third loop, we begin to knit the next petal.
Thus, we knit all the petals of a sunflower with a crochet.
Because the petals are close together, they overlap somewhat. We straighten them through one: one petal from below, one from above. It turns out the effect of two rows of petals.

The sunflower is almost looming crochet, still need to tie leaves for him.
Knitting twigs with leaves
We knit a twig with leaves in the same way as a sunflower petal.
We collect a long chain from the VP (I scored 60).
We tie it with columns on both sides, while knitting the leaves first on one side, then on the other.
For a leaf, as well as when knitting a sunflower petal, we knit a chain of 16VP and tie it as follows:
1VP, 1СБН, 1С1Н, 2С2Н, 3С3Н, 2С2Н, 2С1Н, 2СБН, at the end of the chain - 5 RLS in one loop and then in reverse order on the other side of the chain.
After about 10 loops of the branch, I knitted another leaf.

sunflower panel
Finished parts are ironed through a damp cloth.
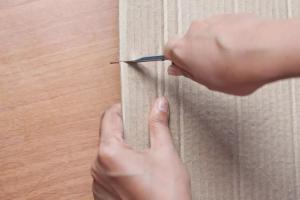
Cut out a cardboard circle with a slightly larger diameter than the central part of the sunflower so that it covers part of the base of the petals.
We glue the sunflower flower on the cardboard, and do not forget to insert a loop of braid between them.

Glue the branch with leaves onto a piece of cardboard, and then cut it out and glue this part to the sunflower flower.


Now it remains to decorate the flower with seeds - the real ones!
Glue the seeds around.

I was set up for a long, painstaking and boring job, but it turned out that everything was not so scary. It only took 30 minutes!
Decorative pillow in the form of a sunflower flower will be a wonderful decoration of the interior.
The base of the pillow is crocheted of yarn " ALPINA" "Roland". This yarn is ideal for knitting nature motifs thanks to its wide palette of natural melange shades. The yarn consists of 100% silky alpaca wool, which makes it soft and pleasant to the touch.
For work we need:
The diameter of the pillow base is 28 cm, the size of the petal is 10x13 cm.
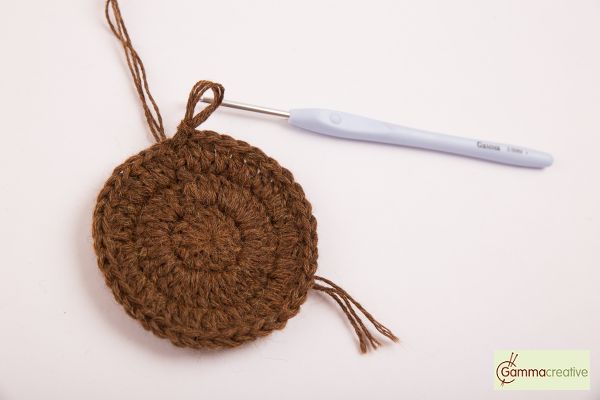
For knitting the middle of the sunflower, we use the yarn "ALPINA" "Roland" (No. 36 light brown) and the hook "Gamma" No. 3.5 mm (RHP). We knit in three threads.
A pattern that imitates the relief center of a sunflower will be formed by changing the direction of knitting and making double crochets for different walls of the loops of the previous row.
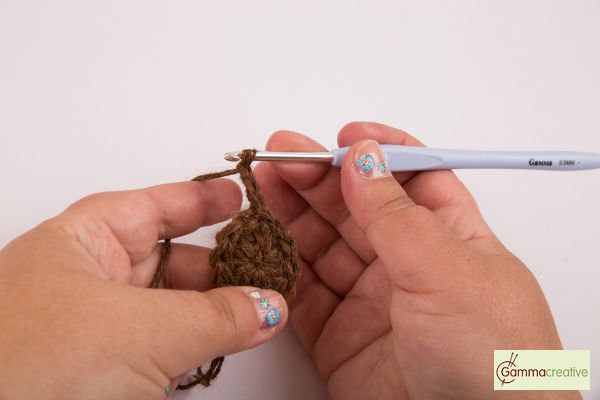
1. Knitting starts from the center of the circle. In order for the middle of the flower to turn out beautiful, it is necessary to make an adjustable loop or an “amigurumi” loop.
Its main advantage is the ability to gently pull off the center of knitting after completing the first rows so that there is no hole in the product at the start of knitting.
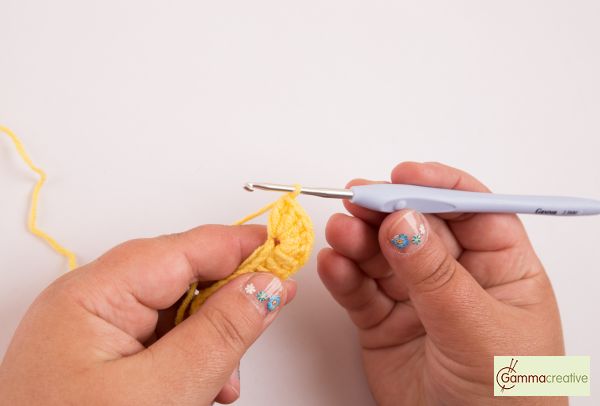
We make a loop at a distance of about 2.5 cm from the end of the thread. We place the working thread between the index and middle fingers.

Insert the hook into the loop, grab the working thread and pull it out in front of the loop.

Grab the working thread and pull it through the loop formed.

Now we will introduce a working thread and tighten it. This loop does not count as the first stitch in the ring.

Bring the hook from below under both threads, forming a large loop. Let's grab a working thread.

We knit three air loops for lifting.

1 row.
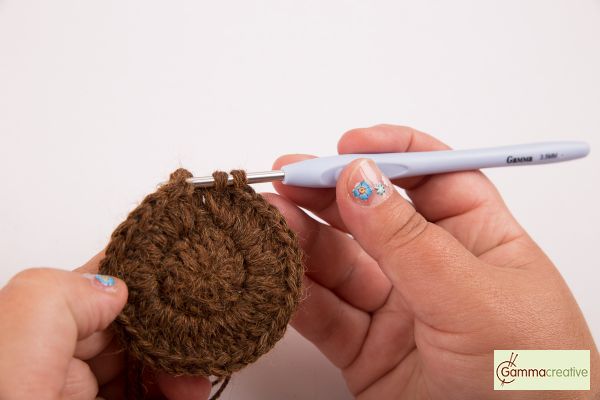
We knit 12 double crochets into the loop. We try to knit freely, without pulling too hard. The thread is very soft and durable, easy to knit.

With a connecting loop we close the loops in a circle.
Pull on the “tail” at the beginning of knitting, thereby tightening the large loop on which we knitted the double crochets.
2 row. We knit 3 air loops. We continue to tie a circle.
To expand the circle, we knit 3 double crochets in each loop.
It turned out 36 columns with a crochet.

We knit a connecting column and close the 2nd row of the circle.
3 row- 3 air loops up for lifting. Turn the knitting over to the other side.

We knit to the end of the row in the following sequence: * 2 double crochets in one loop, 1 double crochet *.

We knit the last column with a crochet, with a connecting column we close the knitting in a circle.

4 row. We knit 3 lifting air loops.

We make a crochet, insert the hook behind the back wall of the loop, stretch the thread.

Then we knit like a regular double crochet.


We knit in a circle. In the same way we knit 3, 5, 7, 9, 11 rows.
Flip the canvas. With ordinary double crochets, we knit even rows (4, 6, 8, 10) without increments.
Observing the rule of knitting a circle, we make increases in odd rows: we knit 2 double crochets in one loop:
in the 3rd row through 1 loop,
in the 5th row through 2 loops,
in the 7th row through 3 loops,
in the 9th row through 4 loops.
We turn the fabric over when knitting each row.


back side

We knit the back side of the pillow with double crochets according to the rules of knitting a circle.
For knitting petals we take yarn « ALPINA""Vera" (05 yellow) and hook "Gamma" RHP No. 2.5 mm.


We knit 15 air loops for the chain.

1 row. In the 3rd loop from the hook we knit 1 double crochet.


Until the end of the row, it turned out 12 double crochets.

To round the petal, we knit 5 double crochets in the 1st loop of the chain.

And another 12 double crochets to the end of the row.

2 row. We turn the knitting over and knit 3 air loops for lifting.

We knit 12 columns with a crochet.

For rounding - 2 double crochets in each of the 5 double crochets of the previous row.


3 row. Flip the knitted fabric. We collect 3 air loops for lifting. We knit 12 columns with a crochet in each loop.

For rounding in each loop of the previous row, we knit 2 columns with a crochet. We knit 12 columns with a crochet in each loop.

4 row. Flip the knitted fabric. We knit 3 columns with a crochet for lifting and we knit 10 columns with a crochet.

For rounding. Knit 24 single crochet.


We tie each petal with a “crustacean step”. To do this, do not turn over the knitted fabric and continue to knit from left to right with single crochets.

Thus, you need to tie 20 petals.

Stitching details.
We lay out the petals on the back of the pillow in 2 rows as follows:

We take a needle, thread a brown thread and sew the petals of the first row (10 pieces) to the knitted base.


In the same way we sew the second row of petals. Then we impose a second knitted base and sew the details, inserting a synthetic winterizer inside.


By popular demand, I tell you how I knitted a sunflower
Inspired by this sunflower
I tied another one to take a step-by-step photo
It will take
-yarn
color: black, yellow and green. (I have cotton from YarnArt green begonia, yellow violet, black Canaris in two threads)
- black beads
-a little filler (I have holofiber)
-hook (I have No. 1) 
We knit a circle of green color RLS in a spiral (that is, without lifting the VP).
1st row: in a ring of thread, knit 8SBN
2nd row: 2 sc in each column of the previous row - 16 sc
3rd row: increases in every second column of the previous row, etc.
Then I make increments by eye, you can use the circle rule https://lh4.googleusercontent.com/-YtR9pzGd3GA/TdeczJswy0I/AAAAAAAAAyY/GvkX7vdi0ZQ/s576/0_61d43_d2b76b2_XXL.jpg
My green circle is 4 cm in diameter, 8 rows. 
Next, we tie a circle according to the scheme, we introduce a hook in front half loop.


Without poisoning the thread, we knit the leaves. Small according to the scheme, large similarly for 15VP. You need to flip the circle.


We attach the yellow thread and tie around the edge with half-columns with a crochet, insert the hook in the back loop. Since my yellow yarn is thinner than green, it turned out 2 half-columns in each loop. According to the scheme we knit the petals 
We knit the black upper circle in the same way as the green one, only in diameter it is larger than the green one. Should be approximately equal to the lower green circle along with the yellow row of half-columns. I have 5cm in diameter, 11 rows. We knit the petals along the edge in the same way. 

We sew the middle with beads. Two pieces are ready 
We sew along the edge of the circles, leaving a small hole. We fill the middle with filler, sew it up completely. I sew with monofilament. This is a transparent thread, like a thin fishing line. 
Ready 
PS I don’t know how to knit with beads yet, so it’s easier for me to sew it on.
Please do not post on other resources. Hope for understanding
Outside the window is autumn, and the soul so wants to continue the summer. Bright accents of the interior and wardrobe will help to prolong this beautiful warm season. And here you can not do without a constant companion of the sun - a sunflower. It is very easy to do it yourself. Crocheting a napkin or an elegant brooch is available even to beginner knitters. There are several ways to crochet a sunflower, the diagram and description are presented below:
Tools and materials Time: 2-3 hours Difficulty: 2/10
- yarn for knitting chocolate brown, green and yellow;
- hook, according to the thickness of the yarn;
- scissors;
- beads or beads;
- thread and needle;
- brooch pin;
- foam rubber
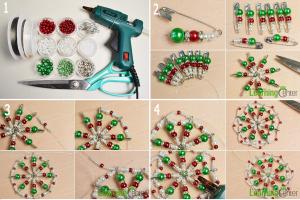
Lesson 1

Step by step description with diagram
Step 1: Knit the middle
We start crocheting a sunflower from the middle. To do this, you need to take chocolate brown yarn and a hook. We start knitting with a set of a chain of 5 air loops. We close the chain into a ring with a connecting loop. Next, we continue knitting according to the pattern shown in the photo:

The scheme uses double crochets combined into one "lush column" in alternation with air loops.
So, in the second row it is necessary to knit 5 "lush columns", which are separated from each other with the help of 4 air loops.
Next, we knit lifting loops (3 pieces) and continue circular knitting with “lush columns”. AT third row their number is doubled. The number of dividing air loops between the columns remains the same.
AT fourth row the number of “lush columns” doubles again, and the dividing air loops become a little less - not 4, but 3.
Fifth row completes the center piece. There is no increase in the number of “lush columns” here, their number remains the same and equals 20. There are more dividing air loops. Their number is 4.
Step 2: Knitting flower petals
To knit the petals, you will need yellow yarn. The thickness of the yarn should not differ from the thickness of the previous thread.
We start knitting by fixing the thread and knitting three lifting loops. Next, you need to knit 6 more air loops and fasten the chain to the already connected workpiece in the places indicated in the diagram (see above). After that, we continue knitting by dialing 8 air loops, followed by fixing the chain on the product. In total, you need to knit 20 chains or arches.
The next row must be knitted with double crochets. Each column is knitted in one loop. The only exceptions are the air loops at the top of each arch. In this loop, it is necessary to knit immediately along the double crochet. Subsequent rows are knitted similarly, in accordance with the scheme (see above).
The last row of the napkin can be knitted with chocolate brown threads to give the product a contrast and expressiveness.
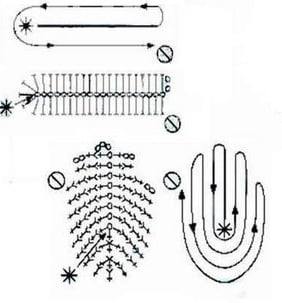
If desired, a stalk and leaves of green yarn can be tied to a napkin. The pattern of knitting leaves and stem is illustrated in detail in the photo:
Here is such a crochet sunflower according to the above scheme and description, you should get:

Lesson 2. Brooch "Sunflower"

Step 1: Knit Warp
We start knitting from the base. To do this, you need to take yellow yarn and a hook that matches the thickness of the yarn. First, we make a loop of arugumi. Then we knit 7 columns without a crochet and tighten the loop.
Next, we form the petals. To do this, you need to dial a chain of 10-12 air loops (the number of loops depends on the desired length of the petals). We knit a chain towards the base with single crochets. Next, we fix the chain on the base. After that, we continue tying the petal with single crochets (2 times). After the first petal is connected, we move along the base 6 loops to the left and continue to knit the second petal in the same pattern.

Step 2: knitting the middle
To decorate the middle, you will need brown yarn and beads. We knit in a circle, without adding loops. It is necessary to knit with a thread on which beads or beads have already been strung.
When the core is ready, it can be sewn to the base, after placing foam rubber between them to give a convex shape.