Do-it-yourself layout of a knight's castle from paper. Do-it-yourself cardboard castle: a master class with photo schemes
A cardboard castle can be made not only by adults, but also by children. Cardboard craft is a separate type of creativity that not only children, but also adults are fond of. Seeing the finished models, it seems very difficult to make them, but in fact, having mastered the basics of craftsmanship, you can immediately begin to create real masterpieces. Accuracy, patience and perseverance - this is all that is needed to engage in this kind of creativity. Because a large and beautiful castle made of cardboard is sometimes made for several days or weeks. Of course, one cannot do without a flight of fancy, which must be shown when decorating a future work of art. But the future hostess or owner of the castle will be happy to help adults in this.
Beautiful castles with carved turrets are made according to patterns that can be found on the Internet or made independently, after drawing the drawings. For work, you will need large cardboard boxes or sheet cardboard.

Sequence of work:
- With a simple pencil, draw the outlines of the future castle on cardboard.
- With the help of sharp stationery knife silhouettes of walls, towers, arched openings are cut out.
- Structural elements are glued together with adhesive tape or glue.
- The walls are painted with paints or pasted over with colored paper.
This is the simplest scheme for making a cardboard castle, which can be used as an algorithm for other buildings.
The easiest way to make round castle turrets is from paper towel bushings, food foil, and oilcloth.
How to make a cardboard castle with your own hands: a step-by-step master class
If you thoroughly start making a castle out of cardboard, you should first present it in detail and draw a picture. And then, based on it, create a detailed drawing. After that, there is a long and painstaking work to build and decorate the castle.
Tools and materials:
- Stationery knife;
- Scissors;
- Thick cardboard or boxes;
- Compass;
- Paints;
- Glue;
- Scotch;
- Ruler and pencil;
- Colored paper.

You can also prepare various auxiliary materials for decorating the castle: sequins, feathers, beads, flags, chains, artificial flowers and others. If among the elements of the castle there are complex carved figures, then a stencil is made for them.
Instruction step by step:
- First, a drawing is made on graph paper.
- Templates are made separately for all large and small parts of the castle. If the details are repeated, then only one template is made. It must be remembered that in the details it is necessary to leave a place for a seam on which glue will be applied.
- Templates are applied to cardboard and circled, and then cut out. It is advisable to number all parts of the castle so as not to confuse them when gluing.
- The base of the castle is glued from large parts.
- Small parts are glued (balconies, stairs, terraces, turrets).
- Next, you can fix the lock on a solid base (cardboard, foam).
- The castle is painted and decorated with decorative elements.
To make a pattern on the walls in the form of bricks, you need to paint the entire castle with gray or light brown paint. Then a rectangular template is cut out of a piece of foam sponge. It is dipped in dark brown paint and imitation brickwork is left on the walls.
Beautiful do-it-yourself paper castle: templates and instructions
From ordinary paper, you can build unusually beautiful castles that will serve not as a toy, but rather as a decoration. And if you make inside them a backlight of LEDs of different colors, then they can become excellent nightlights. But adults do such serious crafts, and children can be offered ready-made templates that can be downloaded from the Internet and printed on a color printer. They are also sold in bookstores or art stores.

What you need to make crafts:
- scissors;
- Glue stick or PVA glue with a brush.
It is necessary to carefully cut out the contours of the castle and all its individual parts. Then fold them along the fold lines and glue. The last step will be gluing individual parts, for example, turrets to the walls of the castle.
To make the design more durable, it is necessary to stick the paper parts on the cardboard.
Schemes for beginners: how to make a cardboard castle with your own hands
The first crafts are best made according to simple circuits by carefully studying the master classes or watching video tutorials. Once you have learned a lot from there, you can get to work. Masters advise first to try to make not a three-dimensional structure, but a cardboard castle from two walls perpendicularly fastened together. The child will also enjoy making this simple model.

For work you need:
- Two sheets of cardboard (white or colored);
- Colored pencils or paints;
- Scissors;
- Simple pencil.
Arbitrary walls of the castle are drawn on sheets of cardboard and cut out along the contour. In the middle of each sheet there should be a groove into which another sheet will be inserted. Next, the walls are painted on both sides and fastened together. They can also be pasted over with colored paper, making interesting applications.
Doors and windows should be large enough so that the child can stick toys or hands into them during the game, otherwise he will simply break the openings.
After the simplest model of the castle is successfully made, it will be possible to proceed to more complex designs. Children should also be involved in the manufacture of crafts. He, too, will gradually improve his skills and develop creative abilities.
Master class: cardboard castle (video)
Making a castle with your own hands is not always easy. For example, the dimensions of the parts do not match or the cardboard is deformed during the drying of the glue. Therefore, you need to carefully read the instructions and take into account past mistakes. And then the luxurious royal castle will take pride of place in the collection of your crafts.
Theoretical side of the issue
The process of making soda at home is not that complicated. There are several prescription mixtures, but the main one for each is carbon dioxide CO2, which is not amenable to the combustion process, has no smell and color, and is also much heavier than oxygen and at the same time quickly dissolves in a liquid, giving the latter a slight sourness. This is exactly what the soda production process looked like in Soviet-era machines: carbon dioxide was supplied under pressure from a cylinder to a tank of sweetened water and completely dissolved in the liquid.
For home carbonation of water, you can use special cylinders with carbon dioxide and a siphon that allows you to supply gas in portions to water (sold in hardware stores).
Is it possible to purchase a siphon and gas cylinders? It's okay, you can produce carbon dioxide from household items such as baking soda and vinegar. When these two ingredients are mixed, a chemical reaction occurs, the consequence of which is the release of carbon dioxide. Mix products in the following proportions: per liter of water, take seven tablespoons of 9% vinegar and baking soda in the amount of two teaspoons. You will also need the following inventory: a meter polyvinyl chloride tube, two plastic bottles(choose dark ones) and two lids with pre-punched holes, the diameter of which is slightly smaller than the diameter of the tube.
Carbonation process
The first bottle must be filled with water, and the second bottle should be filled with soda and vinegar. It is important to remember that the chemical reaction must be delayed in time, so pre-wrap the soda in paper napkin and pour vinegar over its surface - this way you will have time to firmly fix the cap of the bottle before the release of carbon dioxide begins and you can avoid losing a significant part of its volume. Be sure to fix the tube tightly in the cap holes with liquid plastic or glue to avoid gas leakage.
A paper napkin can be replaced with an envelope made of cling film or foil. Make holes in its surface in advance to facilitate the process of a chemical reaction.
During the process of mixing water and carbon dioxide, the soda container must be shaken well for 5 minutes in order to release the maximum possible volume of gas in the best possible way. At the end you will get a drink of a low degree of carbonation, the taste of which can be diversified with the help of syrups, fruit or fruit juices.
Which ones did I tell you about recently? So, it all started with them. Because princesses, you know what they are? They don't want to live in an ordinary dollhouse! Give them a castle! And certainly from cardboard! Can you imagine? It was in approximately these terms that my daughter turned to me with a request for an urgent provision of a separate living quarters for the princesses.
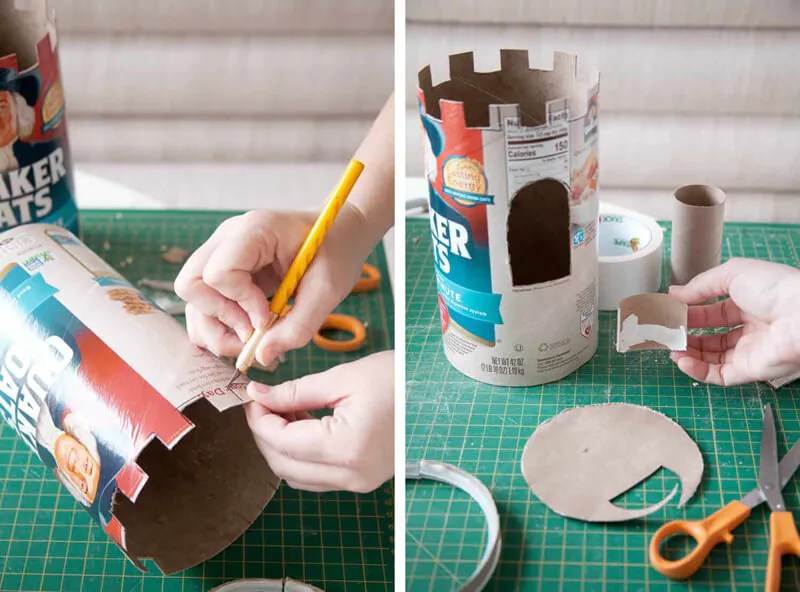
I started to rack my brains, like what. As usual, I went through the Internet on the topic of cardboard castles and cardboard palaces, I looked at a few interesting ideas, took out a cardboard (fortunately, we always have a lot of this stuff, because we love breakfast cereals very much), took out toilet paper sleeves (oh, what we don’t have in the pantry!), scissors, a pencil, a ruler, sat down in front of this whole bunch and... And nothing... no ideas. At all. Complete stupor. I attached parts this way and that, it doesn’t work like a stone palace and that’s it ... In short, on the first evening of working on the project, the first glimpses of my creative consciousness began to appear after about an hour of almost meditative contemplation of a pile of garbage. Here is what happened as a result of this meditation.
But in the morning, there was a clear understanding in my head that the castle consists of two main parts: a) from the palace, b) from the fortress. That is, a castle is a palace, inside a fortress.
And now the creative consciousness is already awakened, the process is launched and away we go!
FORTRESS:
It was decided to make the base of the fortress out of two boxes, laying the boxes on top of each other with a shift.On the sides, it was decided to attach walls - two more boxes.

The walls of the fortress were pasted over with strips of cardboard with denticles, which turned out to be real fortress walls, on which sentinels can walk.

The walls were glued to the base with PVA glue.

From above they pressed down with a load to stick better.

But, as the chief architect, the child asked, how will the princesses climb these walls? I had to make stairs.

Here you can see where they are glued.

The round towers of the fortress are made of three rolls of toilet paper, connected with adhesive tape. The towers themselves are also attached to the walls of the fortress with adhesive tape.

The central gate, that is, the entrance to the castle, was made of cardboard, bent with the letter L. The lower part was glued to the base of the fortress with double-sided tape, the upper part was stapled to the towers in two places.

And then we unexpectedly came in handy with a part of the chain that remained after shortening the handle on my daughter's handbag. Thank you dad for saving it just in case!

The chain is attached to the wall like this: it is inserted into through holes, ordinary paper clips are attached to the ends. The clips prevent the ends of the chain from slipping out and serve to facilitate the closing of the gate. Here is an interactive element for you!

The chain is attached to the door on the wire as if you were sewing on a button.
I cut out the loopholes of the fortress from some picture found on the Internet, reduced it to right size, reproduced and printed. The picture came in black and white, so I had to color it by hand. But that's just more interesting, right?

The final touch is brickwork. I drew it with wax crayon over a painted and well-dried wall.

CASTLE:
The palace was made from a box from a magnetic alphabet and cardboard, twisted into tubes and stapled on both sides. Moreover, the extreme turrets turned out to be composite. Small cylinders are not attached to anything, they can be removed. Many small incisions were made on the bottom of the cylinder of the central tower, bent outward and glued on double-sided tape.
The base on which the towers of the palace are installed is a box that has a part with a hole to make it easier to hang the goods in the store. It is not fixed to the base by anything, it is held solely by this hanging part inserted into the slot made in the cereal box. But holding on tight. Round side towers are attached to the box with double-sided tape.
The palace must have a balcony, and for this we attached a cardboard folded with the letter C to the wall of the building with double-sided tape. Attached to the base with double sided tape.

From above, they covered this case with an arch-shaped cardboard, inserted this cardboard into the slot and glued it on the back side inside the box with a glue stick.

According to an idea spied on the Internet, such railings were originally planned on this balcony.

As a result, it turned out like this:

The halves of the toothpicks are attached to the cardboard with hot glue, the beads are put on top and are not fixed by anything. On top of the toothpicks, a piece of braid is glued to the hot glue, which has remained since the time of manufacture.
To the balcony of the palace, at the request of the chief architect, ladders were also attached.
In addition, our architect could not figure out how the princesses could get to the large balcony from the entrance to the fortress? Indeed, there was no direct route, but it was not a princess thing to jump through the air, we had to cut a through passage from the courtyard to the balcony.
The roofs of the palace towers were made of colored cardboard. Color scheme - daughter's. Empirically, that is, through trial and error, we got a pattern for cones from a newspaper, it turned out that half the circumference from a reel of adhesive tape fit well in size. They cut out semicircles, rolled them into a cone and fixed them with a stapler.

Each princess castle has spiers with flags fluttering in the wind. Therefore, flags were cut out of the same colored cardboard, glued together and put on skewers for barbecue. Then these skewers were attached to the roofs with hot glue.

Windows, as in the case of the fortress, were found on the Internet. We were more lucky with these windows - we managed to find colored ones that matched the color scheme.
One of the integral parts of castles and fortresses is a wooden lattice door. She, or rather them, because we have two of them, we made from ice cream sticks, fastened together with PVA glue.

I love ice cream sticks! :) We even made them out of them. :)
Since we made the castle in the evenings, due to good weather, the project was delayed. But you know princesses! They are so impatient! Therefore, we started painting the castle when it was not yet finished.
Every little girl certainly dreams of a brave and handsome prince on a white horse. And what is a princess without a real luxurious castle?
In this article, we have prepared for you a very interesting master class for making a cardboard castle that will become the most beloved object for games. With a cardboard castle made by hand, not only girls, but also boys can play. Indeed, in the castle you can arrange large-scale battles, and not just wait for your lover in the highest tower.

So, to make a cardboard castle, you will need the following materials: cardboard boxes, toilet paper packaging and sleeves, as well as scissors, glue and paints.
Based on the cardboard wealth that you manage to collect, you must design your own unique castle.

From cardboard boxes, make the main buildings in the fortress. From small rectangular boxes, you can make strong walls. And cardboard sleeves from toilet paper can be made turrets.


For the construction of roofs you will need cardboard.


Be sure not to forget to cut out windows and doors, balconies and terraces in buildings, then it will be much more interesting to play.
Do you want to surprise your neighbors in the country? Do you dream of plunging into the atmosphere of the Middle Ages? Then build a medieval castle on your site. You can, of course, purchase a prefabricated version in a children's toy store, but at a cost of several thousand rubles, it will look like a large plastic toy. The castle, created by oneself, will look like a real one, and its dimensions and appearance limited only by your imagination.

Materials: stone or wood
For a structure consisting of three walls with towers, you will need the following materials:
- Styrofoam - 5 sheets measuring 100 x 60 cm x 3 cm
- Insulation for pipes "foam", diameter 110 mm - 4 pcs x 1 m
- Decorative plaster based on colored chips - 1-2 large cans
- Small stone or marble chips - 1 kg
- Acrylic paint to match the plaster - 1 can or can
- Dark acrylic paint (black or brown) - 1 can or can
- Plastic flower pots (for roofs) - 2 pcs.
- Glue for polystyrene foam (for example, "Moment Installation") - 2 large tubes
- Long screws (for flagpoles) - 2 pcs
- Mounting foam + gun - 2 cans
Instruments
- Thin knife - 1 pc, screwdriver - 1 pc.
- Meter ruler, short ruler, felt-tip pen or marker.
- Narrow paint brushes - 4-5 pcs.
- Spatula - 1 pc.
- Large brushes for painting teeth - 2 pcs.
- Insulating tape - 1 pc.
- Modeling mass (black or brown) - 1 pack
Stage 1. We draw a diagram of the future structure
First you need to determine the constituent parts of the future castle - the number of walls and towers. I offer schemes of three types of walls that can be combined in any quantity. I decided to start with three walls and six towers - three round and three square. You can start work from any wall.

Stage 2. How to make a DIY wall layout
WALL-1. For its manufacture, we need two sheets of foam (preferably white color) and two plastic flower pots.

This is how it looks when finished:

We draw a scheme of walls
On one sheet of foam, draw a diagram of the wall with a felt-tip pen. She will be the carrier. The height of the towers is equal to the height of the sheet. The width of each tower is equal to the width of the cache-pot (roof) minus 1 cm. The distance between the teeth must be at least half the width of the teeth. The height of the walls and the middle part is approximately two thirds of the height of the towers. At the edges of the wall, it is necessary to leave 5 cm of an area free of teeth. You will then hide this part under the tower. Carefully cut out with a knife. In the middle part we cut out the gate. We do not cut out windows on the towers.
We draw blanks of towers
On the second sheet of foam we draw blanks for towers - 6 pieces, 3 for each tower. The size of the blanks is equal to the size of the towers. We cut out windows on four blanks. We do not throw away the cut pieces, they will later be useful to us when painting. We glue the blanks of the towers on top of each other on the load-bearing wall in the place marked for the towers - we glue two blanks on the front side of the wall (glue the blank with windows on top), glue the second blank with windows on the end side of the bearing wall. As glue, you can use Moment Installation glue. If you intend to use a different adhesive, be sure to first test on scraps of Styrofoam to see if the adhesive is corroding the Styrofoam. The same goes for colors. As a result, we get a wall with two towers, each of which has a thickness of 4 foam sheets. There are blank windows on the front and back walls of the towers. Windows need to be painted inside with dark paint. You also need to paint over the inside of the gate arch and the gate itself. If the side walls of the towers turned out to be protrusions due to the discrepancy in the dimensions of the blanks glued to each other, it is necessary to cut the towers on the sides, aligning the side walls.
We try on the "roof" on the towers. The cache-pot should be freely put on the tower and go on it by 1-2 cm. Please note that after painting the dimensions of the tower will increase by 5-10 mm. Therefore, if the "roof" is difficult to put on, then the tower must also be cut.
After the dark paint dries, a “lattice” can be made on the gate. To do this, using a ruler with a screwdriver or scissors, we make deep grooves in the form of a lattice on the painted gates so that unpainted light foam shines through them.
Painting the castle walls
Let's start with the teeth. Painting the teeth with plaster is the most time-consuming operation, so they must first be painted with paint to match the plaster, and the composition itself can only be placed on the front and back sides. You can generally not cover the teeth with plaster, but paint with paint from a spray can in a contrasting dark color, as we did on the third wall.
So, first we paint the teeth with paint to match the plaster. We use spray paint to paint over each tooth from all sides. Let's dry. Then we cover the front surface of wall-1 with decorative plaster. At this time, it is better to lay window openings with pieces of polystyrene foam so that the plaster does not get inside. The brush should be fairly hard and clean. After painting, if possible, it should be washed off the plaster and put into water. It is better not to use one brush more than twice because of stuck plaster. We are not painting the side walls of the towers yet. We will paint them last. We leave the wall blank-1 to dry in the sun for two days. After two days, we turn the product on the back side and also cover it with decorative plaster. In the meantime, it dries, you can do other walls.
WALL-2. For its manufacture, we need two sheets of foam.

This is how it looks in finished form (the outermost prong on each side then had to be cut off):

This wall is a variation of the first wall. Only here the tower is in the middle, and the gate is on the side. In addition, the teeth, as well as the tower, are cut from another sheet, and the windows are made through. The windows on the right side of the wall are lined with tabs painted dark. The windows on the left side are through. The height of the walls and the tower is equal to the height of the sheet.
So, we mark the gates, windows and a place for the tower on the first sheet. We cut out all windows, incl. and on the tower, we paint the cut out pieces of windows in a dark color. Then we paint in dark color the openings of windows and gates, as well as the gates themselves. After applying the plaster, you will need to insert the dark pieces of windows on the right side of the wall back into the openings. Leave the rest of the windows blank.
From the second sheet we cut out two blanks with windows. We make windows on the same level with the windows located on the tower, on the load-bearing wall. Separately, we cut out two or four blanks for the teeth for the right and left parts of the main wall. We glue the tower blanks on the front and back sides of the load-bearing wall, aligning the window openings. Then we also glue the teeth - on both sides of the load-bearing wall. I glued the teeth on only one side, using only two blanks, because. originally planned to make an extension behind the second half of the wall. The tower is made up of three layers. The thickness of the tower can be increased by adding an additional false wall glued to the front side of the tower (as we did when making wall-1).


Do not forget to leave the edges on both sides free from 3-5 cm teeth, which will then be hidden under the towers, and make rectangular cutouts for joints measuring 3 x 1.5 cm along the edges with back side walls.
We paint over the teeth with paint to match the plaster. After the paint dries, we cover the front side of the wall with decorative plaster (you can not cover the teeth with plaster). Then we sprinkle a part of the wall around the gate with small stone chips and, patting, melt the crumbs into the plaster. Crumbs can be sprinkled on the second half of the surface. After that, we leave the entire structure to dry for a couple of days, while we ourselves will be engaged in the manufacture of the third wall.
WALL-3. For its manufacture, we need one whole sheet of foam and pieces of the sheet remaining after the manufacture of the second.

This is how it looks in finished form (the extreme teeth then also had to be cut off in order to hide the edge in a round tower):

This type of wall is quite simple to manufacture, but looks quite impressive. Three and teeth are glued to the main sheet. The teeth are painted with acrylic paint in a contrasting color. After painting with plaster, the wall is covered with a thin layer of stone chips.
The teeth on this wall have a more complex structure - the top row is formed from wide teeth (3x3 cm), and the bottom row from narrow ones (4x1.5 cm).

We cut out the teeth from strips 10 cm high. To do this, the strip must be divided into 3 parts - 3 cm high, 3 cm and 4 cm high. On the first strip 3 cm high, we cut out teeth 3 x 3 cm in size, the distance between them is -1.5 cm. On the lower strip with a height of 4 cm, we make a triangular cut at an angle along the length of the entire strip, leaving a strip 1 cm thick at the bottom. After that, on the lower strip, we cut out long teeth measuring 1.5 x 4 cm. The distance between the lower teeth is no more than 1.5 cm Then we paint the teeth with paint using a spray can and a thin brush, carefully painting between them. The teeth can be painted either to match the plaster or in a contrasting color.
Then, from the remnants of the foam, we cut out three retaining walls in the form of triangles or trapezoids, the height of which should be at least a third and not more than half the height of the wall. We glue the supports and teeth on the main wall. Do not forget to leave 3-5 cm free from teeth on both sides, which will then be hidden under the towers, and make rectangular cutouts for joints measuring 3 x 1.5 cm along the edges on the back of the wall.
We put the structure face up and cover everything except the teeth with decorative plaster:

Then we sprinkle the entire surface with small pebbles, gently pressing them into the plaster.
While the third wall dries, you can paint the reverse side of the first two with plaster, if their front sides have already dried by this moment. Lastly, we paint over the sides of the towers, placing the walls on the end. Let each side dry for two days.
Now you can start working on the corner round towers.
Stage 3. Round towers of the knight's fortress
For the manufacture of round towers, you can use any thick pipes of the desired diameter that can be processed with a knife, for example, “shells” for pipe insulation made of foam. If they are not there, then you can use a foam pipe insulation with a diameter of 110 mm, which is sold on any construction market.

For the manufacture of three towers, we need four meter pieces of foam. From each of the four pieces we cut off cylinders 8-10 cm long and cut out teeth half the height of the workpiece. We cut the ring of teeth along the height and glue them on top of each of the three towers, wrapping them around the main part of the tower. We cut off the missing pieces with teeth from the fourth workpiece. While the glue dries, for a better fit, we fix the seams with electrical tape.
Next, on each tower we make longitudinal cuts along the length, equal in height to the height of the walls (60 cm) and in width - a little more than twice the thickness of the walls. The width of the cuts can be increased after painting, when you insert walls into them.
For variety, one or more towers can be decorated with an additional cylinder with tall narrow windows. The overlay is made from the remaining fourth piece of foam.

While the glue dries, we paint over the windows on the tower with black paint, and only after that in three or four steps we cover the elements with plaster, turning them by 90-120 degrees. Carefully paint over the teeth.
While the towers are drying, you can start making small parts for them and walls, such as roofs, flags, coats of arms, cornices, small windows. The number of details depends only on your imagination and patience. You just need to keep the proportions.
Metal buttons and stripes can be used as a coat of arms. Flags can be made from colored self-adhesive paper, but it is better to use self-adhesive film. We stick the flag on a long screw. Screws are screwed into plastic flower pots. We paint the cache-pot in red, drawing some details with black paint. The coat of arms is attached above the gate with the same plaster or glue.

Masonry elements can be added to rectangular towers and walls. To do this, you can use the black modeling mass, which is sold in children's stores and in the stationery departments. You can also use plasticine, but the advantage of the mass for modeling is that in air, unlike plasticine, it freezes.


We made the roof for the middle tower from a half of black paving slabs.
By the way, after the plaster on the round turrets dried up, and the towers stood in the rain for several days, the plaster began to move away from the foam near the edges of the cut, as Orange peel, and we had to additionally glue this “crust” with Moment Installation glue. Helped.
After drying, you can proceed to the most important stage - the assembly of the castle.
Stage 4. Assembling a medieval castle
Despite the fact that the design of the castle allows it to be moved to any place, it is still better to assemble the building on the site where it will stand.

The site for the castle must be prepared in advance. It should be flat and preferably without a slope. We made a castle to decorate the pond, so our platform had a slight slope towards the pond, which added additional difficulties for us when installing it. In order for the castle to stand evenly, it was necessary to cut the walls at an angle from below, since the foam plastic, even covered with massive plaster, is easily cut.
Having installed and connected the walls to each other, it is necessary to tighten the entire structure around the perimeter with a rope or cable, and then “glue” the walls at the joints with mounting foam. After the foam dries at the joints, remove the rope and begin to install round towers. To do this, we put the towers on top of the corners of the castle, inserting the walls into the longitudinal cuts made in the towers. If the cut is small, we increase it to the desired size so that the turrets fit snugly against the walls from the outside. The missing part of the towers on the inside of the castle can then be formed using polyurethane foam. We tightly press the edges of the cuts to the walls of the castle, if necessary, supporting each tower with stops, and fill the towers from the inside with mounting foam, making small protruding slides on top. In addition, it is possible to form the missing parts of the turrets from the inside of the building using mounting foam. To do this, we form a protrusion of the desired shape from foam at the junction of the walls, and after the foam hardens, cut off the excess with a knife and plaster. We limited ourselves to covering the internal joints of the walls with plaster.
After the foam dries, we carefully cut off the slides protruding above the towers with a knife so that a flat area is formed on top, which we also cover with plaster.

Then we remove all the remnants of the foam in the places where the towers adjoin the walls and paint over them with plaster. After that, the castle must be covered and allowed to dry for two or three days until the plaster is completely dry.


Now you can move on to the last step - highlighting.
The final stage. Building lighting
Undoubtedly, a castle built with your own hands will decorate your site at any time of the day. But it will look most impressive in the evening if you make a special highlight.

As a backlight, you can use solar-powered diffused light fixtures that need to be placed inside the castle. Then, through the through windows and open gates of the castle, located on the second wall, a faint light will stream at night, enlivening the castle and giving it mystery. And solar directional light fixtures built into the “stones” and installed outside will illuminate the walls from all sides.
But to illuminate the front wall, it is better to use a stationary directional light, into which a color-changing light bulb is screwed. And then the effect will be extraordinary.
And finally, a few more practical tips.

In toy stores and online stores you can find a wide variety of models of locks. However, if you do not have enough funds to purchase them or want to create your own unique model, then you can always make such a castle yourself! First of all, you need to choose the materials that suit you. This choice will depend on the level of your skills, available financial resources and free time. Then you will need to find a ready-made model drawing on the Internet or create your own. Based on this drawing, make and assemble all the details of the castle. In the end, all you have to do is paint the castle and add accessories to make the model more realistic.
Steps
Part 1
Material selection- circular saw for cutting wooden parts;
- screwdriver;
- wood glue;
- nails and screws of various sizes.
-
Please be aware of the limitations. Before proceeding with the modeling of the castle, consider those factors that will affect the design of the model. For example, think about limited space. This includes the limitations of both the working space and the space for placing the finished model. If your castle is too big, you simply cannot put it anywhere. You should also consider the following things.
- What are the limitations of the materials you use? For example, a paper lock will not last as long as a wooden one.
- What is your budget? A paper lock will cost you much less than a foam or wood lock.
- How much time are you willing to devote to this project? A wooden castle will be very strong but will require several weeks of work from you.
Part 2
castle simulation-
Decide if you will create your own model. On the Internet you can find many beautiful drawings for the manufacture of various models of castles. They will be useful for beginners and those who are going to work with materials that do not forgive mistakes (for example, with wood). However, if you have a specific idea in mind, it is probably wise to prepare your own drawing for it.
Draw a small scale drawing of the castle . When drawing to scale, the correct proportions must be observed. To make such a drawing correctly, you need to proportionally reduce all the parameters of your future castle. For example, if the finished castle should have a size of 90 x 60 cm, then the drawing for it can be reduced by 10 times and have parameters of 9 x 6 cm.
- To build a drawing, it will be more convenient to use graph paper.
- Be sure to include elements such as towers and drawbridges in your drawing.
-
Highlight the large and small details of the castle. The lock can consist of several large sections at the base and many small sections fixed on top. For example, in the simplest square castle with four towers, the large section will be a square of walls, and the small sections will be the cylinders of the towers.
- Draw each section of the castle separately to better represent the process of assembling the castle.
-
Plan every single detail precisely. Your drawing will become your main reference point. Sign on the drawing the actual dimensions of each part of the lock. Try to visually represent the process of assembling parts so as not to be mistaken with their parameters. Be sure to include any additional model elements in the drawing. For example, the following:
- battlements of the walls;
- towers;
- roof;
- large flat base.
-
Consider creating templates for making each piece. This step is optional. However, to perform identical parts, it is quite convenient to use paper templates. For example, if you're making a Styrofoam castle with many identical towers, prepare a full size paper template for the tower. Then simply apply the template to the foam and cut out the towers. So they all turn out to be the same in shape and size.
- Templates are also useful when making paper castles. Instead of drawing the same parts again each time, it is more convenient to cut them out according to the template.
Part 3
Making a lock-
Cut out all the details. Depending on the material chosen, you may need a saw, a construction knife or a jigsaw. First of all, take a ruler and a pencil to mark the details of the castle. Then carefully cut out the parts, making sure they match the original drawing.
- You may want to start building your castle as soon as you have just a few details ready. However, it will be easier to work if you cut out all the details beforehand.
- In order not to get confused during the assembly process, number the parts of the lock.
-
Make all the necessary holes in the details. Before assembling the parts, make all the necessary holes in them, including windows, loopholes and doorways. Use the drawing as a guide, otherwise you can make a mistake with the location of the holes. If necessary, use a ruler or paper template so that the holes have the correct parameters. For example, you can do the following.
Collect large sections of the castle. Large sections of the castle are its foundation. Assemble each individual section with glue or tape (or nails and a hammer if you're working with wood). After assembling large sections, arrange them in the correct order and connect them together. Just remember to use the right adhesive for the material being used. More information on this is provided below.
-
Assemble the smaller sections. Small sections are separate structural parts of the castle, such as towers, roofs, gates. Separately assemble all the small sections before attaching them to the larger sections of the castle. After connecting all the details together, it will be possible to start decorating the castle.
- If you used PVA, spray glue or wood glue to assemble the castle, give it a few hours to fix it and only then proceed to decorate the castle.
Decide if you will use cardboard. Cardboard is a great working material for beginners. In addition, it is great for those whose financial capabilities are limited, because extra cardboard can always be found at home. However, a cardboard castle model will not be as strong and durable as a model made from other materials.
Consider using foam or foamiran. Thick sheets of foam and foamiran can be found in craft stores. They will allow you to create a fairly durable and lightweight construction from them. However, it is sometimes difficult for beginners to cut out parts from foam. If you've never done this before, buy Styrofoam with a spare so you can practice. To work with foam, you will need the following:
Take wood as a basis. Wood is an excellent choice for building large and strong castles. With high-quality performance, such locks can serve long years. However, it is quite difficult and expensive for beginners to work with wood. To work with wood, you need the following: