Macrame schemes for beginners. Macrame for beginners: simple schemes with comments
Macrame- a slightly forgotten technique that was very popular 40 years ago. Technique came to us from the East and appeared in our country at the beginning of the twentieth century. Macrame is a knotted weaving technique. Today there are hundreds of types of knots and every day their number is growing. Many nodes are widely known, thanks to the sailors who actively used them.
Skillful craftswomen have learned how to create beautiful and practical things: planters, belts, handbags, bookmarks, jewelry, baskets and even curtains.
Learning the macrame technique will not be difficult, because having mastered the basic knots and techniques, you can easily weave various gizmos.
Let's look at what is needed for work.
Materials that are needed for weaving macrame:
Threads - threads are special, they are sold in needlework stores. You can also use twine, soutache, braid or thin rope.
Tailoring needles or pins
Pillow for weaving a very useful little thing that you can do with your own hands. But I’ll tell you honestly that most craftswomen do without it. They weave on an ordinary pillow, sofa, chair, whichever is more convenient for you.

Glue - PVA or clerical.
Lighter - in some cases, it may be needed to singe the threads.
Scissors
Where to begin?
To begin with, you always need to determine the length of the threads, and this is easy to do: the length of the thread should be eight times longer than the product that you will weave. But much depends on the thickness of the thread, the thicker it is, the longer the threads should be.
If during weaving it turns out that the thread is too short - it's not scary, you can glue the thread. If the thread is thin, then we coat both ends with glue and put one on top of the other, press and leave the product until the glue dries. If the thread is thick, then you can cut the ends a little, as in the figure and glue them together.

The number of threads should always be in pairs.
Any work begins with hanging threads on the "carrier thread", which is pinned to the pillow with pins.
There are two ways to hang threads:
1. The thread must be folded in half, placed on the carrier thread, then bent over it. We pass the free ends of the thread through the loop and tighten.


2. We also fold the thread in half, put it under the carrier thread and bend the loop towards ourselves. We pass the ends of the thread into the loop and tighten.


Basic techniques in macrame:
Flat knot macrame from which any macrame training begins. You can meet this knot in many master classes as a square one.
It takes 4 threads to make a knot. The diagram shows the principle of knot weaving.

Many jobs may require checkerboard square knots how do you ask?
First row: square
Second row: you need to skip two threads on the right, and weave the knot on the next four threads.
Third row: We take two threads from the first row and two threads from the first node of the second row.
And so on, in a checkerboard pattern.

Chain of flat knots:
To weave a chain, you need to weave a knot one under the other, in each row you need to alternately weave, starting from the left, then from the right.

Spiral chain:
It is woven in flat knots, one under the other. In each row, we begin to weave from the same side. Due to this, the chain will twist.

Knotted chain, it is either single or double.
A single one is woven from two threads, and a double one from 4. The principle of weaving for them is the same:
We take the left thread with our left hand, draw the right thread around it and thread it into the loop. We hold the threaded thread in our right hand, circle the left thread around it and thread it into the loop and so on.

Bridy
The principle is simple: weaving around one thread of all the other threads with double knots is called a brida. The extreme thread (right or left) is called nodular.
Circle the first thread around the knotted thread. As in the diagram and tighten. We got rep knot.

Brides consist of rep knots that can be woven horizontally or diagonally.


Braid:
In many works, you may need to beautifully finish the weaving of the product and collect the threads in a bun. And here a braid can come to the rescue.
It is done like this: We cut off an additional thread, from 40 to 70 cm long, depending on the thickness of the thread and the desired width of the braid. We put one end of the thread along the future brush and make a loop, as in the photo:

The second end goes under a bunch of threads, we wrap it from the bottom up several times with fairly tight turns. And then we thread the working thread into the loop and pull the short end of the working thread at the bottom.

That's all for today, but to be continued ....
A variety of weaving and knitting techniques have long been very popular among needlewomen. Today, the art of creating amazing images with the help of macrame will allow you to decorate the house in an original and beautiful way, bringing a special atmosphere to it.
Knotted weaving, which replaced the usual knotless, is commonly called macrame. Translated from Arabic, this term has the meaning - "fringe", as well as "lace".
Modern needlewomen, using a special scheme, weave interesting details for clothes with their own hands or create comfortable and unique covers for household items. Such decorative items can be woven using different materials. For this, linen ropes, ordinary threads or decorated with gold threads, as well as floss and silk, are well suited.

However, for high-quality jewelry making, macrame knots must be tight, this allows you to create a clear, correct relief and pattern.
The macrame technique has found its admirers due to its ease of use. Such weaving will not become an insurmountable problem even for beginners. It is enough to strictly follow the MK (master class) and an excellent result is guaranteed.
Macrame training course (video)
Master class: macrame panels for beginners
Having decided to try macrame weaving, you should initially pay attention to the selection of materials. Such creativity compares favorably with the fact that improvised materials are suitable for creating a product, and your own hands will be the main tool.
Having chosen the necessary scheme, it remains only to choose the threads or ropes (they can be any - silk, woolen or some other), after which it is important to follow the instructions step by step, this will ensure the successful creation of the panel.

When weaving panels, beginners should remember that for the correct macrame technology, it is necessary to attach the main thread to the working surface, it will not participate in weaving, but instead all working threads must subsequently be attached to it.

There are several knots that you need to remember to master the macrame technique.:
- Flat Right Knot. Here, two threads are attached to the bar to make 4 ends. The base will be 2 and 3 threads, the workers 1 and 4. The fourth thread must be placed on the base, and the first is passed under the base and pulled out from below into the loop.
- Flat Left Knot. Here the weaving technique is similar to the previous type, but instead of 4 threads, you need to start working with the first one.
- square knot. It is considered the main knot in macrame. To create it, you need to weave both of the above knots. You should start with the right side.
- "Chameleon". In the technique of such weaving, working threads change all the time. Weaving a square knot, you need to swap the main threads with the workers and make another square knot.
- "Tatting". It is woven from 2 or 4 threads. Using two threads - the first is placed on the base, which is wrapped with 3 threads from top to bottom and pulled into the loop formed. Then the first thread is brought under the warp and pulled into the loop from the bottom up. If 4 threads are used, 1 and 4 will be working, and the rest will be the base. First, a knot is woven using 4 threads, and then changes to the first. It is necessary to weave a chain constantly changing the threads in places. Such round weaving will create the desired image.
Macrame panel options: weaving patterns
Today there are many options for making panels. Moreover, all the schemes explain in detail how to create an interesting product.
An excellent decoration for the kitchen or living room will be a self-created panel with a pocket. Such a macrame is not only an interesting interior detail, but it will be an excellent solution for storing all sorts of little things. Using the scheme for making such pockets, it will be possible to quickly and beautifully weave a unique panel.

For those who want to update their interior and decorate, for example, paintings, a wicker panel "Forget-me-nots" will be a good solution.
Special schemes will help to correctly make the frame and the flowers themselves.
Many needlewomen prefer to make their own new Year gifts. An interesting and beautiful solution would be a wicker New Year's panel in the form of a Christmas tree, or other souvenirs of a similar theme.
In addition to the panel options described above, products depicting birds, animals or flowers are very popular. It can be macrame, which depicts an owl, fish and a variety of products on the wall.
Whichever version of macrame is chosen, the main condition for proper weaving is the clear execution of all the instructions of the selected product scheme. Attentive and unhurried work will help create an excellent panel that will decorate the room and the pride of the needlewoman.
How to make a panel for a wall clock
Using a special scheme, you can independently create an interesting panel to decorate the wall clock. This will help to update and decorate even out-of-fashion products.
You will need a bar, 5 cm wider than the watch and a cotton rope. To begin with, 20 threads are cut (each about 5 m), which are attached to the bar. It is necessary to make 2 zigzag horizontal brids (bases).

The pattern is made on 16 threads (on the left), counting 8 threads for the warp, 7 threads are tied to it with rep knots. Another brid - 9 threads on the left, weaving is done with rep knots to form the top of the rhombus. Under it, 14 threads are woven into a flat double knot. And the lower part of the rhombus is formed.
On one more brid (2) impose 5 threads from the brid described above. To the 3rd base, 4 knots are imposed, to 4 - already 3, and so on up to 6, where there should be 1 knot. Similarly, 6 and 7 bases are performed. After that, it should be diluted in different sides 2 threads in the middle, 7 threads are woven onto each. The same pattern is made on the right side.
In the middle of the weaving macrame, where there are 8 free threads, you can make two chains of 11 cm each.
To prepare a place for fastening the watch, you need to distribute 4 threads on 2 horizontal brids. Their length is 15 cm and in a checkerboard pattern they are woven with double flat knots. Each extreme thread is tilted to the middle and 19 threads are braided there.
From 2 extreme threads on each side, you need to make chains. The length of the first should be 11 cm, the next is shortened to 8 cm, then 6 cm. After creating the last chain, two threads are left free, and the length of the next one will be 4 cm.
All 40 threads are woven to an additional thread (horizontal) using rep knots. Then they should be divided into 10 chains (4 threads each) and make 3 double flat knots in each. It remains to decorate the side parts of the panel with a hemstitch, and tie their ends into one bundle, and then beautifully attach it to the brids.
Macrame: pattern for panels (video)
So, for the manufacture of macrame panels, you need a little patience, attention and strict adherence to all weaving instructions. Compliance with these conditions guarantees an excellent result, which will become the pride of the needlewoman.
Examples of macrame panels (photo)


Macrame is an ancient form of textile craft. The main principle of weaving is to tie knots. China is considered to be the birthplace of macrame. Beginning craftsmen can master the simple technique of weaving shoelaces, while experienced needlewomen can create real masterpieces.
What is macrame?
Macrame is a weaving technique based on tying knots, thanks to which you can create interesting crafts, bracelets and other unique things. This is one of the most ancient types of needlework, the roots of which come from Asian countries. Today macrame has become very popular. There are art schools around the world where you can learn this weaving technique.
What is needed for macrame?
The main material used for work is any thread. As them, you can use a rope, cords and more. True, it is not recommended to take threads with pile , because due to their fluffiness, the pattern becomes less pronounced. Looks much more attractive silk cords , however, weaving from them is not very convenient, since they slide in the hands. To make a strong knot when weaving using the macrame technique, you need to make enough effort. Therefore, it is not recommended for beginner needlewomen to use silk threads. For them it would be preferable cotton rope . It is convenient to use when creating various chains and nodes.
Used in macrame two types of threads . The first is for the base, the second is for work. The base is necessary for attaching working cords. It has certain requirements. First of all, the main thread must be of optimal length, which exceeds the width of the work. It is she who is tied and pinned to the base.
In addition to the main material, you will need:
- thread attachment,
- pins with balls at the ends,
- measuring tape,
- scissors.
And novice craftswomen for weaving using the macrame technique with their own hands will need and step-by-step instruction . It is desirable that it be written in an accessible and understandable language, and also accompanied by a photo.
On a note! It is important to take care of fixing the work in advance. The base must be necessarily stable, but it is excellent to skip the pins. In the case of weaving small-sized products using the macrame technique, an ordinary pillow is quite suitable as a base.
Macrame patterns for beginners
It is convenient to master weaving macrame for beginners according to the patterns.
The simplest knot, which is used in almost every macrame pattern, is a simple Herculean knot. To make it, you need to take two threads and secure each with a pin. Then the right cord is wound under the left, and the left is braided into a loop, as shown in the diagram. So it is necessary to weave until the product of the required size is obtained. At the end, a knot is made.

Often in weaving macrame, the "Spider" pattern is used. For her, you will first need to make several square knots, then one is tied on 3-6 threads in the second row. As for the base, these will be 4 and 5 cords. Performing the third row, according to the scheme, you need to braid 1 square knot using a similar warp, as well as adding 7 and 2. Threads 4 and 5 are used for the square knot, which is performed in the fourth row, using also 8 and 1.

Also, using the macrame technique, you can make a double flat knot with the left crossbar, as shown in the diagram.

Macrame weaving master class
Using the master class with step by step photos and a detailed description of each action, you can weave anything with your own hands. Macrame weaving allows you to realize any fantasies, to bring to life the most unexpected ideas. Such products will definitely become the main decorations of the house.
Master class 1: planters

To weave a planter using the macrame technique, you need to prepare a glass round vase, adhesive tape and nylon threads white color. Then you can start weaving the product.

The work is done as follows:

Thus, an interesting planter of knots and chains is obtained, which will become a decoration of the house, and also suitable as a gift.
Master class 2: macrame belt
Weaving a flat macrame belt for beginners is not difficult if you follow our master class exactly. To work, you need a base on which 6 cords (threads) are fixed.

Further weaving macrame continues in a similar pattern. This pattern is simple and suitable for beginner needlewomen. Despite the ease of manufacture, the belt is quite attractive. When the required length of the product is reached, all cords or threads must be tied into one knot. The belt can be painted with beads by attaching them with glue.
Macrame is a knot weaving technique. You can use different materials for this hobby, there is only one requirement for them - strength. From thick threads, products are more textured, but thin patterns are poorly visible.
Classic macrame is done in white or light beige tones. But you can use other colors as well.
Here are some reasons to get into this needlework:
- You will be able to create interior items and accessories with your own hands. There are a lot of options for using macrame. For example, the manufacture of bracelets, bags, rugs, wall panels, bedspreads, coasters for hot, curtains.
- Macrame style items are suitable for those who love minimalism or eco-style in the interior. For example, wicker planters will definitely decorate your home. Or not yours - decorative items are a great gift.
- This hobby does not require large financial costs. Expensive equipment is not needed, most necessary tools cost a penny.
As a child, I went to a knitting and macrame club. The acquired skills were rarely used in life. A year and a half ago, I wanted to make a pillow for a chair, or rather knit it. I quickly remembered all the loops and double crochets. I liked the feel of the thread in my hands. I decided not to stop and continue to do macrame.
This is a simple technique, there are not very many rules in it, which gives room for self-expression. For me, weaving is a kind of therapy. I concentrate on the process, as a result of which the inner storm calms down, harmony comes. And this is not the only plus of my hobby. The active work of the hands and fingers contributes to the development of memory and attention. I knit left to right and right to left. This makes both hemispheres of the brain work at the same time.
What tools and materials are needed for macrame
You can find them in the departments for creativity and needlework or order them in online stores.
- Cords made of fabric - cotton, wool, any plant fibers or even leather. You can also use a regular clothesline or twine.
- Thick safety pins.
- Scissors.
- Ruler and measuring tape.
- A device for attaching a thread - an old sofa cushion or a piece of foam will do.
- Awl or knitting needles in case you make a mistake and the knot needs to be untied.
- Clamps or wooden sticks for fixing the product.
- PVA glue.
- Decorative elements - ribbons, beads, buttons or buckles.


Marina Sushkova
macrame master.
The first question that beginners face is: “What kind of rope to use for weaving and where to get it?” Almost any cord will do - it all depends on the idea and the desired result. It is easier to weave from natural cotton. You can find such a rope in hardware and construction stores or on the Internet. For the first work, it is better to use a tourniquet with a diameter of at least 5 mm.
Don't be afraid to experiment, use different materials to see which one you enjoy working with.
Let's analyze the basics of macrame, without which you will not be able to create patterns. Consider knots that are woven from one thread.

What will you need
- 3 threads 30 cm long;
- 1 thread 50 cm long;
- sewing pins;
- working surface - foam or pad.
How to make a simple knot
1. Take 2 threads 30 cm long and fasten with pins on the work surface so that they do not move out. There are two ways to tie a simple knot. Depending on this, it will be called left or right.

2. The left one is done like this: take the rope in your right hand and pull it slightly. Note that the knot will tie where you hold the cord with your fingers.
 YouTube channel "Lyubov Lopantseva"
 3. With your left hand, take the free end of the rope and put it over the stretched one from left to right to make a loop.
 YouTube channel "Lyubov Lopantseva"
 4. Now drag the end of the rope from top to bottom into the resulting loop and tighten. Get a knot.
 YouTube channel "Lyubov Lopantseva"
 The right knot is made in exactly the same way, only the main hand that holds the rope changes to the left. Details are in the video below.

How to make a figure eight knot
1. Use pins to fasten a 30 cm long thread to the work surface. Take middle part ropes in the right hand, and the end in the left.
 YouTube channel "Lyubov Lopantseva"
 2. Bring the end of the rope from left to right on the middle part of the cord to make a loop.
 YouTube channel "Lyubov Lopantseva"
  YouTube channel "Lyubov Lopantseva"
  YouTube channel "Lyubov Lopantseva"
 How to make a capuchin knot
1. Attach a 50 cm cord to the work surface. Take it in your right hand. Grab the end of the rope with your left hand and make a loop, as in a simple knot.
 YouTube channel "Lyubov Lopantseva"
 2. With the fingers of your left hand, hold the place where the threads intersect. With your right hand, take the end and wind around the right side of the loop 3-5 turns.
You can make a handbag, a beautiful bracelet of threads for yourself, as well as flower pots, panels for the home, after reading about weaving macrame for beginners.
Easy macrame patterns for beginners

Let's start with the basics. For work use:
- threads;
- scissors;
- solid base.
In principle, you can take any threads and even a rope, but cotton makes the most textured and beautiful things, and white nylon makes wonderful planters.
A rigid, rectangular object is taken as a solid base: a wooden cutting board, thick plywood, or even a large book.
As you can see, nothing unusual is needed for macrame, with your own hands you will create beautiful things from what is available. It remains to talk about the basic patterns that are easy to perform even for beginners. Here are the preparatory steps:
- First, tie a thread across the book or other similar object, the knot should be at the back.
- Now you need to cut a few threads. The amount depends on the specific job.
- Having bent in half, they are tied to a thread stretched across.
As fasteners, you can even use tape or tape. A piece of such adhesive tape is attached to the top of the weave to the work surface.
Let's start with simple patterns that require a little thread. They will help to complete the elements of the macrame weaving pattern. In this technique, you can make a bracelet.
See how the right and left loop knot is performed.

- Let's start from the right. F1 is the working thread, and F2 is the knotted thread. We put a working thread on the knotted thread, make one turn counterclockwise, pass the end of the thread into the resulting loop, tighten it.
- Now tie a second knot in the same way, lifting it up to the first, then put the thread on the right under the knot. Place the working thread F1 to the right of the knotted F2 and reverse the element so that you have a left loop knot.

- Place working thread F1 on the left and knotted F2 on the right. Perform one looped right knot, then one left knot. So, alternating these elements, weave a chain.
- The right "tatting" begins with the right loop knot. If you want to do a left tatting, then start with the left.
For it you will need 2 threads. Usually their length is 1 meter. Bend each in half, tie on a cross thread or attach to a soft surface with a pin.
In the process of weaving, the working thread is shortened more than the main thread. In order not to build it up, you can tie the thread during the initial fastening so that the working one is larger than the main one.
In this case, the workers are those located on the right and left, and the two main ones are in the center. Throw the left working thread through the two main ones, throw the right one on it, wind it behind the main ones, insert it into the loop formed on the left (this knot is called “left-sided flat”).

Now repeat the manipulation in mirror image, starting with the right working thread (this knot is called "right-handed flat"). So, alternating threads, complete the entire chain. It will turn out to be embossed two-sided. If you want to make a twisted chain (these are used, for example, for planters), then do only the left-handed, or only the right-handed pattern.
If you alternate "square" nodes in a checkerboard pattern, you get a "checkerboard" pattern.
Original weaving patterns using macrame technique
You are familiar with simple patterns from which you can make a bracelet. See how to arrange threads to complete the job.
This can be done in several ways:
- Starting to weave a bracelet according to the macrame method, tie the threads so that 10 cm remain free on top. That is, place the first nodes so much lower. When finished, weave one pigtail from the remaining upper and lower threads. You will have to combine them and tie them into 2 knots.
- Braided loop. First, weave the pigtail, fold it in half, tie a knot, pin it to the base with a pin, and then start doing the work. Such a wicker loop will hold a hammock, a hanging planter well, like the next one.
- Twisted loop. The name speaks for itself. Braid the remaining threads on top with the same yarn. Tie artistic knots below the loop to secure it.
- 6 threads;
- a pin or one thread to secure the work;
- scissors;
- pillow or book as a base.
- First row. From the central - 5, 6, 7 and 8 threads weave a "square" knot.
- The second row - we create two "square" knots: the first - from 3, 4, 5, 6 threads; and the second - from 7, 8, 9, 10.
- Third row: two "square" knots need to be woven from 1, 2, 3, 4 threads and from 9, 10, 11, 12.
- The fourth row is similar to the first.
- Fifth - third.
- The sixth row repeats the second.
- And the seventh is the third or first.
Fasten on the basis of 4 threads, bending in half to make eight of them.

Let's number the rows in order to know on which threads square knots are made:
- 1, 2, 3, 4 and 5, 6, 7, 8.
- 3, 4, 5, 6.
- In this third row, for a square pattern, the main threads will be 4 and 5, and the workers - 2 and 7.
- One square knot. For him, the working thread is 1 and 8, and the main thread is 4 and 5.
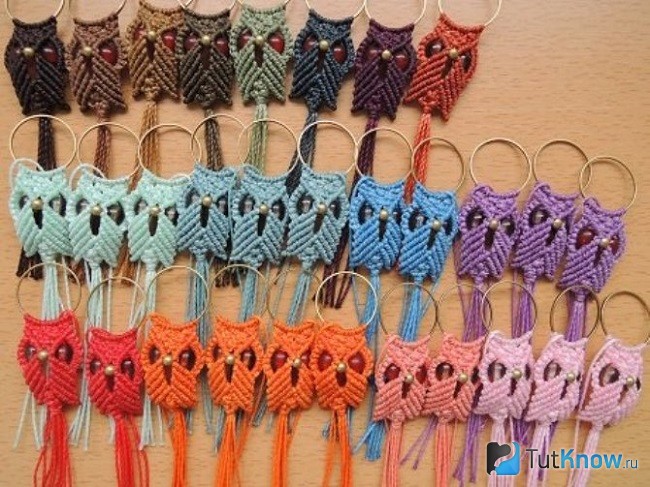
"Owl" - a beautiful do-it-yourself panel made of threads
Here is the macrame owl you will get after you complete the work.

At your discretion, you can use certain patterns, thereby modifying the appearance of a wise bird.
In any case, for work you need:
- cotton threads No. 10 - 10 meters;
- round sticks - 2 pcs.;
- dye;
- brush;
- eye beads 2 pcs;
- PVA glue;
- insulating tape.
If you do not have enough thread length (it will be tamed in the process), tie another one to it. When weaving, place the knot on the wrong side of the owl.
Cut the threads into 10 pieces - one meter each. Attach them to a stick so that you end up with 20 threads. To do this, take the first rope, fold it in half. Put the center of this thread just above the stick, bring both ends of the rope back, pass it into the resulting loop, straighten it. Attach the remaining 9 ropes in the same way, as a result you will have 20 of them.

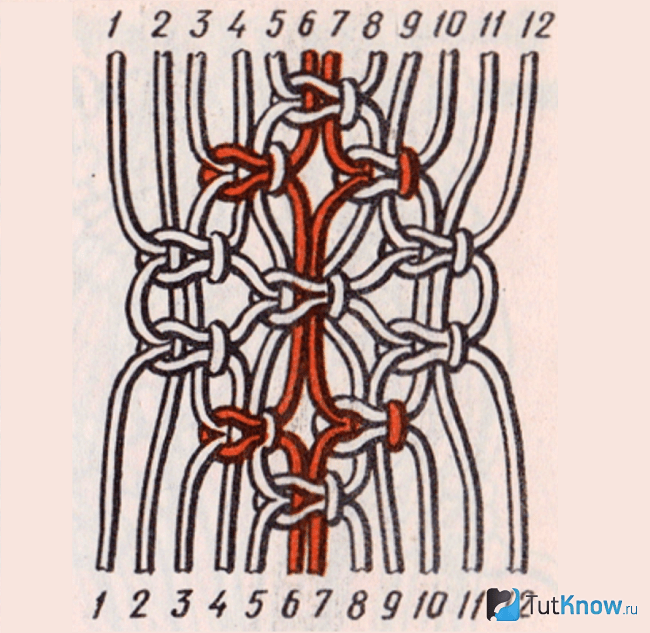
Tape the stick to the table to secure the work. To get the most realistic macrame owl, we start making it from the frontal part. To do this, we use the checkerboard pattern. Run it so that you get a triangular canvas.

- First row. Leave the first 2 threads free, twist 3, 4, 5 and 6 ropes, making a “square” knot. From the following threads, also follow this knot.
- Second row. Leave the first 4 threads free, and from the next, make "square" knots in the same way. At the end of this row, you should also have 4 threads left.
- Row three. It starts from the seventh strand and consists of two square knots.
- In the fourth row make 1 marked element - in the center.

As you can see, starting from the right, from the first two threads we tie a right-hand loop knot. Then we make the next one - from an adjacent pair of ropes and so on. We frame the upper part of the owl's right eye. This element of the left also consists of 10 threads, but the loop knot must be left-handed here.

The description of macrame work continues further, see how exciting it is to make an owl's nose with your own hands. For it, you need to separate 4 central threads and weave 4 flat double knots from them - each consists of one right-handed and one left-handed "square" knot.
Count the fourth thread from the right and left sides. Lubricate their ends with glue. When it dries, string a bead on each strand.

Bring a chain of flat knots into the hole one row higher, then lower down so that the macramé weave helps make the owl's hooked nose. We also put these threads to work. And to complete the eyes of the bird, starting from the central thread, first make looped knots along one diagonal, and then along the second.

Next, we perform the "chess", as shown in the diagram. It consists of the following rows.
- in the first, one square knot is woven;
- in the second - 2;
- in the third - three;
- in 4 - four;
- in the fifth - 5.

To make the owl's wings, work 6 double knots on the first and last four strands. From the rest, weave a “checkerboard”, as the following macrame pattern shows.

We connect the wings to the “checkerboard”, weave everything together with this pattern 2 rows.

From 7-10 and 11-14 central threads, weave one flat knot.

Place a second stick under the work, which will become the owl's perch. Throw 3, 4, 5, 6 and 15-18 threads on this base.

Next, weave to the end according to the presented scheme.

Perform 5 rows of "chess", at the end you will have 1 knot. Cut the threads diagonally, on one side and the other, and admire what kind of owl you have. The same macrame technique will help create original key chains.
How to make a flower pot from threads?

To make such a macrame planter, you will not need a diagram. It is performed from nodes already familiar to you. And you need to stock up on materials, but they need a little. Namely:
- round pot or glass vase;
- white nylon threads;
- a piece of tape.

Cut 8 identical threads, fold them in half, attach them to the work surface with adhesive tape at the top. With the ninth thread, twist these eight to make a loop, fasten its tip.

Divide 16 threads into 4 parts. We will continue to weave macrame, using the knots already familiar to you:
- flat;
- square;
- twisted chain.

We measure the desired length, tie knots under each of the four straps. Here's what you get at this stage:

Stepping back from the top of the vase, 5 cm pot, divide each rope element of four strands in two. Take 2 threads of the first strap. Tie them with two threads of the second element. So connect them all. Now from the new groups, consisting of 4 threads, complete the following pattern.

Having reached the bottom of the pot, make 4 chains of square knots. Next, wind the thread across, as you did at the top of the planter. The work is nearing completion.

Cut the threads and see what a wonderful flower macramé you have made. And here are some other beautiful frames you can make for house plants.

Watch a master class with step-by-step photos, it tells and shows how an ordinary plastic mayonnaise bucket quickly turns into an elegant flower pot.

Here's what it needs:
- plastic bucket and saucer;
- napkins;
- PVA glue;
- white acrylic paint;
- green gouache;
- sponge;
- scissors;
- alcohol;
- sandpaper;
- clear nail polish;
- tassel;
- beads.
You can take a plastic bucket from under mayonnaise, ice cream. In the same container they sell glue for PVC panels. It is enough to wash an empty jar well and use it.
Remove the sticker from the container, degrease the outside of the jar with alcohol. Paint it with white acrylic paint in 3-4 coats. When it dries, go over it with fine sandpaper.

Cut out the napkin pattern you like, glue it with a solution prepared from PVA and water, taken in the same proportions.

Add a little green gouache to the white paint, stir.

To make the flower pots unusual, apply this solution with a sponge to the parts of the pot that are not covered with a napkin.

Decorate the tray in the same way.

Apply 2 layers of varnish to both of these products, allowing each to dry. Now we will make a wicker planter for flowers.
- We fix 12 threads to get 24 ends.
- We create a flowerpot handle from flat square knots, and three ribbons are a twisted chain - each consists of eight threads. To make it, take 2 threads instead of one.
- We divide all 24 threads by 6 and weave six ribbons with flat square knots.
- Having reached the upper third of the flower pots, we divide each ribbon in half with our own hands and weave new ribbons from two of our own and two neighboring threads.
- When you reach the bottom third of the pot, again divide the strands of each strip in two. And weave from every four chains with square flat knots.
- Tie the planter at the bottom with a loose thread or weave a chain with square flat knots from all the threads.
- Lubricate the ends of the ropes with glue. Let it dry, string beads. We shorten the length of the threads with scissors. The work is over.

There are many more options for weaving flower pots. If readers are interested in them, you can read them in one of the future articles. In the meantime, watch the story about macrame for beginners to consolidate the knowledge you just learned: