Handmade decorative stitches. Stem stitch: video tutorials and a detailed description for beginner needlewomen How to sew with a stalk stitch
Stem seam in video and photo tutorials
The stem stitch is one of the most used stitches due to its ease of embroidering. It got its name because it is in this way that stems of various colors are often embroidered. As a rule, it is with this seam that the lessons of experienced craftswomen begin, who teach those who wish to embroider.
With this seam, you can create both the borders of a pattern, and fill it completely, like a satin stitch. In addition, it goes well with many other seams: goat,
, counting or printed cross. This is a universal technique, thanks to which embroidery can be created only with the help of this seam, or it can serve as an accent, embellishment of some nuances. 


Stitch seam technique
According to the technology, the stalk seam can be divided into two types:
- ordinary;
- compacted.

Ordinary stem stitch Both types, like the vast majority of stitches, are embroidered from left to right. In order to secure the thread without knots on the wrong side, two consecutive stitches must be made on the edge of the outline of the pattern. Then, according to the sketch, step back 2-2.5 mm to the right, complete the first stitch, return the needle to the left under the wrong side, pull it out together with the previous puncture. Next - pull the thread, retreat the same distance again, and repeat the manipulation described above. It is important to take care not to pull the thread tight after bringing it to the front of the embroidery.
The result should be a thin, slightly convex line, as in the photo. 
Condensed stalk seam To embroider a stalk sealed seam, you need to bring the needle not to the place of the first puncture, but in the middle of the previous stitch. The resulting pattern, in the end, resembles a neat lace. Its thickness depends on the thickness of the thread and the length of the stitch.
Photo of such a seam:
As a rule, such a seam is used in order to make a beautiful filing. To sew it, you should take a thick thread - so the seam will be more effective.
In other words, the stalk stitch grabs the material from the right side. A characteristic feature of this seam is that the thread from the inside is two times shorter than the one that actually forms the pattern on the front side. That is, each next stitch will protrude half the length of the previous one. 
Thus, the seam is sewn by moving the needle towards itself, and it fits the other way around - away from itself.
In no case should you try to make several stitches at a time, which is allowed, for example, when sewing a “forward needle” seam. This will pull the fabric and tangle the thread.
In such embroidery, one stitch comes after another, so you need to carefully ensure that the thread is always above the needle when performing the next stitch.
A stalk seam will form a beautiful pattern only if each stitch does not differ in size from each other. How long it will be, you need to decide depending on the thickness of the embroidery thread. The thinner it is, the shorter the stitch should be, and vice versa. The maximum stitch length should not exceed 5 mm.
Also, the stitch length may vary depending on the pattern. So, on the bends, the stitches should not be large. Therefore, if there are a lot of them on the selected sketch, you should take this into account in advance and perform stitches of the same size along the entire length of the line. If the embroidery on the bends is done with too long stitches, then it can spoil the overall state of the picture due to blurry contours. You also need to bring the needle to the front side along the bend from the side in which it is wrapped. 
To thicken the branch in the floral pattern, gradually increase the length of the stitch, while bringing the needle to the front side a little lower than the middle of the previous stitch.
In case the thread runs out, or you need to start work in another place in the pattern, you need to insert the needle at the point where the embroidery could be continued, bring the thread inside out, circle around a few stitches, cut the thread. Starting the next fragment, you can also secure the thread by passing it through several already existing stitches on the wrong side.
To make sure that the seam turns out correctly, you just have to look at the wrong side: there should be an even stitch, similar to a machine.
It must be remembered that when performing a stalk seam, it is important to monitor the location of the working thread - it should be either all the time on the right or all the time on the left. If this rule is violated, then the desired pattern will not be achieved.
The nuances of preparing for work

Before starting work, it is better to stretch the fabric on which the pattern will be embroidered. If this is not done, the material may shrink after the first wash and thus the design may be deformed. It is better to embroider with a stalk stitch on pure linen or on cotton material. On the canvas, it will not look so organic.
To make the drawing more accurate, it is better to copy it onto the front side of the fabric with a simple pencil or a special washable marker. For beginners, it is better to select patterns that have clearly defined limits.
The thread should not be taken very long, otherwise it will twist and tangle, which will break the structure, and the embroidery will look sloppy.
To summarize, we can highlight following conditions for a beautiful stem seam:
Also, the stalk stitch is often used when embroidering with beads. It helps to make the drawing more even and dense.
To do this, you need to fasten the thread or fabric, take two pieces of beads, string them, insert the needle through two ovals, as in the picture taken, bring it out between the strung beads. Next, you need to stretch the thread through the last bead, add the next one, insert the needle into the fabric through another oval, bring the needle out between the last two beads. And so on, repeat these steps for as long as necessary for the drawing.
If, after starting work, it seems that the embroidery is wrong, you can watch a video that will help you figure it out.
Video: stem seam and other types of hand seams
Comments
related posts:
 Stitch embroidery types and technique (photo and video)
In traditional folk needlework, two groups of seams are used, free and counted. Satin stitch embroidery, performed along a drawn outline, belongs to free embroideries and is done with satin stitch (white and color stitch) and simplest stitches. Contour or auxiliary stitches for embroidery are easy to perform, but can form independent floral patterns.
Which of the free seams are used most often? These are the well-known tambour, looped, goat, lace and, of course, stalk. To master the techniques for making simple seams, you need to develop certain skills in embroidery and work extremely carefully.
What is a stalk seam? This is a series of diagonal stitches adjacent to each other, performed from left to right and away from you. First, we make the first stitch on the fabric, draw the needle from the wrong side towards ourselves and pull it out at the middle of the previous stitch on the left side. We pull the thread and pierce the fabric above the first stitch, pull out the needle at the middle of the second stitch on the left. You can see that we perform the seam with a movement towards ourselves, and we lay the stitches away from ourselves. Each next stitch protrudes half of the previous one.
The stalk seam is made so that the working thread is always on the same side - left or right. If you change the direction of the thread during operation, the structure of the seam will be disturbed.
A stalk stitch is used when designing pattern motifs in Oryol spis embroidery, as well as for embroidering stems and twigs in satin stitch embroidery and independent patterns. If it is necessary to make a line along an arc, we bring the needle to the front side of the work from the side of the center of the circle. To make the branch thicker, we gradually increase the length of the stitch, while bringing the needle to the front side a little lower than the middle of the previous stitch.

When embroidering a floral ornament, we combine the stem stitch with other simplest stitches. To make small leaves and flower centers, the stitches of which are placed from left to right are suitable, pulling the needle through the fabric alternately along different edges of the strip of the desired width. In the center of the strip, the stitches intersect, the new stitch is laid on top of the previous one.
The contour of flowers embroidered with satin stitch can be drawn. It looks like a series of loops coming out of one another, and is performed by moving the needle towards itself. We bring the working thread to the front side, lay it in a loop, insert the needle at the point where the thread came from and pull it out of the fabric higher to the height of the loop so that the loop remains under the needle. Repeat the stitches as many times as necessary. We can make this seam straight or zigzag, depending on the pattern.

The decorative seam of the lace looks especially beautiful if you use threads of two colors for it. First, we perform it and then we thread a thread of a contrasting color under each of the stitches from top to bottom, wrapping the main seam around. You can thread the thread alternately from bottom to top and top to bottom to get a wave pattern.
Learning how to perform the above simple seams is not difficult, the work will be greatly facilitated by the hoop and a special needle for embroidery with a blunt tip.
I wish you successful creative decisions!
Stem seam in video and photo tutorialsStem seam in video and photo tutorials
The stem stitch is one of the most used stitches due to its ease of embroidering. It got its name because it is in this way that stems of various colors are often embroidered. As a rule, it is with this seam that the lessons of experienced craftswomen begin, who teach those who wish to embroider.
With this seam, you can create both the borders of a pattern, and fill it completely, like a satin stitch. In addition, it goes well with many other seams: goat,
, counting or printed cross. This is a universal technique, thanks to which embroidery can be created only with the help of this seam, or it can serve as an accent, embellishment of some nuances.
Stitch seam technique
According to the technology, the stalk seam can be divided into two types:
- ordinary;
- compacted.
Ordinary stem stitch Both types, like the vast majority of stitches, are embroidered from left to right. In order to secure the thread without knots on the wrong side, two consecutive stitches must be made on the edge of the outline of the pattern. Then, according to the sketch, step back 2-2.5 mm to the right, complete the first stitch, return the needle to the left under the wrong side, pull it out together with the previous puncture. Next - pull the thread, retreat the same distance again, and repeat the manipulation described above. It is important to take care not to pull the thread tight after bringing it to the front of the embroidery.
The result should be a thin, slightly convex line, as in the photo.
Condensed stalk seam To embroider a stalk sealed seam, you need to bring the needle not to the place of the first puncture, but in the middle of the previous stitch. The resulting pattern, in the end, resembles a neat lace. Its thickness depends on the thickness of the thread and the length of the stitch.
Photo of such a seam:
As a rule, such a seam is used in order to make a beautiful filing. To sew it, you should take a thick thread - so the seam will be more effective.
In other words, the stalk stitch grabs the material from the right side. A characteristic feature of this seam is that the thread from the inside is two times shorter than the one that actually forms the pattern on the front side. That is, each next stitch will protrude half the length of the previous one.
Thus, the seam is sewn by moving the needle towards itself, and it fits the other way around - away from itself.
In no case should you try to make several stitches at a time, which is allowed, for example, when sewing a “forward needle” seam. This will pull the fabric and tangle the thread.
In such embroidery, one stitch comes after another, so you need to carefully ensure that the thread is always above the needle when performing the next stitch.
A stalk seam will form a beautiful pattern only if each stitch does not differ in size from each other. How long it will be, you need to decide depending on the thickness of the embroidery thread. The thinner it is, the shorter the stitch should be, and vice versa. The maximum stitch length should not exceed 5 mm.
Also, the stitch length may vary depending on the pattern. So, on the bends, the stitches should not be large. Therefore, if there are a lot of them on the selected sketch, you should take this into account in advance and perform stitches of the same size along the entire length of the line. If the embroidery on the bends is done with too long stitches, then it can spoil the overall state of the picture due to blurry contours. You also need to bring the needle to the front side along the bend from the side in which it is wrapped.
To thicken the branch in the floral pattern, gradually increase the length of the stitch, while bringing the needle to the front side a little lower than the middle of the previous stitch.
In case the thread runs out, or you need to start work in another place in the pattern, you need to insert the needle at the point where the embroidery could be continued, bring the thread inside out, circle around a few stitches, cut the thread. Starting the next fragment, you can also secure the thread by passing it through several already existing stitches on the wrong side.
To make sure that the seam turns out correctly, you just have to look at the wrong side: there should be an even stitch, similar to a machine.
It must be remembered that when performing a stalk seam, it is important to monitor the location of the working thread - it should be either all the time on the right or all the time on the left. If this rule is violated, then the desired pattern will not be achieved.
The nuances of preparing for work
Before starting work, it is better to stretch the fabric on which the pattern will be embroidered. If this is not done, the material may shrink after the first wash and thus the design may be deformed. It is better to embroider with a stalk stitch on pure linen or on cotton material. On the canvas, it will not look so organic.
To make the drawing more accurate, it is better to copy it onto the front side of the fabric with a simple pencil or a special washable marker. For beginners, it is better to select patterns that have clearly defined limits.
The thread should not be taken very long, otherwise it will twist and tangle, which will break the structure, and the embroidery will look sloppy.
To summarize, the following conditions for a beautiful stalk seam can be distinguished:
Also, the stalk stitch is often used when embroidering with beads. It helps to make the drawing more even and dense.
To do this, you need to fasten the thread or fabric, take two pieces of beads, string them, insert the needle through two ovals, as in the picture taken, bring it out between the strung beads. Next, you need to stretch the thread through the last bead, add the next one, insert the needle into the fabric through another oval, bring the needle out between the last two beads. And so on, repeat these steps for as long as necessary for the drawing.
If, after starting work, it seems that the embroidery is wrong, you can watch a video that will help you figure it out.
Video: stem seam and other types of hand seams
Comments
related posts:
Stitch embroidery types and technique (photo and video)
Products handmade especially attract the attention of modern residents. Despite their increased cost, many people prefer to purchase just such products in order to decorate the interior of a living space, to present to friends on the day of their celebration. However, creative people prefer not to buy embroidered products, but to create them on their own.
You can master the basics of embroidery by visiting master classes, downloading a training video. Initially, you should familiarize yourself with the variety of seams, learn how to perform them correctly. One of the most "old" and common seams is a decorative stem seam.
What it is
The stem stitch got its name due to the fact that it is it that allows you to create plant stems that are identical to natural ones during the embroidery process. Also, decorative fine embroidery allows you to create simple patterns, make neat lines of flowers, leaves.
The contour graceful line, characteristic of the stalk seam, differs in the form of execution, it can be:
- curved;
- straight;
- close in a circle.
If you look closely at the pattern created on the basis of the stalk seam, it is easy to visualize that the seam consists of several oblique stitches adjacent to each other. It is necessary to perform stalked lines without haste, it is very important that the stitches lie evenly, and also have the same size.
At the time of embroidery, stalk seams can lie at different angles, as well as in any, but always the same direction that was originally chosen. It all depends on what details of the pattern you plan to embroider.
The stalk stitch is endowed with amazing plasticity, so experienced needlewomen often use it when embroidering with satin stitch, especially if it becomes necessary to fill the internal space of the details. irregular shape. The stalk stitch is one of the main ones in the embroidery technique, not only with satin stitch, but also with beads and ribbons.
Schemes
If you need to perform a stalk seam, and the embroidery pattern is still incomprehensible to a beginner, you can use small tips to help you understand the sequence of basic steps.
Stitch stitch embroidery involves the following steps:
- draw a straight line on the fabric;
- put on the drawn line four points equidistant from each other;
- fasten the fabric in the hoop;
- take a needle, insert a thread, bring it from the wrong side to the front, be sure to fix it;
- prick the needle into the third point, pull it out from the wrong side;
- bring the needle now from the second point to the front side;
- prick the needle into the fourth point, remove it from the inside;
- return to the front side, leading the needle from the wrong side through the third point.
Before starting to embroider complex patterns, it is recommended to hone the technique of making a stem stitch on simple patterns by embroidering small stems of plants.
Experienced needlewomen pay attention to the fact that there are two types of creating a stalk seam:
- stabbing (the fabric is pierced, and the needle is brought out to the opposite side);
- sewing (the needle is directed so that it immediately pierces two points, respectively, the punctures are made horizontally).
Beginning masters are advised to practice using the piercing method, which helps to prevent excessive contraction of the fabric. During work, it is important to ensure that the thread does not twist, and that the tension is identical when creating each new stitch.
After the skills of performing a stalk seam are honed, you can learn the secrets of experienced needlewomen, based on which you can get original patterns. You can get acquainted with such secrets by downloading video tutorials from professional masters.
In particular, if you want to make the seam thicker, you need to move each subsequent stitch back to the left. If it is very important to get an elegant thin stitch, it is necessary to perform each upcoming stitch so that it moves a little to the right.
The stalk stitch is used when embroidering with satin stitch when dense filling of the pattern is required. In this case, straight rows are embroidered, which are created close to each other.
Fashionistas who prefer to wear only exclusive clothes know that with the help of a stalked seam with beads, you can decorate any item of clothing in an original way, thanks to which the clothes will become bright and incredibly beautiful. This type of seam is also used for embroidery with ribbons.
A photo
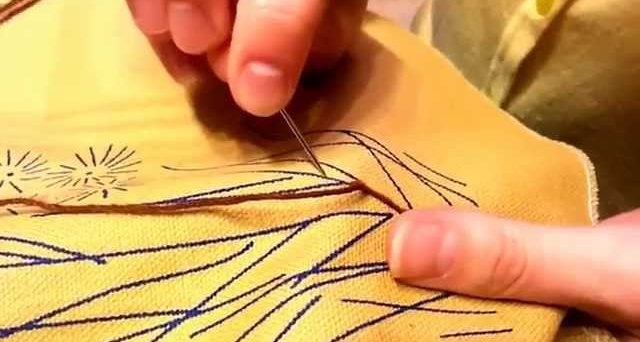
Most novice masters prefer to see once rather than hear verbal explanations many times. By attending master classes, it is really easier to master the technique. An experienced master at any time will be able to adjust the direction of movement by hand. If there is no real opportunity to attend master classes, you can download a training video on the Internet or detailed instructions, supplemented by the corresponding photos, which clearly show how the needle is inserted, through what intervals it is brought out to the opposite side.

The masters also list the mistakes that beginner needlewomen can make due to inexperience. To make it easier to understand such technical errors, relevant photographs are also attached to the explanation. In particular, one of the common mistakes is changing the direction of the working thread. It is not allowed to direct the working thread first up and then down. With this approach, the completely stalk-like appearance of the seam is lost.
Experienced craftsmen confirm that art for most modern people with a creative nature is the same need as food and drink. For this reason, if you have a desire to learn how to embroider, you need to cast aside doubts and ridiculous fears. It is useful to visit specialized stores selling goods for needlework. There you can always buy ready-made embroidery kits with simple and complex patterns. Subsequently, you can purchase kits for embroidering large paintings. In such stores, sellers will help you choose needles, threads and canvas that are ideal for embroidering with satin stitch, including using a stalk stitch.
Having mastered the technique of making a tambour, stalk seam, you can decorate any household item with it, including pillows, tablecloths, sheets, towels.
For decorating fabric items: tablecloths, napkins, towels, apron, etc. - embroidery is often used. It makes products stylish, colorful, unique. Beautiful embroidery will allow you to make even simple decorating seams: stalk, tambour, "velvet", "knots", "herringbone" and others, the technique of which is really quite accessible. But do not think that a beautiful pattern will turn out right away: even the most elementary seams come out beautiful and neat only after long workouts. Therefore, if you want to decorate clothes, accessories or home textiles with beautiful embroidery, you will have to be patient. The first step should be to purchase accessories for embroidery: special threads (mulina), needles, fabrics, hoops (they are a must, because to get even stitches, the fabric will have to be stretched, and pulled very tightly). The second step is to study the step-by-step instructions for making embellishing stitches. You will find them below.
"Lace" and "snake"
Seam Snake
"Lace" and the so-called "snake" are very light seams, it would be more correct to say that they are not simple, but elementary. They are performed on the basis of the simplest seam "forward the needle."
- Sew a “needle forward” stitch, while trying to ensure that all stitches are the same size. It is not necessary to grind strongly, but large stitches are all the more unsuitable. The optimal length is two millimeters.
- To get the "lace" start to make the second stitch of the pair to the left, each time threading the needle and thread under the stitches on the right side in the same direction. To get a “snake”, alternate the direction: through the first stitch, pass the needle from the bottom up, through the second - vice versa.
These seams look original only if the threads are taken in two different colors, close in tone or, conversely, contrasting. If the threads are of the same color, these seams do not look elegant enough to be called decorating. However, they are rarely chosen for embroidery in any case.
Stem stitch (step by step)

When creating floral ornaments, they most often use a simple decorating seam, which is called a stalk stitch. It resembles a tightly twisted rope. Depending on how frequent and long the stitches are, the appearance this "string". The same seam is often used to embroider on drawings simply thin lines, straight and winding, denoting the outline of the drawing.
With seeming simplicity, the stalk seam requires some skill to perform. However, if you follow the step-by-step instructions for the technique of making a stalk seam, decorating products with it will actually be quite simple.
- Insert the needle from the inside and pull it to the front side.
- Holding the thread at the entry point, pull the thread slightly to the right and up and peg towards you.
- From the wrong side, make the next peg approximately in the middle of the stitch and pull it to the front side.
- Repeat the operation as many times as needed.
In order for the stalk seam to turn out even and attractive, try to make the stitches the same size, preferably medium-sized. In addition, it is necessary to ensure that they fit snugly against each other - in other words, there should not be a large distance between the stitches. Of course, it will take more time than embroidery with large stitches, but it will look aesthetically pleasing. So no need to rush.

With an ordinary needle on your hands, you can also make another very beautiful and at the same time simple decorating seam - chain stitch. It is also very common when embroiderers create floral ornaments. Outwardly, it resembles a chain.
- Insert a needle and thread from the wrong side to the front, pull the thread. It is more convenient to make a chain stitch with a needle when it goes from top to bottom.
- Lower the thread and, holding it thumb with the right hand, form the outline of the loop.
- Stitch from the entry point of the thread with the needle down. When pulling the thread with the needle, make sure that they remain inside the loop all the time. The stitch length should be small - along the length of the "link" of the "chain" that you want to get.
- Repeat the operation several times until you get a "chain" of the length you need.
- Try to change the direction of the stitches - this way you can embroider leaves and petals, start up a “chain” with a snake.
"Velvet" seam, or "goat"

The “goat” is often used to embroider the edging of napkins and aprons, it is also often used to “fill” the space inside the contour embroidered with a stem or chain stitch. From the front, this seam, which is sometimes called “velvet,” resembles intersecting lines, while from the inside, two dotted lines parallel to each other are observed.
- Work must be done from left to right. For convenience, two parallel lines can be drawn. On the top line from the inside, make a peg, pull the thread to the front side.
- Slightly to the right of this point on the bottom line from right to left, make a small stitch, pull the thread with the needle to the front side.
- Stepping back a little more to the right, make the same stitch on the ear on the top line. The next one will be already on the bottom line and so on.
"Loop" seam

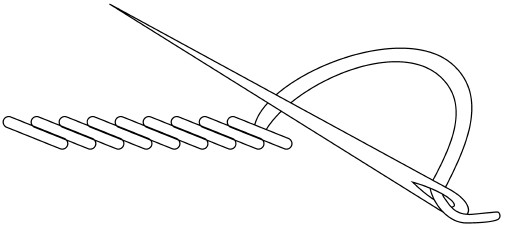
This type of decorating seam resembles the one used for. It is performed quite simply - it can be seen in the figure. Even without step by step instructions even an embroiderer who does not have needlework skills can make it. I must say that this light seam is used for decorating products infrequently. They usually let it go along the contour of handkerchiefs and napkins.
"Knots"

These elements, resembling knots or small, very small buds, are also very simple. Insert the needle into the fabric from the wrong side to the front. String a thread on it (wind it). Insert the needle from the right side to the wrong side at about the same point where the first peg was. An unusual stitch is ready. By the way, with the help of this unpretentious seam and stalk seam, you can embroider amazingly beautiful patterns- the main thing is to show imagination and be patient, since the work is simple, but painstaking. However, in needlework everything requires perseverance and creativity.
"Herringbone"

Like the "goat", it is performed between two parallel lines (you can draw them right away for convenience). We will sew from right to left. So, we make the first peg on the top line. We make the second peg on the lower ruler at the same level, we lead the needle forward and up (at an angle of 45 degrees) to make a stitch, but at the same time we press the thread against the fabric so that the needle from the inside comes out on top of it between the rulers. We make the next peg on the top line and lead along the slope to the left and down, also passing the thread under the needle. So alternately we make stitches from above, then from below to the center. It turns out "herringbone". If each time two stitches are made above and below, then a “double” Christmas tree will come out. Both of them are used most often to decorate children's underwear.
Elena Pronina