Wool toys for beginners are light. Step by Step Wool Felting Tutorials for Beginners
And having tried in practice, you can move on to more complex forms. In this master class, I invite you to move forward in learning this interesting type of needlework using the example of a funny monster. By a similar principle, you can, of course, dump any other little animal or little man, using your own ideas and sketches.
Materials for dry felting toys
- unspun wool of any color (it is better to use carded wool)
- a small amount of wool of a different color to create a muzzle and decor
- felting needles: No. 36, 38, 40 (according to international classification)
- substrate
- colored pencils or pastel crayons and a brush for tinting

Technique of dry felting toys
Like any other creative work, felting a figurine begins with an idea and its sketch. simple shape you can start playing without preliminary sketching, however, when it comes to a figure that has more complex proportions and its own character, you can’t do without a sketch.

When the idea is fully formed, we mentally divide it into simple parts. In my case, the head and torso of a fantastic monster are a single whole, and the limbs and decor will be rolled separately. Usually, the head and torso of the figurine are rolled separately if they are approximately equal in size or have a very complex shape.
In this master class, I will not dwell on the choice necessary materials, nor at the stages of wool preparation, as these issues have been discussed in detail in previous articles.

We prepare the wool by dividing it in different directions until a completely homogeneous mass is formed. If you are felting from carded wool, you will not need much effort for this, however, for example, you will have to tinker with a rowing tape more. The amount of wool needed depends on the size of the toy you want and will decrease by several times in the process of work, which you should not forget.
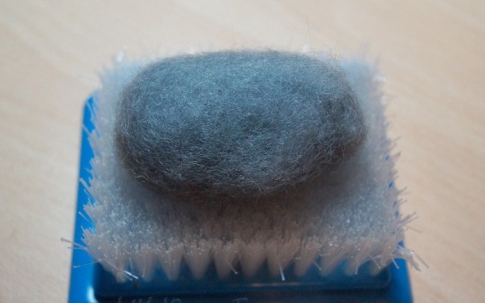
The figurine of my monster has a pear-shaped shape, greatly expanded at the base, which gives stability to the whole toy. With a thick needle, we begin to dump the wool first into a round lump, gradually forming the desired shape with our fingers and moving on to a needle of medium thickness.


Remember that at this stage, your main task is not to perfectly level the surface, but to make the toy as dense as possible without any internal voids.

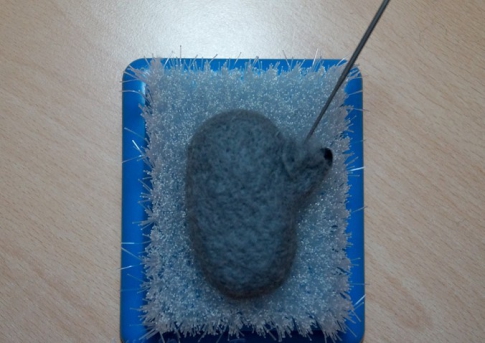
If in the course of work you realized that the resulting form does not quite suit you, you should not despair, since these shortcomings are quite easy to correct. For example, I decided to make a small belly for my monster. To do this, I will need to make a separate “cloud” of wool, having previously felt it quite a bit on the substrate. Gently attach the resulting overlay to the right place, falling with a needle for felting in a circle.


If the resulting shape suits you, we grind the surface with a thin needle. It should turn out homogeneous and smooth, despite the fact that it is still far from the final alignment, because our figure has yet to acquire limbs.

If the body and head are ready, we proceed to the creation of paws-handles, using the example of which we will try to master the study of small details in the felting technique.
It is very important to remember that when creating symmetrical parts (arms, legs, eyes, ears, horns, etc.), an equal amount of wool must be harvested at the same time! If you completely dump one arm, and only then try to remove the right amount of material for the second by eye, the chances of getting two identical limbs are small. Ideally, both hands should be felted in parallel, constantly turning and comparing the details with each other.
We make separate wool blanks for the upper and lower limbs of the monster and proceed to felting, not forgetting to leave loose wool feathers at the ends. It is with their help that the details will subsequently be attached to the body.


Please note that the paws can be more complex in shape than just two cylinders, it all depends solely on your original idea. For example, I made a monster with deliberately large palms, for which I felt the hand itself as tightly as possible, and added more wool in the ankle area.

When the workpiece has already acquired an average density, you can begin to work out small details. To do this, we need a thin needle and utmost attention.
Tip: it is better to outline the contours of small details of the muzzle or paws with a thin needle, and then work out all the bends and bulges with a thin needle with a cruciform section, which not only gives them the necessary hardness, but also evens out surface irregularities.

Having finished working on the upper paws, I wanted to give them a smooth bend, because the monster has yet to hold the mushroom in his hands. It is quite easy to do this: just bend the workpiece between your fingers a little and work it with a medium needle in this position.

The lower limbs of my monster are smaller in size, since they should not interfere with the figure to maintain a stable, "sitting" position. They are made in exactly the same way as the upper paws.


In total, we have a complete set of limbs, which should be securely connected to the body. We apply them to the main part, finding the most successful position symmetrically to each other. Paws can be fixed in place regular pins. We begin to roll one by one, walking with a needle in a circle and diligently straightening the fibers.

If a sloppy edge is obtained when connecting the parts, this drawback can be hidden by then adding a little wool on top and processing the joint with a thin needle.

If all the main details have firmly taken their places, and the surface has acquired a smooth and uniform appearance, you can proceed to the most interesting and creative part of the work - the design of the muzzle. I offer only one options such a decor and I suggest, having mastered the technique, to experiment with the decor on your own.
The eyes of the toy can be made different ways, the easiest of them is to glue beads or ready-made plastic eyes, which are easy to purchase at the store. You can, as in my case, make eyes out of multi-colored wool. To do this, you need to dump two not too dense identical balls and, using a thin needle, roll them to the muzzle.

There are also plenty of head options. You can make a monster comb along the entire back, big ears, horns or lush hair from cone-shaped wool blanks. I chose a fairly simple option, sticking colored balls to my head in the manner of small horns. Not too dense blanks are separately rolled on the substrate, and then fixed in place.

Tip: small parts can be attached or glued using Moment-Crystal transparent glue. In the latter case, it should be noted that the wool fibers that have stuck together can no longer be pierced with a felting needle.

In addition, you can always draw some details on the surface with a gel pen or felt-tip pen, but you should be extremely careful when doing this. You can combine several options at once, for example, I attached a convex tongue to the monster, outlined a smile line with a thin needle, and then emphasized the resulting relief with a black pen.

Another interesting and important technique for decorating wool figurines is tinting, which makes the forms more expressive. So, with the help of crumbs from pastel crayons and a dry brush or soft watercolor pencils, you can emphasize the muzzle, apply shadows between the fingers or style the hair. Pastel and pencil are easily eaten into wool fibers and will not rub off when touched.

Feel free to combine different shapes and decor options, experiment, giving your work a different mood, do not be afraid to decorate the figurine with drawings, sew beads, ribbons or buttons on it, because the more individual and original your creations turn out, the better!
Needlework is a world of miracles and a flight of fantasy. There are many techniques and ways to create a masterpiece. Each craftsman has his favorite type of activity in this area, but there are hardly those who are indifferent to felting from wool. Cute little animals, made of soft material, instantly captivate the hearts. They also inspire to try their hand at working with wool and further.
 For dry felting, natural unspun alpaca, camel or llama wool is used. Due to the special structure of the animal's hair, it gets tangled, forming the so-called tangles. It is this property that allows you to give shreds a certain shape.
Felting, as felting is often called, is an interweaving of wool fibers to create a dense fabric structure. There are several felting techniques: dry felting, wet felting, nuno felting and felting of knitted fabrics.
The most popular today can be called the dry method. It is quite simple and allows even novice hand-makers to create real masterpieces. You don't need complicated tools to work. The arsenal of the master is simple and concise.
Inventory for work
For dry felting wool, a beginner will need only a few tools. It is important to bear in mind that the device for work is very sharp, so it is better for children under 12 to do needlework under adult supervision.
What you need:

Scissors and other cutting objects are not needed for work. The wool is pliable, so it can be torn off by hand. In addition, the cut bundle loses its structure, and the torn one keeps the hairs intact.
Since the felting needle is quite dangerous, it is better to choose a radio as background noise when working. Being distracted by the TV, you can cut your hands. Wounds caused by metal notches heal for a very long time.
Master class for beginners
Wool felting technique allows you to create real masterpieces. These are toys, brooches, and even applications on clothes. But in order to learn how to create beautiful little things, you need to learn the basic points of working with a needle.
Before starting work, you should find a comfortable place with a flat surface. Ideal for a desk or kitchen table.
Learning to felt wool is advised from simple figures. For example, from a ball:

 To get ahead of the readiness of the figure, they press on it with their fingers. If a lump does not change its shape from this, then it is enough matted.
To felt a flat part, a ball of wool is flattened on foam rubber and rolled to a sponge, periodically turning over to the other side. Felting flat elements can be compared to drawing on a sheet of paper: you can apply a drawing only on the front and back of it.
To give a flat element a certain shape, paper patterns can be used, to which the workpiece is periodically tried on during operation.

Woolly good monster
Having familiarized themselves with the technique of dry felting, hand-makers will definitely try to make felt toys with their own hands. For beginners step by step master classes may seem simple, but working with a needle requires experience and skill, so it should be understood that the first creations of a newly-made master will be far from masterpieces, but you should not give up. It is better to try to blame the hero, who will only be absurd to face. For example, a cute monster.
Any creative task begins with a sketch. The future hero is drawn on a sheet of paper, observing approximate proportions, but without going into small details.

When the sketch is ready, it is conditionally divided into main parts. In the case of a monster, the process is broken down into the creation of a torso, limbs, and decor.
In the proposed example, the head and body of the monster smoothly flow into each other, so it makes no sense to roll them separately. If the sketch requires a clear and graceful neck, you can break the diagram in a different way.
Torso and head
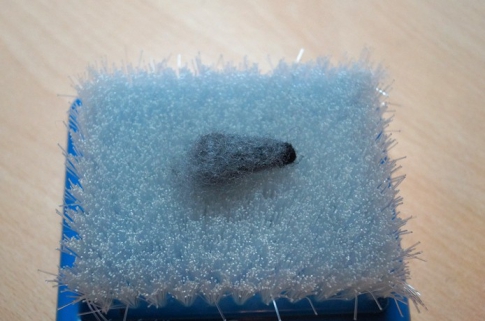
Work on the monster starts with the biggest detail. To do this, pinch off a large ball of wool and roll it into a ball. Don't make your debut work too small. Small details are hard to work with.
So, the torso is rolled up. Now begin to form its outlines. Sticking a needle, roll a small pear. To do this, as the ball narrows, more and more injections are made.

At the stage of body formation, a flat surface is not as important as the density of the element. It is important to knock down a tight pear-shaped lump, in which there will be no cavities.
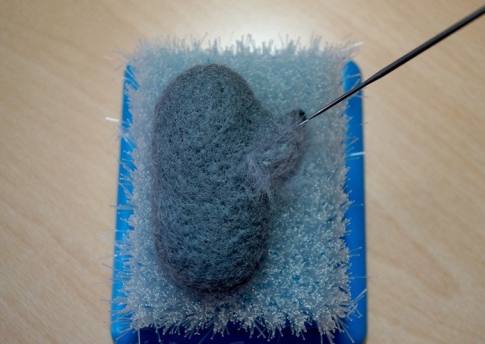
To form a small belly for the monster, a ball with fluffy edges is made from a small tuft of wool of the same color. With the help of a needle, it is rolled to the pear, paying attention to the edges. The contour of the belly should not stand out.

To level the surface of the future body, use the thinnest needles.
Preparation of symmetrical limbs
The limbs of the future hero must be the same, so they are rolled simultaneously from equal lumps of material. If you fully form one leg, then it will be difficult to find the right amount of wool for the second.
Two identical pieces of wool are felted. Periodically, the blanks are turned over and compared in size.

The upper parts of the arms will be attached to the body, so the wool in these places does not need to be knocked down. It should be fluffy and fleecy. The shape of the hands can be any. The master class suggests making long paws with large palms. The limbs are made from large curls of wool so that they are elastic, and not "dried".
After the contour is formed, fingers are drawn. To do this, along the edges of the workpiece, longitudinal grooves fail.

All small details are worked out at the stage of blanks. It will be very difficult to form fingers and other indentations on the arms attached to the torso. Therefore, before attaching the limbs, they are as detailed as possible.

Finished arms and legs should be fluffy on top and tight at the ends. Then they begin to roll to the body. To do this, the fluffy hair of the monster's hands is applied to the proper place and they begin to insert the needle, piercing it approximately to the middle of the body.

Gradually, the edges of the limbs will begin to merge with the main part. There should not be sharp transitions and joints.
Character face design
To complete the craft, you must select a facial expression for it. The muzzle of the monster in the instructions is kind and mischievous. It was performed by attaching woolen eyes to the hero's head, as well as embroidering the mouth with threads. You can use other techniques, as well as combine them.
Step-by-step design of the muzzle of a toy:


In the hands of the monster, you can give any accessories. They are made from the same wool or other materials. How the decor of the craft will be carried out depends only on the imagination of the needlewoman.

If inaccuracies were made during work, you can hide them with an outfit for a toy. The same felting from wool will help to create a wardrobe for the character. Clothing is formed from thin sheets of felted wool. By pinning it over the entire surface, you can dress up the toy in pants or a sweater. A crocheted suit is also suitable as clothing.
Toy with a secret stuffing
 From felt, you can create not only cute animals, but also others. interesting crafts. But some toys are too voluminous, so it will be difficult to make them from wool alone. Even if the needlewoman acquires a sufficient amount of material, it is possible that the needle simply will not pierce large parts to the desired depth.
Therefore, to create voluminous crafts, the filling method is used. As a filler, you can use a synthetic winterizer or foam blanks. Soft padding can be formed into any curve, but foam elements can only be wrapped in a woolen shell.
Working with fillers is as simple as ordinary dry felting. With the help of a needle, the pile is tangled, penetrating inside the workpiece. The finished felted product resembles a solid woolen craft and does not give out its secret filling in any way. In this case, the weight of the toy will be small.
Wool combined with foam is often used in the manufacture of Christmas decorations and other round things. You can buy a blank in the store for creativity. The craftswoman will be able to decorate the finished craft using any technology - beads, patterns, rhinestones or artificial snow.
Felting on wool will help to make unique Easter eggs and felt chicken. The nest for the composition can be made from real straw.

Felting is an activity that wins hearts. Therefore, you need to be extremely careful, because the first toy on the shelf is very insidious, because it will definitely “call” comrades with it, and the hand-maker will wake up, having already created a whole zoo of cute woolen animals. And the ideas of dry felting for beginners will help him in this.
Or felting) allows you to create whimsical figurines, decorations, interior items, toys and accessories. For beginners, this topic is completely incomprehensible, but those who have already tried to create their first craft or even several in practice do not see anything complicated.
Principle of wool felting technique
The technique of dry felting arose due to the special structure of wool. Hair (both human and animal, that is, wool) is covered with small scales that can protrude, interlocking with each other. Sheep wool (like the wool of a camel, llama, angora, mohair) in its normal state looks about the same as a severely split human hair, forms tangles, falls off. It is this structure that makes it possible to use the technique of dry felting.
The choice of materials for felting
The quality of any do-it-yourself items depends not only on the accuracy and skills of the needlewoman, but also on right choice materials. The acquisition of materials and tools should be taken carefully, especially since not so much is required for dry felting toys.

You will need a substrate to protect your fingers and the surface of the desktop from possible punctures during work, natural wool of different colors, special needles. You can purchase a plastic backing, thick felt, or use a regular foam sponge.
The whole secret of dry felting from wool is just in special faceted needles, with the help of which a shapeless skein of wool turns into a dense figure. To decorate the finished figure, you will need sheet felt, beads, ribbons, buttons, and various accessories. Do not forget about ready-made plastic eyes for toys. All decorative elements can be sewn, felted or glued to the finished product.
You can purchase a ready-made kit for dry felting toys or all the materials separately.
Special faceted needles
In general, a small toy can be felt with almost any needle. The only question is the convenience of work, the quality of the finished product and the speed of the process. But still, for needlework, it is better to purchase several special needles that differ in cross-sectional shape and thickness.

Needles for felting can be thin or thick (coarse), this determines the number of the needle. The coarsest is marked “19”, and the thinnest is number 42. Ultra-thin needles at number 43 can also be found on sale. Most of the work is done with thick tools, and thin ones are needed to level the surface of the finished product and work out details.
By cross section, the most convenient are star-shaped and triangular needles. In addition, it is these options that are easier to find on sale. The tool may be knurled in the forward or reverse direction. With needles with straight notches, the upper villi are tangled inward. The reverse cut tool will allow you to create the effect of fur or felt wool in hard-to-reach places. It is also convenient to work out details with a reverse needle.
For work, you will need at least three or four needles: thick (No. 36) with a triangular section for the initial felting of wool, medium (No. 38) for intermediate stages, star-shaped (No. 40) for the final finishing of the product.
You can simply hold the tool in your hand, but it is much more convenient to use a special handle. This will speed up the process of dry felting toys and make the work convenient. Some needles are sold immediately with a holder and an ergonomic handle.

Wool, decor and accessories
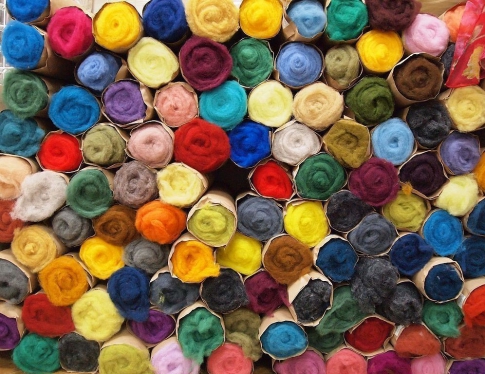
For the manufacture of crafts, accessories and interior items, you will need raw wool (sheep is usually used) of different colors. In needlework stores big choice so it's easy to get lost in this variety. The main types of wool suitable for felting toys are:
- Sliver- coarse, undyed and unbleached wool. Suitable for creating a blank for a toy, the inner layer of slippers or bags and stuffing rag dolls instead of synthetic winterizer.
- Carded cotton- very soft wool with randomly mixed fibers, similar to cotton wool. Suitable for all types of felting.
- Rowing tape - wool with fibers aligned in one direction. Suitable for felting toys, but less convenient than carded wool.
- Fine and semi-fine wool- used to create decorative elements and finish finished products.
- coarse wool- an analogue of a sliver, coarse fluff can only be used for felting the base of a future toy.

In needlework stores you can find the Russian "Troitskaya" and "Semenovskaya", the Italian wool of the Yarna company (inconvenient for dry felting), the New Zealand "Merino".
The finished look of the work is given by accessories and decorative elements. You can use beads, buttons and various accessories. For dry felting toys, you will need colored felt in sheets, ready-made plastic or glass eyes.
The cost of materials and tools
A set of needles for felting of three pieces (initial, main and finish) costs about 100 rubles, and of five (besides the initial, main and finish, there is also a crown needle, used for felting very small elements, and an intermediate one, which levels the surface before the next steps work) - 150 rubles. A set of three reverse needles costs a little more than 150 rubles.
One hundred grams of "Semenovskaya" wool will cost about 120-220 rubles, depending on the color. To create products in one range, sets of five different colors are sold (from 130 rubles per 10 grams). Sliver costs about 100 rubles per 50 grams.
Fundamentals of dry felting technique
Having mastered this simple technique, with the help of an ordinary needle, you can create real masterpieces. First, you need to draw the future product on paper and “decompose” it into smaller details. If the craft is more than fifteen centimeters long, it makes sense to make blanks from a sliver or coarse wool.

Secondly, the wool must be prepared for felting. After you can start work. The master class of dry felting for beginners is simple - you just need to often stick a needle into a ball of wool, giving it the necessary shape with your hands.
Finished parts need to be connected, the product should be polished, expressiveness and volume should be given to it using tinting. The process is long and painstaking, but very exciting and creative.
Preparation of material for felting
Dry felting of toys provides for the mandatory preparation of wool for further work. From a common skein, you need to separate the fibers for a future part with a good margin. In the process of needlework, the initial volume of wool will decrease by three to four times.
The strands need to be disassembled, separated in different directions, until they mix again into a homogeneous mass. Long fibers will create ugly furrows in the future, so you need to divide the material into small ones from the very beginning and mix them well together.
If you want to make two identical parts (for example, paws), you must initially take equal balls of wool for each. If you start felting the second part only after the first is completed, there will be very little chance of making the same ones.

Rules
The technique of dry felting toys is quite simple, but you still need to take into account certain rules. Felting is always necessary only on the substrate. This is a safety requirement. Otherwise, you can pierce your fingers (and serif needles severely damage the skin) or ruin the surface of the table.
Work should always begin with a thicker needle, gradually moving to thinner ones. The tool must be stuck into the material at a right angle, the movements must be frequent and fairly fast. The part must be constantly turned over, simultaneously processing the entire surface of the product.
At the initial stages of work, you need to stick the needle quite deep in order to well dump the core of the toy. As long as six is soft enough, the material can be shaped to the desired shape with your fingers. A part is considered finished when it acquires a tangible density. There should be no voids inside, the toy should not be deformed when pressed.
Connecting parts together
The head and torso or other large parts usually fall together, but small items(nose, paws, tail, ears) must be made separately. If you plan to join the parts in the future, you should leave loose wool fibers at the junctions. To securely connect the parts of the toy, the free ends must be well attached to the base.

Finished product grinding
Any master class on dry felting for beginners ends with grinding and tinting the finished product. Grinding will make the surface of the toy uniform, dense and not fleecy. From the main skein of wool, you need to separate several villi, separate them (fluff) and roll the resulting “cloud” to the main part with the thinnest needle. So you should work out the entire surface of the toy until it becomes smooth. This is a very time-consuming and painstaking work, but the result is worth it.
Toning with pastel crayons
To give the toy greater expressiveness and emphasize volume, it is better to use the tinting technique. You can use both acrylic paints diluted with water and crushed pastel crayons. Pastel is easier and suitable for beginners. You need to apply colored chips on the surface of the toy with a dry brush, for smooth transitions you can shade the color with your fingers.
Master class for beginners
How to learn to dry felting toys? Of course, you need to try in practice. Schemes of toys (dry felting) are given above. It is enough just to make, for example, a small penguin. You will need white or gray wool, a sliver for the base of the bird, some black wool for the back, felt for the wings, small black eyes and a piece of yellow wool for the beak.

A do-it-yourself toy (dry bulk felting) must be started from a base of white or gray wool. First you need to form the body and head of the penguin. The back and head can be covered with black wool at the grinding stage. Felt wings are recommended to be attached to the main figure (they can also be made of wool), glue the eyes, attach the beak in any convenient way.
At first glance, wool felting for beginners may seem quite complex process, but this is not so - it is enough to have patience, a little skill and choose the right technique.
Wool felting techniques
There are 2 main techniques for felting wool, the process for creating products for which is fundamentally different. That is why it is difficult to say which style of felting is easier for beginners to master - here everyone chooses what he likes.
Wet felting
It was wet felting from wool that gave the name to the technique of creating warm products.
A piece of woolen material must be wetted with a simple soapy solution and begin to roll the product in your hands, giving it the desired shape. Since wool shrinks in size when felted, 2-3 times more material is needed for work than the size of the future product.
There are 2 ways of skating: in the first one, a wet ball is skating in the hands, which results in voluminous crafts. In the second, the wool is laid out evenly in a thin layer on a bamboo rug, moistened with a solution, covered with a film. The resulting workpiece must be rolled into a roll of medium density and rolled for a long time, gradually increasing the pressure of the hands.
The latter method is used more often - it allows you to make beautiful bright matter with the effect of a marble color transition, sometimes it also looks like a patchwork technique. However, wet felting for beginners is better if you work with bulky figures.
In this style, it is customary to create paintings, clothes, bags, scarves and capes, accessories, jewelry.
dry felting
Dry felting is done in a completely different way. Prepare a ball of wool and roll it a little between your palms, giving it the desired shape. Take a special needle with notches and start poking it into the ball often, often - this tangles the wool fibers inside the ball, fastening them and compacting them.
You can understand that the part is already ready by slightly pressing it - the workpiece of the desired density will return to the shape that you gave it before squeezing. Further, the fibers will no longer be confused, but torn.
Dry felting from wool is used to create volumetric figures of animals, fairy-tale characters, people - they can be used as ordinary figurines or toys.
Felting wool for beginners always seems to be a very long and laborious task. However, the result of each lesson pleases and makes needleworkers continue to create amazing woolen works.
Wool for felting
Even for beginners, it is no secret that the felting technique chose wool as the main material. It comes in different textures, densities and colors, and each variety is used for specific purposes.
Tops
Tops wool, or comb tape, is of the highest quality - it is actively used in both wet and dry techniques. The material is well combed, the fibers are soft and lie in one direction. It is also called spun wool.

In its raw form, the blank is similar to a woolen ribbon, from which you can tear off shreds.
wool wadding
Another type of wool is called carded wool due to the large brushes (cards) with which it is combed out. Unlike tops, the fibers in carded wool are multidirectional, and the material itself is more like cotton wool.
Such wool is cheaper than comb ribbon and therefore suitable for beginner needlework. Properly made products made of woolen wool look no different from tops.
Sliver
This is the name of combed, cleaned, but not dyed wool, which is used as a base - if you make the whole toy from tops or carded wool, too much expensive material will go away.
In addition, this variety is specially designed to serve as stuffing - it is denser and therefore holds its shape better.
Tools for the job
Special devices are needed mainly for dry felting. Wet felting wool involves more work of fingers and hands than special accessories.
Needles
Dry felting from wool, as a rule, is performed using special needles in the form of the letter L with notches on the tip - they tangle the hairs of wool, compacting the material and forming a certain thing out of it.

For beginners, it is very important to remember the classification of needles by number:
- No. 36 - the roughest, used on initial stage material processing;
- No. 38 - thinner, the main felting is performed precisely by this number;
- No. 40 is the thinnest needle, which is used to process small details, decorative elements.
In addition, there is a needle with notches directed in the opposite direction - it does not dump, but draws out the fibers, and is suitable for giving fluffiness to toy animals.
Felt machine
Automatic alternative to the needle - can hold up to 12 or more needles in the nozzle! It is understood that the device allows you to speed up the processing time of the product several times. Such a device is especially useful when working on flat things.
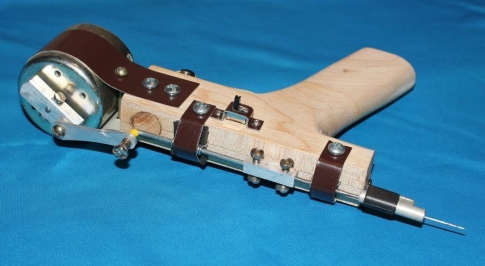
However, before buying it, you need to get used to working with needles and practice well - this is especially true for beginners.
Substrate
In other words, the rug you work on. Its presence is important for several reasons:
- due to the hard surface under the work, the needle can easily break or bend;
- it is also inconvenient to hold the product on weight - you can accidentally pierce your finger.
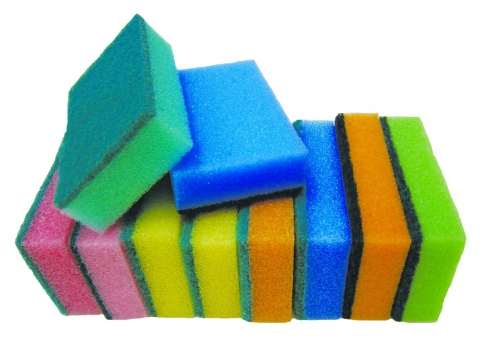
It is not necessary to buy a special substrate - instead, use foam rubber washcloths, thick hard brushes, felt mats or foam blocks.
Beginner Tip: Felt counts best material! It doesn't fluff the bristles like brushes, it doesn't leave pieces of foam rubber in the work, and it doesn't make nasty sounds when pierced like foam.
Master class: do-it-yourself hedgehog
Below is a master class on dry felting for beginners - you can make a cute brooch in the form of a hedgehog from the cult cartoon "Hedgehog in the Fog".
You will need: black, dark gray, light gray, white and red carded wool, needles of all thicknesses, brooch clasp, Moment glue, soap and hot water.

When creating some small details, wet felting from wool was used.
- Lay a small ball of black wool on the backing and sew along the entire length with a size 38 needle.
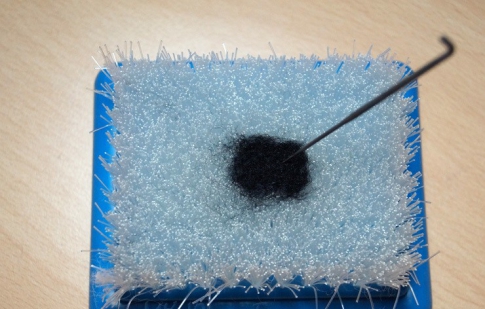
- Roll the part into a roll, put it back on the substrate and let it go.

- One side of the foot should remain fluffy, do not touch it.
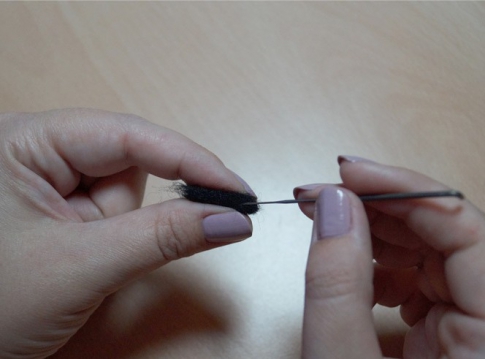
- Wet the workpiece completely in warm water. Lather your fingers well and begin to gently rub the foot from all sides.
- Now put the “sausage” on the palm of your hand and roll it, covering it with the other palm on top.

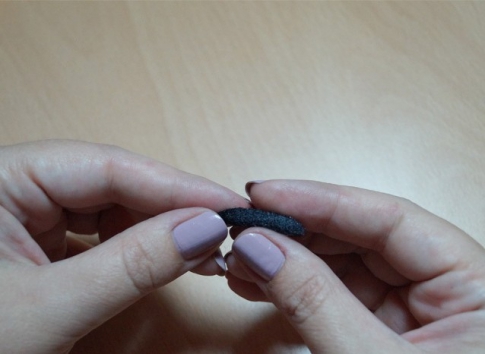
Rinse the workpiece in clean water and send to dry. Similarly, make all 4 paws: longer - legs, a little shorter - handles.
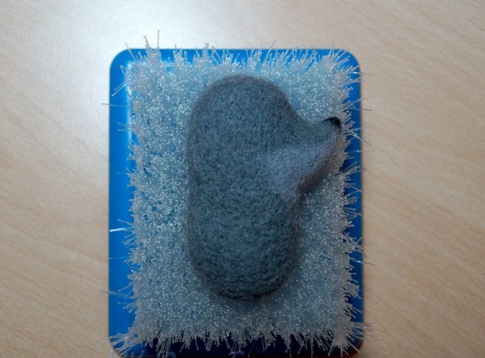
- Prepare a ball of black wool about 10 centimeters long, 3 centimeters high and thick. Lay it out in the form of a flat oval on the substrate. You can choose other options, but remember that the material will decrease by about a third in the work.

- Start felting the product with a needle number 36, moving over the entire area of \u200b\u200bthe oval. Stick the needle in the center at a right angle, decreasing it towards the edges.

- When the ball turns into a dense, plump oval, wrap it with dark gray wool so that the black color does not show through it.
- At this stage of work, use a needle number 38. Stick it not so deep - the black layer is already quite dense, you need to fill the gray wool.

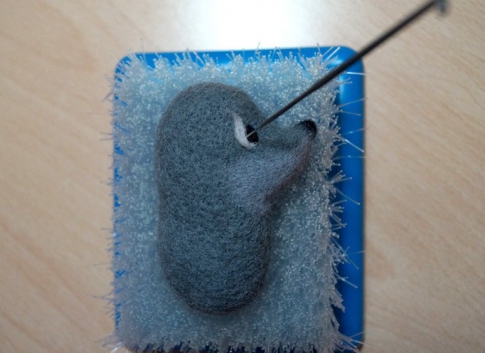
- When the torso is ready, take care of the nose. Lay a small triangle of dark gray wool on the backing and work it with a size 38 needle.

- Roll the workpiece into a roll and go through the needle again, leaving a wider edge fluffy.

- Now work out the base of the triangle - as a result, you will get a cone that is dense on all sides. Roll a small black piece to the tip of the cone - this is the spout.
- Attach the nose blank to the body and roll it, working with a needle from all sides at the base.

- If the shape of the nose or torso does not suit you, you can always correct it by rolling a piece of a suitable color in the right place.
- Take a flat small piece of light gray, straighten and roll under the nose, marking the mouth area.
- Now grind the product - stick the needle shallowly and as often as possible. Each puncture should be as close as possible to the previous one.
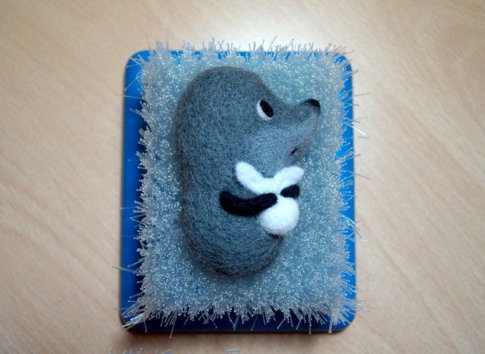
- From a tiny black piece, roll an oval and fasten the eyes in place.

- Lay the white color around the black oval and fix the protein around the pupil.
- Make a mouth in the same way.

- Roll up a small ball white color, screw it with a No. 38 needle. Fasten it to the hedgehog with the same needle. Roll small white “petals” on top - you get a road knot.

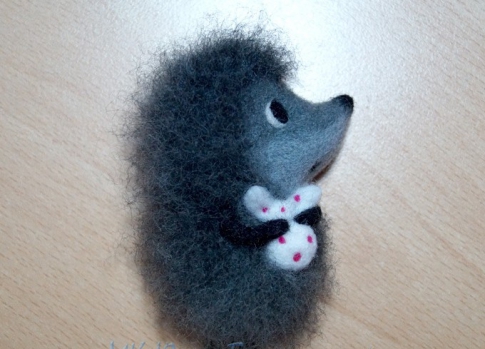
- Fasten the handles on top of the knot.
- The legs need to be fastened by attaching the free side to the "back" of the brooch. On the back of the hedgehog, make a recess for the fastener - often go through the needle number 36 in the right place.

- Place the clasp in the recess, cover with a pre-felted rectangle of dark gray wool on top and fasten with a No. 38 needle.

- Use felting to decorate the knot with small red peas - this can also be done using beading.

- Go over the entire surface of the brooch with a needle with reverse fibers. Stick it not very deep, but often to get fluffiness - hedgehog spines. Leave the muzzle and knot smooth.
Remember that even for professionals, felting one product from wool takes from several hours to several days, despite the fact that the work progresses easily. In this case, the main thing is to be able to wait and watch how a wonderful little animal emerges from a simple piece of wool!
Another simple tutorial for beginners you can learn from the video - here you can see how to make felting a flower from wool.
Today we have a guest post - a detailed and large master class Wool toy from felting master Inga! Suitable for those who already have basic knowledge and skills in dry felting.

Moiseeva Inga works wonderfully in the technique of felting, creates fabulous animals and little men from sheep's wool, many of her creations are in the genre of a felt portrait doll.
Member of the St. Petersburg Union of felt masters, participant and winner of many Russian and European exhibitions.
Coordinates In contact with, Score
Text and photos provided by the author. All photos are clickable.

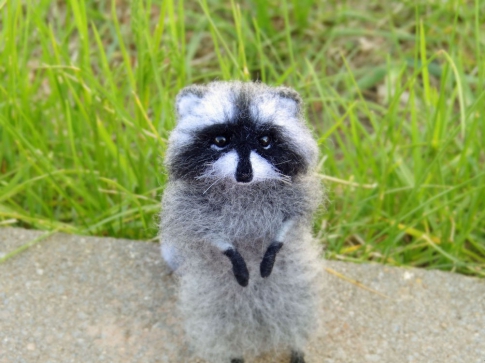
Be patient, in the coming days we will make a doll, and not a simple one, but a woolen one. Our hero will be the star of Soviet animation, the terrible and terrible Uncle Au.
I want to warn you right away that the success of our enterprise is guaranteed only if you already have three wonderful skills - needle felting, knitting and wet felting. I will not explain in my MK why a grinder is needed, when to change the needle from 36 to 38 and how to close the loops (it is assumed that you already know). If this is a dense forest for you, then I advise you to study MK for beginners, dozens of excellent MK from wonderful craftsmen are available right here and now, at the Masters Fair. And I, with your permission, will begin ...

For a toy with a growth of 18-20 cm, we need the following materials and tools:
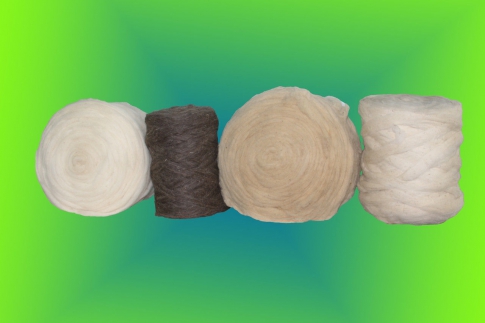
- A small amount (15-30g) of wool for felting of different grades and colors:
beige or sand, thin
black thin
rough "boot" of any natural color
salt-pepper, (with a bias in "salt") to imitate gray hair, if you can't find it, use white
brown thin (merino 16-18)
- A small skein of thread for knitting (wool, acrylic) color brick or swamp, faded shades or melange
- Wire "Pipe Cleaners", sold in tobacco departments shopping centers at a price of 100 rubles per 100 pieces (there is also small packaging) For lack of brushes - hard wire.

- Any plastic with which it is customary to work (fimo, paperclay, phytoclay, etc.) for sculpting an eye
– Acrylic paints for painting, dry pastel or shadows for tinting, plastic varnish
- The usual tools for felting dry and wet (needles, brush, backing, pimple, VSHM, etc.), small knitting needles number 3 or 4, glue Moment-crystal, awl, scissors, needle with a large eye.

Uncle Au has a non-standard figure (short legs and a tiny body with long arms and a big head), so I recommend printing his full-length image from the Internet and constantly monitoring the proportions.

We start making toys from the head. We roll the sand-colored wool quite tightly, getting a ball of the desired size. Schematically outline the location of future eyes, add additional volume in the lower part of the face (cheeks, chin) I immediately apologize for the quality of the pictures - photography and photoshop are not among my “wonderful skills”

We make sure that the back of the head is not too flat, and the forehead is not too small, if necessary, add volume.

Separately, we roll a large plum-shaped nose from the same wool. On its basis, we leave a bunch of untouched wool for attaching to the face. We remove the rest of the part to the final density.


Gently roll the nose to the face, masking the joints with pieces of fluffy wool. We add a little wool to the bridge of the nose, achieving a smooth transition from the forehead to the nose.

Ears are not visible on the printout from the Internet, but this does not mean that they are not there! Our Uncle is an ancient old man, so his ears must be large, dumpling-shaped. From two identical pieces of beige wool we form two symmetrical "dumplings".

We roll them off until cooked, leaving, as in the case of the nose, strands of untouched wool at the junctions.


We roll the ears in their rightful place, masking the connection with pieces of wool.

Let's take care of the eyes. We sculpt flat oval eyes from plastic, checking the shape and size with the printout. Next, we act according to the instructions for your type of plastic - bake or let it harden in air. I use self-hardening clay for realistic floristry, adding Zinc White oil paint to it. This clay needs a day to dry before it can be painted.
I advise you to prepare several pairs of eyes at once and then choose the most successful one. In addition, it will not be so scary to make a mistake when painting, you can even make a trial version.

Having chosen the most successful pair, we press each eye to its future location and with a thick needle we prick the contour of the orbit.

We evenly deepen the eye socket inside the contour.

Uncle has no eyelids, as such, there are only small pretty "bags" under the eyes. We take two identical woolen cakes, each one is slightly rolled in the center and folded in half, getting semicircular details. We round the thick edge of each detail and seal it with a needle.
For those who do not understand the process, I show in the following photos in more detail, using the example of one large detail (I repeat, Uncle Au needs two and smaller ones)


We roll the "bags" to the edges of the eye sockets.

Re-align the contours and the bottom of the eye sockets. It was at this moment that the soul of our future pet peeps out for the first time from a simple lump of sheared sheep's wool;)) do not miss the moment - "Uncle Au, nice to meet you!"

We paint the eyes, since this is done elementarily. With brown acrylic we draw an elongated oval of the iris, with black - the pupil (also slightly elongated). Let dry well and cover with plastic varnish.

While the eyes are drying, we make the final bow of the head. We grind the part of the face that will not be covered with a beard and hair.
We glue the eyes with Moment-Crystal glue.

Let's put the head to the side and take care of the legs. From two wire brushes we form a pair of internal leg frames. The length is controlled by our printout. We bend the upper end of the wire by 1.5-2 cm, this part will not be covered with wool, it will be needed to attach the leg to the body.

We wrap the frame with strands of fluffy wool - from the top to the middle of black, from the middle to the toe of coarse felt boots. At the border of two colors, the strands of wool will be tangled - let it be, later we will decorate the transition from black pants to gray felt boots.
If you use a simple wire, then fix the first layer of wool on it with glue. No glue is needed on the brushes.
And once again I remind you - there is no wool on the bent ends of the brush or wire!

We roll the leg to the desired density. Now our felt boots are more like a sock than winter shoes.

We make felt boots. We roll a long and wide strip of coarse wool (length \u003d leg circumference) on a brush, fold it in half lengthwise and roll it again.

If you want the appearance of very thick boots, fold the fold of the strip again.

We wrap the leg with a prepared strip, fasten and roll. We check the density of the heel and foot, if they are "liquid" - add wool. Bringing the final beauty.

We form from beige wool a pair of hands and a pair thumbs. We roll them to a high density, leaving fluffy ends.

On the hand with a thick needle we pierce the “fingers”. We act on the principle of animation - cartoon characters always have 4 fingers on their hands (why - the answer is easy to find on the Internet :)). The brush is slightly bent, giving it a natural position.

We need one wire brush for both hands. We drip a little glue on its tip to fix it and press it against the “palm”, slightly moving it away from the middle.

We put a “finger” on top of the wire


We wrap the hand with fluffy wool and gently roll it off. We pay special attention to the joints of the finger and hand, the wire should not be visible in any case!

We perform a symmetrical hand on the other end of the brush.

Using a centimeter, we find and mark the middle of the wire with handles.

We wrap the free parts of the wire with wool, leaving about 1.5-2 cm from the center.

I advise you not to fall into unbridled economy, wrapping your hands with sliver or "creative waste". Let them be closed long sleeves, but still, if someone looks under the sweater and finds brown-green shoulders or a pale sliver belly there - believe me, it will be sad. Of course, in large toys it makes sense to wrap the “stuffing” of waste wool with a top layer of high-quality, but in such a small work as our Uncle, such a “gameskin is not worth the candle”.

We take the next wire brush and twist the frame of the body out of it. We bend the upper end by 1.5 cm and in the future we will use it to fasten the head, with the second end, bent inward, we will fasten the handles.

We take legs. We fasten the ends of the wire free from wool to the frame of the body.

We wrap the lower part of the body frame with black wool. discard, add volume if necessary.

We attach the handles to the body frame, screwing them with the free end of the wire brush.


We wrap it with fluffy beige wool and leave it, leaving part of the wool untouched in the neck area.

With an awl we pierce a hole in the head, at the point of connection with the neck.

We drip a little glue on the "neck" end of the wire and stick it into the pierced hole.

We firmly attach the head to the body, using loose wool around the neck, adding more if necessary.

We change the type of activity, we take up the knitting needles. It is convenient for me to use a set of five knitting needles (for knitting mittens-socks) - I use three, you can take any knitting needles of a suitable number.
We knit a sweater in the “raglan with one cloth from the collar” method. You can knit in any other way, but remember - the large head and hands of the toy will not allow you to just put on / take off clothes, think over in advance the algorithm for assembling your sweater on the doll.
My sweater is knitted in garter stitch (all loops are knitted, the first edge is removed, the last is purl). Adding loops - any way you can, I use this simple

So, on knitting needles No. 3 or 4, we collect 14 loops.
1st row and all odd - facial loops
2nd row - chrome., * 1 person., 1 loop inc., 1 person., 1 loop inc., 1 person. *, repeat from * to * 3 more times, chrome.
4th row - chrome., * 1 person., 1 loop inc., 3 persons., 1 loop inc., 1 person. *, repeat from * to * 3 more times, chrome.
6th row - chrome., * 1 person., 1 loop inc., 5 persons., 1 loop inc., 1 person. *, repeat from * to * 3 more times, chrome.
8th row - chrome, * 1 person., 1 loop inc., 7 persons., 1 loop inc., 1 person. *, repeat from * to * 3 more times, chrome.

Now there are 46 loops on the needles. then the common fabric is divided into 4 parts and each is knitted separately, in turn.
Back - on the first 13 loops from the common fabric we knit 10 rows of garter stitch, while in the 4th and 8th rows we symmetrically add 1 loop at the beginning and end of the row. In the last row, cast off all 17 sts at the same time.
Right sleeve - on the next 10 loops we knit 16 rows, while in the 6th and 12th rows we symmetrically add 1 loop at the beginning and end of the row. On the last row, cast off all 14 sts at the same time.

Before - knit like a back
The left sleeve is knitted like the right one.
We cut the thread left after closing the loops, but do not fasten it tightly - you may have to knit or dissolve a couple of rows after trying on, since the density of knitting is an individual matter 😉
We steam the finished fabric.

We put our “Maltese cross” on the toy and first sew the seam along the raglan line at the back.

Uncle Au's sweater looks quite old and worn, so don't hide the seam too much, on the contrary, I advise you to bring all the knots out and even add two or three "decorative" ones to emphasize his grunge style 😉

Back to wool. On the “bald head” of Uncle, we mentally draw three lines from ear to ear - these are our lines of “hair growth”

From the salt-pepper combed ribbon, carefully separate thin strands (as in wet felting) and make a “layout” with a width equal to the length of the first dotted line.

Across the layout, in the middle, we place a small, slightly twisted strand.

We carefully transfer the entire layout to the head so that the transverse strand coincides with the first imaginary line. We attach this strand to the head, while fixing the hair.

We put the hair together. He's already cute ;)

Similarly, we increase the hair along the two remaining lines.

The same principle applies to facial hair.

Mustache:

Beard:

Uncle Au has such a thick mustache that only the lower lip appears to the viewer. We roll it from a small piece of beige wool and roll it under the mustache.

You can add a small short strand of gray hair just above the lip if the face appears "bald".
If any strand of hair is too long, in no case cut it with scissors! Pinch or tuck with your fingers. Uncle Au is not a Yorkie, a neat haircut is not his forte!!
But the old man will have to get acquainted with cosmetics. We tint with a hard brush with grated pastels of brown shades (or you can use dry eye shadow, it will be no worse). Referring to the picture from the Internet, we shade the nose, the upper eyelid area, ears, lip, temples and fingers. Don't be afraid to overdo it with tinting - in some episodes of the cartoon our uncle is so grimy that we can't keep up with him with our pastels.