What does a sailor suit look like? Do-it-yourself suit for a boy
There are never too many carnival costumes in a child's wardrobe. Indeed, in the image of your favorite fairy-tale character or a representative of an interesting profession, you can come to a matinee or a school play, a friend's birthday or any other holiday. Let's try to make a sailor's costume with our own hands and diversify the child's personal dressing room with a new outfit.
The basis of the form of conquerors of the ocean
The most common form of naval troops are dark blue trousers, a white shirt, a peakless cap and a collar. At home, it is not difficult to match a white top and a dark blue / black bottom. It is better to choose classic trousers; a light-colored shirt or turtleneck will suit them. An excellent sailor suit will turn out from a vest. Today on sale you can find stylized children's clothes with a horizontal stripe. A more time-consuming option is to alter a T-shirt for a child from an adult vest bought in a workwear store.
Sailor's headdress: instructions for making

The main part of a sea suit is a peakless cap. The headpiece needs to hold its shape, so we need a hard base. The easiest way is to make it out of cardboard. In total, you need 2 parts: a large circle and a strip. We cut out 1 piece from cardboard, and two large circles must be cut out of light-colored fabric. A strip (two identical parts) is cut out of dark material. Next, you need to sew a cardboard part between two rag ones, and the base strip is sewn in the same way. We sew the edges of the rectangular part in such a way that we get a ring. Next, you need to connect the base and the bottom of the peakless cap. The sailor's costume can be supplemented with another headdress. Let it be a cap or a beret. The main thing is to keep the theme - use white and blue / blue colors, themed decorations.
We make sailor costumes for girls

Do not think that the image of a sailor is only suitable for a boy. Girls look no less charming in marine costumes. We will take the rules of the male form as the basis for creating the image: light top, blue or black bottom. For a sailor, it is best to choose a medium-length skirt, about knee-length. Do not be too lazy to make or pick up a suitable headdress. The sailor's carnival costume can be supplemented with a collar, which is also suitable for a men's costume. To make it, take a square piece of blue fabric, outline and process the neck (semicircular neckline) and sew on two symmetrical ties. Next, we decorate the edges of the collar with light stripes of ribbon - three elements arranged in a row will suffice. Sailor costumes for girls may also include a horizontal stripe on a white background, instead of a pure light shade. A top or even a whole dress can be sewn from a vest. But before you take up needlework, carefully study your daughter’s wardrobe, today you can often find outfits in a marine style in ordinary clothing stores. Perhaps you already have a sailor's dress in your closet. If the girl has long hair, choose discreet hair accessories in a suitable color. Refuse large hairpins and bows, but a blue or blue ribbon woven into your hair will perfectly emphasize the image.
Important costume details

Making a sailor costume is actually not so difficult, which is especially nice - this image will suit everyone, without restrictions on gender and age. But what accessories to choose in order to make the image more expressive? It is very good if someone in the family really served in the Navy. In this case, it makes sense to look for a real headdress among the things put away for storage, and some kind of insignia. A belt will be an excellent addition to a men's sailor suit - a real one from a naval uniform or stylized with a themed buckle. Young sailors should choose jewelry in the form of a steering wheel, anchors, sea knots and seagulls. Do not be afraid to fantasize and experiment. In order for the “sailor” costume for children to look complete and whole, try to follow the compatibility of all its elements. In one masquerade dress of this type, 2-3 colors should be used. Do not complicate the costume with an abundance of fabrics of different textures and small details. Let there be not too many decorations, but they will all be bright and spectacular. This is appropriate when it comes to imitation of a military uniform.
The New Year holidays are approaching, and with them the period of matinees in kindergartens and schools. Many parents are already preparing for this period in advance so that at the very last moment they do not waste time running around the shops in search of an original costume for their children. But in order for the costume to be truly original, you will have to make it yourself. One example is a sailor's suit, for which you only need to make a cap quickly and easily with your own hands and a sailor's collar, and almost every boy has dark blue trousers and a white T-shirt for sure.
In order for your peakless cap to turn out as realistic as possible, it is best to sew it - this is not so difficult to do, and if you have at least a little knowledge of the sewing technique, then you can easily cope with this task.
We study a master class on making a peakless cap with our own hands
For work we need:
- White and blue fabric - white for the main part (crepe satin is best), and blue for the side, or band (gabardine);
- Blue satin ribbon 2 cm wide and 80 cm long;
- Dublerin;
- Application "Anchor";
- Threads in the color of the fabric and a sewing machine.
At this stage, it is necessary to make patterns for all the details of the peakless cap - there will be only two of them: a pattern of a band, or a side, and the cap itself. The detail of the band is a strip about 5 cm wide, and equal to the circumference of the head + 1 cm long for allowances. The cap pattern is a circle with a round hole inside. The radius of the inner circle is calculated by the formula, where L is the length of the band. The radius of the great circle is calculated by the formula R = r + 7cm. moreover, both these circles have a common center. We build and cut out a pattern from paper - this is the crown of the main part of the peakless cap. For the cap, you will need another pattern, but it is a circle equal to the outer circle of the crown, so that it can be immediately cut out on the fabric.

From the blue fabric, cut out the side of the peakless cap, and from the white - the tulle and the top. Glue all the details carefully with dublerin, not forgetting to leave allowances for the seams.
Bend the band in half lengthwise with the wrong side inward and steam well with an iron. You should end up with a fairly dense piece. Place the crown and top together right side in and pin or baste, then machine stitch along the outer circumference.

Make the seam allowance along the edges of the circle jagged - so the peakless cap will keep its shape better. Turn the finished part on the front side and steam thoroughly with an iron.
Bend the allowances along the long sides of the band to the wrong side and baste, and on the inner circumference of the crown, make several small cuts more than 5 mm long - so the crown will lie more accurately on the band. Baste the band to the crown, tucking its cut inside the band. After that, make sure that all the details are sewn evenly and without folds and stitch the product.

At this stage, you need to sew two ribbons on the back of the band from the wrong side. To prevent these ribbons from twisting, they should be sewn around the perimeter, and capturing only the inside of the side, the seam will not be visible from the front side.
It remains to attach the application with an anchor to the front of the crown directly opposite the ribbons and a real sailor cap for a young seafarer is ready.
If you are not friends with a needle and thread, and sewing is not your favorite hobby, then a similar peakless cap can also be made from thin cardboard or paper. Whatman sheet is best suited for these purposes. The patterns are the same, but you don’t need to sew anything - just glue the parts where they need to be sewn with a paste or PVA and let dry well. There are also ways to make various peakless caps, caps or hats using the origami technique, but it takes some time to master it. A paper children's peakless cap will turn out no worse than sewn from fabric. You can immediately paint over the side with blue paint or stick a satin ribbon on it - as you like best.
In order for the sailor's suit to be fully equipped, it is also necessary to sew a collar. To make it, you will also need a blue gabardine and a thin satin (1 cm wide) white ribbon.
The sailor collar pattern looks like this:

It can be built according to all the rules for designing clothes, or you can simply redraw it, as they say "by eye", taking any T-shirt of your child as a basis.
Let's analyze the main stages of sewing a sailor collar
From the blue gabardine we cut out two details of the collar, taking into account the allowances for the seams.

At this stage, you need to decorate the collar with white satin ribbons. To do this, mark the seam line on the front side and, departing from it by about 5 mm, we bait the first strip.
In order for the tape to form an angle of 90 ° at the corner, proceed as follows: wrap it on the sewn tape at an angle of 45 °, and then cover the main tape with it and align it to an angle of 90 °.

In this way, we act with each ribbon (there should be three stripes on the collar) and sew them on a sewing machine with two lines each (on both sides of the ribbon to the edge).
We put the two parts of the collar together with the right sides inward and sew on the sewing machine, leaving a small opening in order to turn the collar inside out.

Then we carefully cut off all the corners so as not to damage the line and make notches along the neck allowance so that when turning out, all the corners and roundings straighten evenly.
We turn the product on the front side, grind the entire product along the edge, steam it through a thin fabric (otherwise the gabardine will shine) and carefully sew up the hole that was left for eversion.
Our collar is ready. It remains only to sew a ring for tightening the ends of the collar from a wide blue satin ribbon and the sailor's New Year's suit is ready.
Video on the topic of the article
In conclusion, we suggest you watch a few videos about what other marine hats you can make with your own hands so that your
You can sew a sailor's carnival costume with your own hands, both for a girl and a boy. To create a children's sailor costume, you do not need a very detailed pattern, because in such an outfit there are no details that require special accuracy and accuracy when creating them. It is enough to use simple instructions and ideas that are easily implemented at home.
Carnival children's costume for a boy "sailor"
One of the most important details of this outfit for a boy is a headdress. To create it, you will need blue and white hard cardboard and white fabric.
From a piece of hard blue cardboard, cut out a strip that will serve as the base. Its width should be about seven centimeters, and the length must be determined by measuring the girth of the boy's head, and retreat another couple of centimeters to leave room for gluing.
Glue the strip to make a circle. We bend a centimeter of its upper edge inward.
From white cardboard we cut out an even circle, the diameter of which will be wider than the glued blue strip. It is necessary to make sure that the edges of the circle recede from the edges of the strip by about four centimeters.
We put a white cardboard circle on the fabric and outline it, retreating six centimeters from the edges. Glue the edges of the fabric to the inside of the cardboard circle without tightening it. Next, glue the blue stripe with the white top.
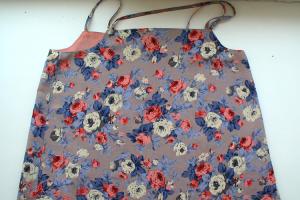
A mandatory attribute of this costume is a collar. From the blue fabric we cut out a square forty by forty centimeters. Visually measure half of the square. We retreat from its lower edges by five centimeters, and cut out a semicircle to its top.

It is not necessary to sew trousers, it is enough to find any black straight children's pants and a belt with a noticeable buckle. But, if you are fluent in sewing techniques and are eager to sew them with your own hands, take a satin fabric in black or dark blue and give preference to a flared style.

For the blouse you will need a white satin fabric. Sewing it is easy - cut out two wide pieces and connect them with a sewing machine, leaving gaps for the arms, head and body. A prerequisite is that the upper neckline must be wide so that the blouse can simply be worn over the head.
A simplified version of a children's outfit for a boy
It is easy to sew a woven headdress with your own hands. To do this, you need a blue wide elastic band and a white cloth. We connect the ends of the blue elastic band and tie. From a white fabric, cut out a circle and sew it to the inside of the gum.
It is not necessary to sew a children's shirt, you can take a vest and put it on under a white shirt that is not buttoned on all the buttons. If you couldn’t find a vest, take a regular white sleeveless T-shirt and paint blue stripes on it with acrylic paint.

The collar can be cut out in the same way as in the instructions for the first costume, but the stripes can be painted with any white paint, and not sewn on.
Trousers for the boy - regular black. Even the classic version is fine.

Do-it-yourself carnival children's sailor costume
You need to try to find a white blouse without all sorts of unnecessary details. We draw wide transverse blue stripes on it, and the blouse for the sailor is ready.
The style of the skirt can be anything, except for a tutu or a very long model. Good options are straight, flared or "sun". Sew with your own hands, find or purchase - your choice.
 The holiday season is approaching, and your child got the role of a sailor at a school concert? Or just decided to be in such an unusual outfit at the matinee? Parents in this case begin to select the right costume. If there are usually no problems with the search for black flared trousers and a white shirt, as, indeed, with a blue collar scarf, too, these items of clothing are very common for other purposes, but the peakless cap is a characteristic, “highly specialized” feature. There is nothing wrong with this, tailoring it is quite simple.
 This headgear, as we have already said, is the form of a cap that does not have a visor, generally accepted in the Navy. In the army, such a cap began to be used from 1811, and initially it was also worn by infantrymen and artillerymen. As a result of the reform of 1850, the right of exclusive wearing was transferred to the morflot, and since 1874 the style, the obligatory presence of ribbons and their length (at least 40 cm) were legally approved. Since 1878, inscriptions began to be made on them indicating the place of service or the ship; black and gold St. George ribbons were used on the dress uniform.
Soviet Russia made only formal changes to the form regarding the font and white border. Note that this is an exclusively Russian invention, although later in the fleet of many countries they began to copy a convenient and practical headdress.
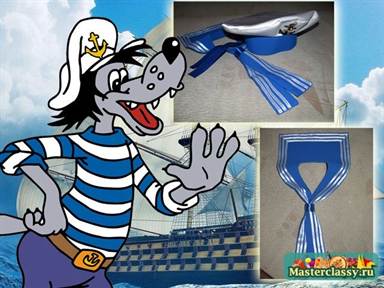
The modern version that we will make for a child looks like this and has different shapes for men and women.
What is needed for tailoring a capless sailor
Materials and tools for sewing will need the following:

Pattern for making caps for a boy
First, we measure the circumference of the child's head (OG). On paper, we need to build a rectangle whose width is equal to this value, and whose height is 7 centimeters. This will be the future band.

Also draw two circles - one solid, twelve centimeters more than the OG (upper part), and the second - ten centimeters more than the OG, but in the shape of a donut, with a round hole in the middle. The diameter of this hole is equal to the OG (that is, the length of the rectangle; when folded, it will be sewn exactly here).
We transfer the resulting patterns to the doubler and cut it out, leaving an allowance for the seams - one centimeter, including along the edge of the inner hole. Then, using a hot iron, we glue the rectangle to the blue fabric, the circles to the white fabric.
How to sew a sailor cap with your own hands
 The band should be very tight - fold the rectangle in half and iron it with an iron. You can use an insert from another dense fabric, or add a few more layers - but remember that you still have to stitch this, do not overdo it. You can make a cardboard insert, a quarter of a smaller size, so that you do not have to pierce the seal when applying seams.
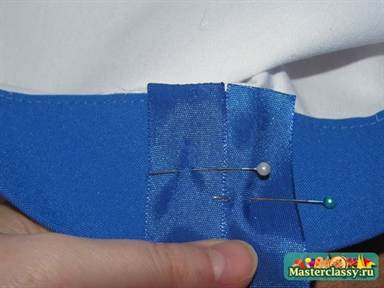
 Both circles should be fastened with pins, or basted - the main thing is that it comes out smoothly - the centers should match. As we remember, the upper part is a few centimeters larger - by bending it, sew two parts along the outer edge. You can incise so that there are no folds, otherwise there will be tubercles along the edge. The beauty of the seam is not critical - it will be inside.
Turn the resulting product through the middle and iron well.
 Now the turn of the band has come - it is sewn to the inner hole. Do not rush to immediately sew on - with pins or a basting, achieve the correct location, let's say right away - this is the most difficult stage.
All parts should fit without folds and distortions, carefully check everything before the final firmware.
We are left with the obligatory and simplest action - decoration. Two blue satin ribbons (shoulder-length, according to marine custom) must be sewn on the back (where the seam is on the band), and the anchor must be glued on the front. Instead of an anchor, you can use other marine symbols, we leave this to your discretion, even an inscription would be appropriate, for example, “Morflot” or “Aurora”.
If your son is planning a matinee in kindergarten, and you don’t know what costume to choose for him, dress him as a sailor, this is a wonderful male profession. And the most important sailor attribute (except for a vest) is, of course, a peakless cap. But it’s not at all necessary to run to the store for an expensive sailor suit, you can make a wonderful outfit at home, literally in an evening, well, or a couple of evenings. If you have problems with time, but they definitely won’t be with the technique, because in this article you will be told how to make a white cap with your own hands.
sailor suit
Becoming a sailor is a childhood dream of most boys, so let's try to fulfill it, at least for a little while, and sew a suit for a boy in a marine style. You will be offered a very detailed master class in the form of step-by-step instructions, everything is very simple, even the most inexperienced needlewoman can figure it out.

You will need:
- Crepe satin (white);
- Dublerin (the denser the better);
- Gabardine (blue);
- White satin ribbon, about five millimeters wide;
- Blue satin ribbon, about two centimeters wide;
- Application for decoration (can be made in the form of an anchor, inscription, life buoy, etc.);
- Threads;
- Paper.
First you need to make a pattern of the product. To do this, you need to take measurements from the child’s head, then cut out a strip of paper (equal to the circumference of the head) five centimeters wide and roll it into a ring. And with the help of this circle, choose the appropriate diameter of the future headdress.
The peakless cap should not move out, it should sit tight, but at the same time, it should not put much pressure on the child's head.
We cut off the strip, we got a band pattern. Now we will make a pattern of the most important part, to do this, measure the value of the strip obtained after trying on, designate this figure with the letter C, and calculate the inner radius using the formula: r = C / 2π, and the outer radius using the formula: R = r + 7cm. We build a pattern on a sheet of paper, the circles should have a common center. Cut out the resulting pattern.

Now cut out all the details from dublerin. The band must be cut ten centimeters wide so that a fold can be made. Look at the photo, here are the details you should get.

Now, with an iron, glue the dublerin on the blue gabardine, while making indents for the addition (one centimeter above and below, and one and a half centimeters on the sides).

Well, now cut the resulting band.


Glue the tulle in the same way.

Cut out both blanks, with increments of one centimeter.

Now go back to the band, fold it in half with doublerin material inside.

Steam the whole thing well with an iron.

Connect the elements of the product with pins with the right sides inward.

Well, sew our future cap around the entire circumference.

We cut the increase around the entire outer circumference of the product.

Now turn the product inside out, straighten all the edges, you can even steam it, this part can be put aside for now.

Take the crown in your hands and lay the additions inside, securing with large seams, which can then be easily removed.

Repeat the same on the other side.

Now cut the increase in the inner circle.

Use a special disappearing fabric marker (available at any craft store) to mark the area where the band will be attached.

Now attach the crown to the band. Place the allowance that you made on the crown inside the band and go through large stitches.

At the end of the band, we fill the side increments inside it and put this part on the unfilled increments of its other end.
Make sure that the parts lie flat, you can once again try on the child's head, if necessary, take in.


We sew the joint on the band with one machine line.


We attach these ribbons to the junction at the band, from the wrong side.
We sew our ribbons with a “forward needle” seam, you need to sew so that the needle does not go to the front side of the product.


Now sew with a hidden seam your chosen decoration (anchor, lifebuoy), place it exactly in the middle, navigate along the ribbons and make it exactly parallel to them.

The capless is ready.

You can also make a collar for such a peakless cap, it will look very nice, and your boy at the holiday will look original.
You will probably be surprised if you find out that a peakless cap can not only be sewn from fabric, but also made from paper or cardboard (if you want to make it more reliable), this is not at all difficult to do, even a child can cope with such a task.

You can build a pattern in the same way as for a peakless cap in the first case (described above), our product will consist of the same three parts.
When the parts are ready, start connecting them. To begin with, with ordinary paper glue, connect two circles, grease the part without a hole with glue and attach it to the part with a hole.
It is very simple to make a side, glue the strip over the edges to make a ring. When all the parts are dry, connect them. That's all, as you can see, it's very easy. The finished peakless cap can be decorated with some kind of inscription or a marine symbol.

Video on the topic of the article
This is how you can please your son in a completely simple way by making him a wonderful costume for the holiday. Watch the proposed video selection, from which you will learn how to make a paper cap using the popular origami technique and many other interesting ideas.