How to make a swan out of paper modular. How to make a swan from modules? What is modular origami
Modular origami is a technique that allows you to make amazingly beautiful three-dimensional paper figures. The difference between this technique and the classic origami is that to create crafts, not one, but several sheets of paper are used, from which modules are made, which, in turn, are folded to form the desired figure.
One of the striking examples of the technique is the swan of triangular modules. As a result of simple, but rather painstaking work, you can get a beautiful bird. Depending on what color paper you have at your disposal, you can make a white or colored rainbow swan from the modules.
Looking at photos of finished figures, it is even theoretically difficult to imagine how to make a swan from modules - it seems to be very difficult and intricate. In fact, there is nothing complicated in making figurines, just study in detail the master class on making a swan from modules with an assembly diagram and consistently follow the steps described there.
We bring to your attention a detailed guide, consisting of two stages - the manufacture of components and the assembly of the finished product.
How to make a swan from modules?
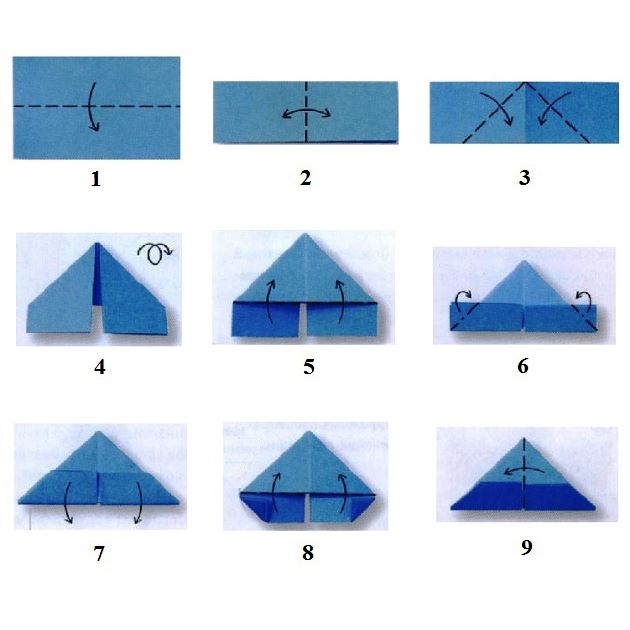
First you need to make modules. To do this, you only need sheets of ordinary xerox paper, white or colored, depending on what you want to get as a result.
Working process:
- We bend a sheet of A4 paper in half in width.
- Fold in half again.
- And fold it in half again.
- Unfold and flip so that the fold lines are vertical.
- We fold the sheet in half again, but in the other direction.
- And fold it in half again.
- We unfold and cut or tear the sheet along the fold lines so that we get 32 rectangles.
- We take one of the rectangles and proceed to the manufacture of the module.
- We bend in half.
- Now fold across the first fold line.
- Unfold and fold the bottom corners inward towards each other.
- Fold the top corners as shown in the photo.
- Now bend the upper part down to end up with a triangle.
- The resulting triangle is folded in half.
- We repeat similar actions with other paper rectangles.
- We got a triangular module with a pocket so that you can insert another one into it.


How many modules do you need for a swan?
The number of blanks directly depends on the assembly scheme and the size of the future bird. For example, in the assembly diagram below, 458 white triangles and one red are used. By reducing their number and simplifying assembly, you can get a small swan from the modules.
Assembling a swan from triangular modules
- Arrange the three modules in the order shown in the picture.
- We insert the corners of the two upper modules into the pocket of the lower one.
- Similarly, we attach two more triangles to the structure.
- We insert 3 pairs of triangles into the extreme modules.
- We proceed in the same way.
- Using 30 modules, we get this design.
- We add 3 more rows, in total there should be 5 rows of modules.
- By pressing on the design in the middle, we turn it inside out.
- We bend the edges up so that the bowl learns, as in the picture.
- Bottom view of the structure.
- By the same principle as before, we put on the 6th and 7th row of modules.
- Starting from the 8th row, we proceed to the construction of the wings of the swan. To do this, we put on 8 next to 12 modules, skip 2 and attach another 12. In the place where 2 triangles are missing, there will be a neck, in the remaining section of the 7th row - the tail of a swan.
- In the 9th row, each wing of the swan is reduced by 1 triangle.
- We continue further, with each row reducing the wings by 1 until one module remains.
- We make a tail, similarly reducing the row by 1 module.
- For the neck and head, we take 19 white and 1 red module in which we glue the corners so that we get a beak.
- We begin to collect the neck, putting the corners of one module into the pockets of another.
- We bend the design with a hook.
- The final step is to insert the neck into the gap between the wings of the swan.
- The swan from paper modules is ready.


From the modules you can make other crafts, for example,
Origami is a beautiful and original toy, which, of course, can serve as a good gift. And such a gift can be made with your own hands. Any origami sculpture consists of paper models, separate parts that are interconnected in a simple way. But it will be more effective if all the modules are coated with glue for reliability.
For making origami, simple office paper, A4 sheets, is great. To compile any origami figure, you will need a large number of paper modules that must be made in advance. How to make a paper swan Let's figure it out.
The swan is a beautiful, fabulous and devoted bird. This bird is a symbol of love and fidelity. An origami swan will be a great gift for absolutely anyone. This article will help you create such a masterpiece with your own hands.
If this is your first experience, then you should start with a simple swan, which everyone can do.

Our beautiful swan is ready! Such a swan will not take you much time, and the gift for your child will be great!
Modular paper swan: blank
This origami will look great. For its compilation, glue is not required, the modules themselves will be attached to each other. Such a craft will take you a lot of time, quite painstaking work. But trust me, it's worth it. The result will exceed all your expectations!
Let's start with the preparation of paper modules:
Modular origami swan: assembly
So, we will fold a colored volumetric swan from paper models. To do this, we will need to collect the following number of paper modules:
When all the colored paper modules are ready, we will begin to assemble the origami swan.
- First, we take 3 pink paper modules.
- We insert the corners of two paper modules into the resulting pockets of the third paper module.
- We take 2 more pink paper modules and attach them to the first three paper modules.
- We will get the first ring, which will consist of two rows: inner and outer.
- The inner one will be a short row, and the outer one will be a long one.
- Each row will consist of 30 pink paper pieces.
- We begin to collect the first rings, while gently supporting them with our hands.
- With the last paper module, we fasten the ends of the extreme modules of the ring.
- Now, from 30 orange paper modules, we assemble the ring in the manner described above.
- We insert the third orange ring into the pink ones in a checkerboard pattern.
- We collect the 4th and 5th rows of orange rings and insert them also in a checkerboard pattern into the resulting ring.
- We turn 5 rows of rings from paper modules inside out with our hands.
- We will get the shape of the stadium.
- We will perform the 6th row from 30 yellow paper modules.
- We insert our yellow ring on top.
- On the 7th row we will start making wings. We need to choose a place for the swan's head. Where the head will be, we leave 2 corners of the paper modules, the swan's neck will be attached to them.
- We attach 12 yellow paper modules to the right and left of this place.
- Now we count the modules, you should get 24 yellow paper modules and two gaps.
- We will continue to make origami swan wings.
- The 8th row will consist of 22 green paper modules, 11 on each side.
- The 9th row will consist of 20 green paper modules.
- 10th row - 18 green paper modules.
- 11th ring - 16 blue paper modules.
- 12th ring - 14 blue paper modules.
- 13th ring - 12 blue paper modules.
- 14th ring - 10 blue paper modules.
- 15th ring - 8 blue paper modules.
- 16th ring - 6 purple paper modules.
- 17th ring - 4 purple paper modules.
- 18th ring - 2 purple paper modules.
- We give shape to the wings of our swan.
- We turn to the implementation of the tail of the swan.
- The tail will consist of 5 rows: 3 rows of 12 green paper pieces, 2 rows of 3 blue paper pieces.
- Paper modules should be reduced by 1 module.
- Now let's start assembling the neck of the origami swan. There will be another technology for assembling paper modules. We insert 2 corners of one paper module into 2 pockets of the second.
- The neck should consist of 1 red and 7 purple paper modules.
- We give the neck a bend.
- We glue the corners of the red paper module with glue.
- Then we attach the following paper modules to them: 6 blue, 6 blue, 6 green, 6 yellow paper modules.
- We fix the neck between the wings on 2 free corners.
- We decorate our swan with a bow and eyes.
- In the same way as we did the neck of the swan, we make 2 rings.
- 1 ring - 40 pink paper modules.
- 2 ring - 36 pink paper modules.
- These two rings are glued together. our swan stand is ready.
- Glue the swan to the resulting stand.
Our origami swan is ready!
This is one of the simplest paper triangle swan patterns. To create such a swan, we need 458 white modules and one red (or orange) for the beak. How to make a triangular module>>
So let's get started. We begin to make the first two rows. We take three modules and arrange them in this way

We insert the corners of two modules into the pockets of the third

We take two more modules and connect to the resulting structure

Then, in the same way, we connect two more modules ... and we understand that the design is frail and begins to fall apart in the hands with every careless movement. Do not be discouraged, in order to keep it all strong, we will immediately collect three rows

To do this, take the module and arrange it like this

And we repeat the trick of inserting corners into pockets

In this way we collect three rows. Each row consists of 30 modules. And we close them in a circle.


Now we take the resulting skirt with both hands on the left and right, gently press the middle with our thumbs, turning the product inside out

Instead of a skirt, we get a saucer

The edges are carefully folded up, giving the product the following shape:
Side view

Bottom view


From the seventh row we begin to make wings. In the same way as in the previous rows, we dress 12 modules. Then we skip two corners (from two neighboring modules) and dress another 12 modules. In the missing place with two corners there will be a neck, and in a wider area - a tail

In the next row, we reduce each wing by one module. Accordingly, in each wing of the eighth row there will be 11 modules
Side view

So we reduce each row of wings by one module, until there is only one left (in the course of laying out the wings, we slightly bend them, giving the desired shape)

we turn the swan back to ourselves and make a tail (also according to the principle of decreasing by one module in each row)

It remains to make the neck and head of the swan. For her, we need 19 white and one red module. In red, it is better to glue the corners in advance so that the swan's beak is not forked. The neck is assembled in a slightly different way. We take two modules and arrange like this

We insert the corners of one into the pockets of the second

and in the same way we will assemble all the rest, bending during assembly in the right way

Now carefully put the neck on the left two corners. The swan is ready.


Modular origami is a way to create a three-dimensional object out of paper. This art came to us from China and gained many fans. It is necessary to collect figures according to a certain technology so that the design is durable. If everything is done correctly, then the product will turn out beautiful and durable.
Swan from modules - step by step instructions with photos and videos
This technology is based on modules that are made from a landscape sheet. For manufacturing, you will need to cut the sheet into 32 equal parts. Each leaf must be bent in half 5 times, and then cut along the fold line. After preparing the material, you can find a step-by-step origami swan diagram from the modules and get down to business.
The lilac origami swan will be a great home decoration. To create it, you will need 1111 parts, that is, 36 landscape sheets. Of these, 937 modules should be lilac, 136 blue, 1 black and 1 red. When they are prepared, you can start collecting crafts. A step-by-step diagram of a swan from the modules will tell you how to proceed.
First, form a chain as in the photo:

Close it in a circle and start building rows. They will need 11 at the moment. The chest part should be done as follows. Put on 1 blue, 8 lilac and again 1 blue. Then continue, focusing on the photo:

Make the neck out of 18 layers. Alternate blue and lilac shades. It should look like in the image:

Now we can move on to the head. Alternate the colors again, and complete the figure with black and red. After that, the bird's head will be ready.

For the ponytail, you will need to increase the rows, lifting them up. They should taper towards the end so that only one module remains at the top. Optionally, you can make a stand. It is made of three layers, closed in a circle. You will need 135 pieces of paper.
If everything is done correctly, you will get a craft as in the picture:

To make the process of creating a bird clearer, it is recommended that you familiarize yourself with the training video.
Origami Swan Princess - step by step instructions with photos
The swan princess looks like a king, as it is distinguished by a bright color, a chic tail and an exquisite appearance. Making it is no more difficult than an ordinary origami bird, if you follow the instructions. In total, you will need 166 green, 680 blue, 615 snow-white, 335 orange parts.

By alternating shades with each other, you can get a bright pattern. You will need to make feathers - 8 small and one large. After that, they will have to be fixed on the tail. Collecting, it is necessary to repeat the figure as in the photo:

For the base of the body, 36 pieces of paper are used, then everything is laid out in a circle and so on until the 11th row. After that, you need to start narrowing the product to the top.

The neck is made up of 25 rows, the colors alternate with each other. For the beak, you need to use one red and one black module. When making wings, the layers will need to narrow towards the top. The same goes for the tail.

For the stand, you will need to use 39 paper parts, it should be from 3 different shades. You should look at the picture:

The finished product is fixed to the stand with a hot glue gun. The origami Swan Princess should look something like this:

Double swan from modules - step by step instructions with photos
To create a bird, you need to prepare 1332 white parts and 180 pink parts. It is recommended to start collecting from the body, gradually increasing the layers. There should be 15 of them in total, after which it will be possible to move on to the neck, wings and tail.
For the neck and ponytail, you should use pink pieces. Place these parts opposite each other as in the picture:

First make wings from 10 rows, and then gradually reduce by 1 piece of paper. It should turn out like this:

Now make a stand, fixing it with glue:

It remains to form the inner wings. They need to be narrowed to the top, so that in the end it turns out as in the photo:

You still have to make an inside bet, in the image it is located on the right:

Having connected the parts, you will need to make the neck and head. It is advisable to fix everything with glue. The beak is recommended to be made from 1 black module and 1 red one. If everything is done correctly, the craft will look like this:

Modular origami involves folding bright crafts from modular paper fragments by nesting them into each other. Modular origami also makes it possible to obtain both flat and three-dimensional three-dimensional figures. Their creation is very simple and for beginners, and the result is magnificent.
Technology features
Modular origami is a variation of the ancient Chinese art of origami. Folded figures and objects in the modular origami technique consist of paper modules that are identical and in most cases equal in size in one product.
Paper modules are folded from a sheet of paper according to the standard origami rules of the desired shape and size.
It is preferable to use thick paper (not cardboard) when creating modules, it keeps its shape better when folded and will not lose strength over time. If you are using colored paper, it is advisable to use double-sided paper.
Origami from triangular modules
The most common is the creation of origami figures from triangular modules. Folding a triangular module is easy. It is necessary to prepare (cut) the same rectangles of paper, which will become the basis for the module. For convenience and evenness of all corners, it is best to use A4 paper. You yourself will be able to determine the required dimensions of the module to create a particular design and line the sheet into rectangles along or across.
To create a module you need:
- Fold the prepared paper rectangle in half.

- Iron the bend line and turn it back, thus marking the center line.

- The upper corners need to be bent inward and along the central bend.

- Turn the resulting workpiece on the reverse side.

- Bend the lower part of the resulting part up.

- Bend the corners that stick out behind the part to form a triangle, and there should be a gap between the lines for the subsequent bend.

- Bend the bottom back.

- Bend the bottom again so that the corners that stick out are inside.
- Fold the resulting triangle like a book.

The result is a triangle with two pockets - this is the necessary module.
For pockets, by inserting into each other, the modules are very easily connected to each other.

We collect a multi-colored swan

You will need a lot of triangular modules of different colors:
- red - 1 (for the beak);
- pink-orange - 136 pieces;
- orange - 90 pieces;
- yellow - 60 pieces;
- green - 78 pieces;
- blue - 39 pieces;
- blue - 36 pieces;
- purple - 19 pieces.
You can create a swan in one color or choose the desired color. In this case, it is still necessary to make a minimum of color accents: prepare one module for the beak, and for the swan itself, 458 modules of the main selected color. You can also highlight the wings in black.
We proceed to the process of assembling the bird.
You need to take three prepared pink-orange modules and put them as shown in the picture.

Connect them together with pockets (insert the first two modules with corners into the pockets of the third).
We take two more pink modules and connect them to the already connected structure.

In this way, the first ring of two rows is assembled - on the short side there are modules of the inner row, and on the long side of the outer row.

There should be 30 modules in each row, each row in the chain should be closed by the last module. Rings must be collected carefully, simultaneously holding so as not to fall apart.
The third row of 30 orange modules must be assembled in a checkerboard pattern, as shown in the picture.

Similarly, we collect the fourth and fifth row.

It is necessary to lift the entire resulting structure and gradually carefully take it by the edges and, as it were, “turn it out”. The resulting shape should look like an "arena".
From the back, the "arena" should look like the one shown in the picture.


From the seventh row, wings begin to form. We choose where the neck and head of the bird will be placed, and symmetrically from it we begin to fold the wings in a row of 12 yellow modules. These 24 modules form, as it were, gaps on both sides of the structure.

In the process of creating wings, we make three rows of green modules in each row, reducing their number by two. In the 8th row - 22 modules, in the 9th row - 20 modules, in the 10th row - 18 modules.

The next rows are made up of blue modules. 11 row - 16 modules and 12 row - 14 modules.


We finish the wings of the swan with purple modules in three rows. 16 row - 6 modules, 17 row - 4 modules, 18 row - 2 modules. The wings need to be given a slightly turned and convex shape on the outside.

To assemble the ponytail, you will need 12 green and 3 blue modules. The tail consists of 5 rows and is created in the same way as assembling the wings, but in each row it is necessary to reduce the number of modules by only 1 element.

To assemble the neck, you need to assemble the modules by inserting both corners of one module into two pockets of the next at once.
We insert a red module (beak) and 7 pink ones, giving the necessary neck bend.

We fix the neck on the whole structure, between the wings. The eyes of a swan can either be marked with a pencil or a felt-tip pen, or glued on cut out paper or ready-made, bought in a specialized store. You can also decorate the swan with a bow, a butterfly according to your own preference.
In the same way as the neck was connected, you need to assemble the stand for the swan. The stand consists of two circles. One circle of 36 orange modules, the second of 40.
You can fix the craft on the pedestal with glue, or leave it without fastening.