What can be done with children at 23. What a gift for a baby to congratulate dad and grandfather on Defender of the Fatherland Day
Men are the stronger sex, without whom you can’t even imagine your life. And now their holiday is approaching - Defender of the Fatherland Day! Every year we are faced with thoughts of what to give on February 23 to a husband, father, grandfather, son, brother ...? In this article, we have prepared original gift ideas for our Defenders.
You will need: 7 sheets of A4 format with the image of various banknotes (euro, dollars, hryvnia, rubles), white sheets of A4 format, silicate glue, scissors, glue gun, thick cotton threads, skewers 20-30 cm long, foam plastic, flat box on half as wide as the bottom of the ship.
Master Class
- Fold the boat from a sheet of paper, as shown in the photo.

- Carefully turn the boat inside out so as not to tear.
- Fold and iron the boat.
- Outline the boat on another sheet, then draw a dividing line and cut out 2 pieces.

- Coat them well with glue and glue them to the inside of the boat to make two-layer sides.
- Cut the money sheets into strips 1.5 cm wide.

- Tape the boat with money stripes.
- Thoroughly coat the entire boat with glue for strength and leave for 2 hours to dry completely.
- Fold the same bills side by side and glue them. Make 3 of these - out of five, out of three, and out of four bills. These will be the sails.

- Carefully thread the sails onto the skewers and fix the joints with glue so that they do not slip.
- Take the boat and glue 3 pieces of Styrofoam inside.
- Insert skewers into foam for front and rear yards. The front yard should be 1/3 longer than the back yard. Make sure the lines are even, then secure with a glue gun.
- Insert skewers with sails, placing them at the same distance. It is worth noting that the deck should be smaller than the stern.

- Fold the threads in 2-3 layers the length of the sail and additional centimeters for the ties.
- Tie the threads to the skewers as shown in the photo.
- Cut 2 bills diagonally and fold the edges 0.4 cm.
- Glue banknotes (sails) to the rail threads.

- Make the sails to the stern in this way: do not twist the bill into a tube much, bend the edge, then glue it.
- Fold 3 bills in half, shape them into flags, then glue.
- Cover the deck with banknotes.

- Make a ship stand out of a flat box.
- Glue the desired background onto the box.
- Glue the ship.
Box with a surprise
You will need: black cardboard, gray leatherette, scrap paper, hat elastic and black eyelets, a ruler, a creasing tool (not a writing pen, a crochet hook), a chipboard (cardboard cutting figures for decoration), a sewing machine, black threads, glue, a decorative inscription, a gift a set - a bottle of alcohol, a screwdriver, a pack of cigarettes, a pill for the morning or something else ...
Master Class
- Cut out a rectangle from black cardboard for a box measuring 37x27 cm. The height of the box is 8 cm, the length of the bottom is 23 cm, and the width is 13 cm.
- Cut out a 27.2 x 17.2 cm rectangle from cardboard for the lid. The lid is 3 cm high, 23.2 cm long and 13.2 cm wide.

- Cut out the corners (8cm x 8cm squares) of the large rectangle.
- Punch and bend along the marked lines.
- Punch through the lid of the box as shown in the image.
- Cut out triangles near the corners of the lid and fold along the marked lines.

- Measure each side of the box and lid, then prepare the pieces of leatherette according to the resulting dimensions. Prepare the scrap paper parts in the same way, just make them a little smaller than the leatherette parts.
- Sew the details of leatherette and scrapbook paper together.
- Sew one of the rectangles to the front of the lid.

- Glue one rectangle to the bottom of the box.
- Install the eyelets and attach the elastic band as shown in the image.
- Line the inside of the box with scrap paper rectangles.
- Install eyelets and elastic holders for other gift items.

- Glue the box lid and glue the outside of the box and lid with stitched rectangles.
- Fill and decorate the box with lettering and a chipboard.
The men's box with a surprise is ready!
shooting gun
You will need: thick colored paper, glue gun, ruler, scissors, adhesive tape, stationery gum, pencil, pen spring.
Master Class
- Take a sheet of paper and a pencil, twist the tube diagonally from the corner, then fix it with tape and pull out the pencil.

- Twist the second sheet of paper around the first tube, then pull them apart. The second paper tube should be slightly larger in diameter than the first so that it can be fired from in the future.
- Fix the second tube with tape, then cut off the edges.
- Twist 2 more paper tubes in the same way.
- Cut the tubes into segments of this length: trunk - 2 tubes 15 cm long; handle - 7 tubes 5 cm long; trigger - 1 tube 8 cm long.
- Glue 5 cm tubes diagonally to make a handle.

- Glue the 8cm tube on top of the handle so that the remaining 3cm protrude to the right. This is a trigger.
- Glue two 15cm tubes together and glue to the top of the gun as a barrel.
- Twist two thin tubes from yellow paper.
- Bend the thin tube into a "U" shape and insert one end into the trigger and the other end into the top tube of the handle. Cut off the excess. This will be the trigger.
- Make a trigger guard from the second thin tube. To do this, place one end of the tube in the handle (in the second tube from the top) and glue the rest of the tube to the bottom of the barrel.

- Twist the pink paper tube, flatten it and tape the handle as shown in the image. It is worth noting that the rear hole in the trigger should be open.
- Remove the trigger from the top tube of the handle and insert the spring. It is worth noting that the spring should rest against the tube covering the back of the handle. Reinsert the trigger.
- Twist a thin thick tube of yellow paper, secure with tape and cut off the edges so that they are even.

- Bend the edge, put on an elastic band and fix with glue.
- Insert the tube with the rubber band into the down tube of the gun barrel and pull the rubber band forward, hooking it between the two tubes.
- Roll up bullets out of paper, load the gun and shoot.
Smoke grenade
You will need: saucepan, potassium nitrate (KNO3), sugar, spoon, cardboard tube, dye, pencil, fuse (fireworks wick), duct tape, lighter or matches.
Master Class

You will need: 11 popsicle sticks, black marker, small image, glue, utility knife, satin ribbon.
Master Class
- Lay the sticks on a flat surface, placing them close to each other.
- Glue the image, then leave to dry.
- Turn the sticks face down.
- Write a wish with a marker.
- Separate the sticks from each other using a utility knife.
- Place sticks together and tie with ribbon.
The original mosaic gift is ready!
creative indoor flower
You will need: pot, styrofoam, skewers, artificial grass, glue gun, candy bars, chewing gum, gift cards, etc…
Master Class

Creative indoor flower is ready!
coffee mug
You will need: mug, coffee beans, cotton pads, thick white thread, brown acrylic paint, superglue.
Master Class

DIY IDAD
You will need: black cardboard, scissors, felt-tip pens, segment knife, white cardboard, white sheet of paper, spray glue or glue stick, printer, cutting mat, silver gel pen.
Master Class

Book safe
You will need: book with a hard cover, pva glue, water, stationery knife, brush, simple pencil, ruler.
Master Class

Tank in modular origami style
You will need: sheets of colored paper, scissors, 6 matchboxes, glue, a round blank for the base (for example: a perfume bottle).
Master Class
- Fold the modules according to this scheme. For the entire tank, 1408 modules will be needed.

- Assemble a circle of 24 pieces, then add 24 pieces to the second row of the circle and 24 pieces to the third row.
- Place 12 modules in the center.

- Make a total of 7 wheels this way - 6 for the tracks and one for the turret.
- Make the tank a caterpillar by preparing 204 modules - the width of the caterpillar is 6 modules, the length of the almost finished circumference of the caterpillar is 34 modules.
- Place 3 wheels on the almost finished circle of the track, then continue to finish it by adding 56 modules.
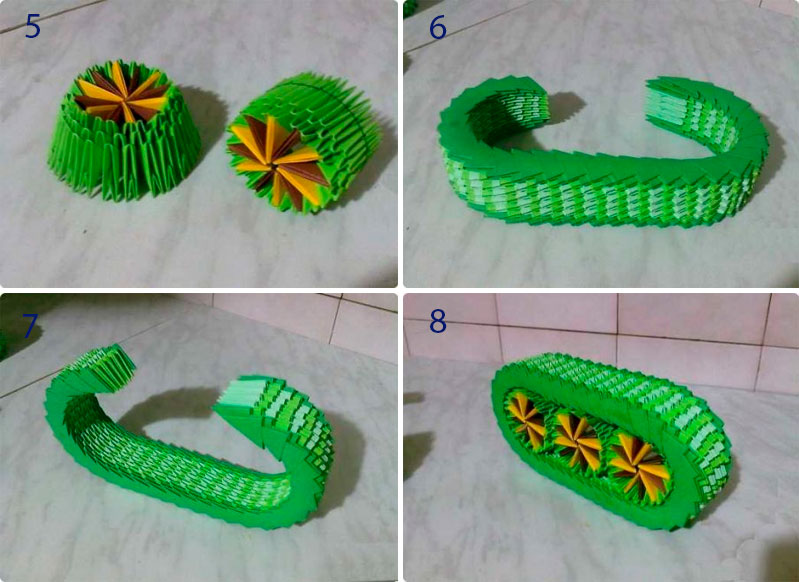
- Make the second caterpillar in the same way.
- Make a turret for the tank like this: make a hole in 4 matchboxes as shown in the picture and glue them together.
- Paste the base of the tower with colored paper.

- Insert a round blank into the hole and glue 2 matchboxes as tower stands.
- Assemble the front of the tank from 42 modules - 7 modules wide, 6 modules long.
- Assemble the back of the tank from 30 modules - 6 modules wide, 5 modules long.
- Glue the front and back to the base of the tower.
- Glue on the caterpillars.
- Take the seventh wheel and add 192 modules - 24 in length and 8 in width. Don't forget to leave a hole for the cannon.

- Assemble a cannon from 36 modules - 3 modules wide, 12 modules long.
- Glue the cannon to the tower.
- Attach the tower to the base, it can rotate.
Dachshund from salt dough
You will need: salt dough, simple pencil, scissors, cardboard, paints, brush, rope, toothpick, foam sponge, clear varnish, PVA glue.
Master Class
- Draw a dachshund on cardboard as shown in the image.
- Cut out the template.

- Roll out the dough to a thickness of 5 mm and cut out the dachshund according to the pattern.
- Roll up oblong eyes, then glue them.
- Blind the eyelids and glue on the eyes.
- Mark the paws, nose, mouth, ear and body contours with a toothpick.

- Roll it into an oval, then glue it over your ear and smooth the seam with a wet finger. In the same way, add volume to the back of the dachshund and the tail.
- Mark stripes in different directions around the perimeter of the entire dachshund, in such a way that the stripes resemble wool.
- Dry the figurine.

- Paint the figurine, then leave to dry.
- Glue a piece of string to the back of the craft for further hanging.
- Cover the craft with varnish and wait for it to dry.
Salt dough dachshund is ready!
IN february Defender of the Fatherland Day is celebrated. All children congratulate their fathers and grandfathers. In kindergarten, it has already become a good tradition to make crafts as a gift dads and grandpas at 23 February. crafts little inventors can be from a variety of materials. Most...
 The falcon flies in the clouds, it soars over the fields. The bird is proud, big, it flies high and high. The falcons flew up into the sky, higher, higher into the sky. This is my beloved dad soared above the clouds. Only a silver dot, and behind it a train hovers. With mom, we stand and watch how our daddy ...
Crafts for February 23. Gifts for dad - Photo report "Postcard for dad by February 23"
Publication "Photo report" Postcard for dad by 23 ..."  We congratulate all the defenders of the country today. All soldiers protect the Earth, sky, peace and labor. So that all children live happily in the world. The holiday is approaching - Defender of the Fatherland Day, which is celebrated on February 23. This is the holiday of grandfathers, dads, because they are all ours ...
 MAAM Pictures Library
 Hello, my dear friends and guests of my page! This year, our children invite their dads to a sports festival: to show themselves, and to "remind" them about serving the Fatherland. We have already prepared gifts and today I present you a small master class on creating ...
 Master class greeting card for dad for Defender of the Fatherland Day Purpose: To continue to develop the ability to make gifts for loved ones with their own hands. Tasks: - to improve the skills of paper folding of a military man; - to consolidate the ability to draw parts ...
 Every year at the end of winter, our people celebrate a significant date. This is a holiday for men - Defender of the Fatherland Day. On this day, we congratulate our fathers, brothers, grandfathers, great-grandfathers. Our kindergarten is no exception. My students and I approached this event very ...
Crafts for February 23. Gifts for dad - Master class on making crafts for Defender of the Fatherland Day "Steamboat"
 On the eve of the holiday Defender of the Fatherland Day, I bring to your attention a small master class of children's crafts - a steamboat. The craft is very simple and suitable for children from the younger group. Of course, younger children should be offered ready-made elements for work; but...
 Which of you teachers does not like to teach children how to create crafts from waste material? I don't think there are any of us. This is not the first time I share with you my crafts from different materials. What is construction from waste material and what goals does it pursue? ...
Friends, hello! Today we have the most responsible task! We have to do crafts for February 23 in kindergarten. And we should have them ... 23! So go ahead!
Postcard
Cut out blanks for appliqué from colored paper, let the baby glue them on himself. A few examples of postcards - more difficult and easier.


Flowers
Carnations are easiest to make from a napkin. I found several MK carnations from a napkin and from paper. All pictures enlarge on click

Carnation from a napkin - option 1

Carnation from a napkin - option 2

paper carnation

carnation origami
Volumetric stars
MK how to make three-dimensional stars for a postcard
Several MK original postcards for February 23 in the video.
typewriter
We will make it in kindergarten with our own hands. And we will make from matchboxes and colored paper. Cover 3 matchboxes with paper of the same color. We fix and glue the third in the middle on top of the two. Cut out the circles - these are the wheels. 
pancake star
Pancakes can be served on the festive table. The bottom pancake is smeared with jam, caviar, and anything red. And on top of it are pancakes wrapped in a triangle so that the red “star” shows through.


Tank
Let's make it with a 3 year old. we will need:
two sponges,
sticks from Chupa-Chups or a tube,
colored paper.
We cut one sponge in half and glue it on a large one. We cut out round wheels from paper and glue them on the sides of the lower sponge. The wand is a gun.
There are other options for tanks: from cardboard, paper. The most beautiful I have collected in the gallery:


Frame
We braid an ordinary photo frame with wool, you can choose the colors of the national flag. Let's insert a photo. The gift is ready!
origami soldier
airplane
Children's crafts from improvised means are the simplest. We take a clothespin and glue an ice cream stick on the side of the spring at the top and bottom. This is the wings. The tail is made from half an ice cream stick.


Cap
boat
Even at 4 years old, such a boat is on the shoulder! A toothpick is inserted into the sponge. A sheet of 10 by 10 cm is strung on a toothpick. this is a sail. A flag is attached to the top.
Star
We cut out a star from red paper and a disk is glued to it. You can decorate it and write a congratulation!


Plasticine postcard
This can be designed by the kindergarten preparatory group. A pattern is applied to the prepared base with a pencil:
Flag,
Number "23"
"Rays of fireworks".
Selecting the desired color, plasticine is placed on the pattern, and pressed against the base. From above, pieces of tubes for a cocktail are pressed into the plasticine.
More options:
Origami airplane
The square sheet is folded in half. Then each side of the sheet is bent at an angle. You need to do this 2 times on each side. This is how the wings are formed. Straighten them and the plane will fly. This is the most common option. He is the first in the gallery. Pictures enlarge by clicking.
And there are more difficult ones.
Imagine, it turns out there are competitions for launching paper airplanes. In 2010, the city of Fukuyama hosted a paper airplane launch competition, which set a new world record for the longest flight. Takuo Toda was able to launch his airplane in such a way that it was in the air for a whopping 29.2 seconds. This result was recorded by representatives of the Guinness Book of Records. The previous record of 26.7 seconds was held by American Ken Blackburn.
Order
The most beautiful crafts are awards. And you can make them from ribbons of two colors. Fold each ribbon in half, and sew the edges like this. So that the seam is at the bottom. Glue the ribbons crosswise to the badge. In the middle, place a pebble or an inscription on a cardboard - “since February 23”.
Or make an origami order
army shirt

Let's make it from a simple paper bag. We will stick or paint a protective background and do not forget about such details as:
collar,
pockets,
buttons.
You can put a gift inside the package.
Or a postcard
Bookmark for a book
You can buy shoulder straps in the store. Glue the tape and you get a simple bookmark.
More paper options:


Or a bookmark - a pigtail, just make the right colors
Craft from dough
We have already talked about the possibilities of salt dough. So now. You can make a real application from the test based on it. Let it be a boat. But the main thing - do not forget to decorate the application!


Photo frame and pen holder
If the baby shares his constructor, you can assemble a tower from it. Attach cardboard to the bottom. Tape the sides, and insert a photo in front.
Paratroopers figures
Make holes in the edges of the square of paper into which to stretch the thread. Gently pull up slightly to pick up the paper. Get a parachute. To each such parachute, you can attach a paper number: "23". Or fold origami. Or glue a few multi-colored leaves and get a bright parachute.
By the way, in the 1st, 2nd picture there are parachutes that can be launched and they will fly.


How to make a flying parachute from a bag, see the video
Cup
We make a tube out of paper, fasten the edges. Attach the bottom to the bottom. And don't forget about the handle of the cup.
Pen Organizer
Cardboard tubes from under the foil are cut at an angle. Colored and attached to each other. At the bottom they can be fixed on the disk.
palms
The simplest, but what remains, like a memory, is a baby’s hand cut out of colored paper. It will be decorated with a star.
Well, I hope you and your little ones are armed and ready for the holidays! Choose your gifts and get creative! Don't forget to visit us for more surprises! Subscribe and be always with us! Invite everyone by talking about the benefits of our site!
And that's all for today! Bye!
We offer an interesting selection of gifts for February 23 with our own hands. In this article you will find some original ideas and popular crafts for Defender of the Fatherland Day. We have compiled the best step-by-step instructions and tutorials to make your creative process as easy as possible.
All gifts in this article are universal and will definitely appeal to men of different ages. Whoever you want to congratulate, you definitely won’t lose by choosing a home-made, rather than a ready-made present. Some of them are created taking into account the interests and hobbies of men, others are suitable for everyone. Choose, repeat, add something new: your man will definitely be delighted!
Bouquet of socks
Giving socks and a shaving kit on Defender of the Fatherland Day is already a classic. However, this present ceases to be banal if presented in an unusual way. A bouquet of socks for a man, and even made by yourself? Why not! Moreover, this sign of attention is not only beautiful, but also useful. Your man will definitely appreciate such an original gift for February 23rd.

What will we need?
- socks (at least 5 pairs, but more is better)
- cooking skewers
- wrapping paper
- any decor for decorating bouquets
- satin ribbons
To make a bouquet of socks more interesting, choose pairs of different colors. If your man only wears black, add charcoal or ones that are dyed gray on top. It will be very nice to complement the gift with white and blue socks. You can choose pairs of different lengths and textures - this way you will create the effect of buds of different sizes.
Cooking skewers can be replaced with drinking straws, sushi chopsticks, newspaper tubes, wooden knitting needles, balloon sticks, etc. If there is nothing suitable, you can try to fasten the socks with ribbons, however, in this case, the bouquet will have to be presented very carefully - the socks can “jump out” of it with such fastening.
How to do?
One sock will take one rose. We twist it with our hands into a roller and bend it a little. The elastic must be tucked up to fix the resulting bud. Take a look at the step-by-step instructions so as not to make a mistake.

We stick a skewer into the center of the rose on one side, a bead, a decorative flower, candy or something else on the other. Then we bind or glue the skewers together with adhesive tape. It is more convenient to tie the "roses" in three, and then make a bouquet out of them.
Wrapping paper can be any, it is best to take a standard floral. We make a gift for February 23, but this does not mean that beautiful and bright textures should be avoided - men also love them. Complete the bouquet with satin ribbons and any other decor to complete the composition beautifully.

By the way, if you want to give shaving foam or deodorant as well, just stick it in the center of the bouquet and stick the skewers on it, and then just wrap everything with paper. Roughly speaking, it will become the base of the bouquet. Such a gift for Defender of the Fatherland Day will be a pleasure for a man of any age and any profession.
gift for dad
Any dad will be happy to receive a handmade gift for February 23rd. This tank is a great craft idea for kids for Defender of the Fatherland Day. The child can easily cope with its manufacture, and the head of the family will be truly happy when he sees the work of his son or daughter.

What will we need?
- matchboxes - 3 pcs
- black cardboard
- colored paper
- plastic bottle cap
- cotton swab
- buttons - 8-10 pcs
For this craft, try to find paper in "army" colors. Fortunately, these are exactly the colors that always remain unclaimed in standard sets: brown, gray, dark green, sand, black. You can add red and orange. If you have a color printer, you can print camouflage-style paper. We offer you a ready-made template.

Paper for crafts is prepared, let's get to work.
How to do?
We take the first box and wrap it with paper. By the way, at this stage you can add something else to the homemade gift for February 23 - for example, put a car keychain or a tie clip into the box.
We first glue the other two boxes together (over the side face), and then wrap them with paper. On top of the double boxes we place the one that was pasted over first. We fasten the structure.

On the sides we glue the rollers on the future caterpillars of the tank. We make them from buttons and fix them with superglue.
Now we clean the cotton swab from cotton wool. We take an awl and heat it with a lighter (take precautions when working with fire!), Then bring the awl to the lid and dig a hole. We insert a stick into it - the tower of the future tank is ready. We need to glue it to the box.
We cut out two thin strips of black cardboard and make an accordion out of them. We straighten it back and glue crafts to the side parts of the case. Tank tracks are also ready.

Such a craft for February 23 will appeal to any defender. Put the tank on a chocolate bar or a rectangular box of chocolates - this will make your present even more pleasant. You can write wishes on the tank itself, and to make it more elegant, glue red stars.
edible gift
This gift for February 23 will appeal to any sweet tooth. We offer you a master class on making a cake with your own hands in the form of a beer mug. You can’t give everyone a foamy drink, but its sweet imitation - why not? Your work will definitely be appreciated!

What will we need?
- ready-made biscuits
- oil cream
- ladyfingers cookies
- round drying
- whipped cream
- any sweet decor (from sweets to berries)
You can replace the finished biscuit with homemade one. Butter cream is easier to make with your own hands: mix a pack of butter at room temperature with a pack of condensed milk - put it in the refrigerator so that the cream does not melt.
How to do?
From the biscuit cut out several circles of the same size. To do this, use a mug or glass. We put them in a pile on top of each other, smearing each layer with cream.
We make a small indentation to insert the "handle" of the beer mug, which will be made from drying.

We coat the entire surface of the edible craft with cream by February 23. We need to cover the entire "mug" so that the cookies stick freely to it.
Cookies (it can be replaced with bread sticks) are placed on the cream along the side faces of the cake to seal and fasten them better. Grab the mug with your hands and squeeze it tight.

Pour a little cream into the center and sprinkle it with crumbs that remain after cutting the biscuit. After that, fill the remaining surface with whipped cream to get a “foamy drink”. It remains only to add decor to make the present more elegant and festive.

Such a gift for Defender of the Fatherland Day will surely please your man. It is difficult to remain indifferent to such a sweet gift, lovingly assembled with your own hands. No matter how serious or strict the head of the family is, a happy smile on his face is guaranteed.
Mug case
A mug is another standard gift for a man. However, it can be presented in a rather original way. In this case, the present will not look banal and will cause real delight and a sincere smile. DIY gifts for February 23 can be both useful and enjoyable at the same time. Most importantly, they feel love and care.

What will we need?
- any mug
- a few pieces of felt in different colors
- cardboard
- Velcro fastener
- small buttons
We will dress the mug in a men's business suit. So even a successful businessman will appreciate this gift.
How to do?
The pattern for this holiday craft is as follows.

Do it on paper by cells (it’s so convenient to measure the circumference of the mug in centimeters and transfer it to paper), then transfer the template to cardboard, and then to felt.

Fold the parts together and sew them by hand (you can glue).

Do not forget about such small details as a pocket with a handkerchief and a tie - this will add charm to the gift.

Add buttons to the "jacket" to make it look even more realistic.

It is not necessary to completely sew the cover for the mug - it is easier to make a Velcro fastener. If you don't have one, replace with a crochet or button.

Mugs can be made in different colors and complemented with interesting decor. In the absence of felt, you can take fleece or velvet, even jeans. Play with textures and colors to get a unique gift for February 23rd. No one else will have such a mug as your man, because he is special.
Video master class on decorating a bottle
This video tutorial will help you make a nice and original gift for February 23 with your own hands. Many men like it when they are given good alcohol. But a bottle in a gift bag is too boring and predictable. Why not present it in a special way? Try to decorate it yourself, it's not difficult at all.
Views: 14 495
The long-awaited month of February has arrived. It is at the end of winter that the Defender of the Fatherland Day is celebrated. All children congratulate their fathers and grandfathers.
DIY crafts are the most popular among children's gifts. After all, by this they show how much they love and value their relatives.
Crafts for little inventors can be made from a variety of materials. The simplest: from colored paper and cardboard. More complex: from the most unexpected materials. For example, an airplane made of ice cream sticks or a tank made of kitchen sponges for washing dishes.
In our article, you will learn some interesting DIY craft ideas for Defender of the Fatherland Day.
DIY craft for children from plastic bottles
From paper of different colors and a plastic bottle, you can make a great airplane. Older children will master it on their own. Toddlers who have recently learned how to make simple paper crafts will be helped by their mothers.

We will need:
- plastic bottle (transparent, 0.5 liter);
- ruler;
- pencil;
- scissors;
- glue for PVA paper;
- colored paper or non-hard cardboard: white, green and rich green.
Stages of work:
1. First, let's start with the body of the aircraft. It will be white. To do this, take a sheet of A4. Let's put it vertically. Place the bottle across the white paper. So that its bottom is exactly along the edge of the paper, and the neck protrudes in addition.
2. Now we determine the place of narrowing of the bottle - the beginning of the neck. We put a mark, in pencil, on a white sheet. We remove the bottle and draw a vertical line across the sheet, in the place where we left the mark.
3. We take scissors and divide the A4 sheet into two equal parts, exactly along our line. We throw out the left part, and the right part will become the main part of the aircraft.
4. Fold the remaining piece of paper in half. We draw the tail part of the aircraft, exactly the one that does not adjoin the plastic bottle, but rises up in the form of a tail.
5. Next, cut out according to your drawing from the side that will be closer to the bottom of the bottle. We wrap the "white case" around the bottle. We put on each other and glue. Fold the two parts of the tail and glue together.
6. Cut out two trapeziums from a bright green color - these will be the wings of the aircraft. And two rectangles for the engines of our "aircraft". We bend the bases of two trapeziums by one centimeter. We fold the rectangles in the form of pipes and glue their edges.

7. Glue the wings on the sides of the white fuselage. Under the bottom, with the help of glue, we fix the pipes.
8. We only have green paper left. Cut out eight circles from it. They will be the illuminating windows of the aircraft.

9. Now glue four windows on each side of the plane.
10. Our "air machine" is almost ready. It remains to cut out the dark green propeller. It is shaped like a bow. Cut out a large hole in the middle of the propeller. So that the propeller can be put on the neck. And we push the neck of the bottle through the hole so that the propeller is next to the plastic ring on the neck. Now we twist the cork.

The tone of the cork and the main colors of the aircraft must match. In this case, a green cap will do. If the shade of the cork is different, we advise you to choose other paper tones for the aircraft.
11. And finally, from the remnants of green paper we cut out two small wings of the tail section of the aircraft. We bend the base and attach it to the white tail using glue.

So our gift for the Defender of the Fatherland Day is ready.
But the idea is already more complicated, here you need to glue the plane with paper and decorate it, but it also turns out very cool

Here, for example, is a simple version of a pirate ship, kids can handle it too:

You can even make a rocket:

Or here is such a beautiful ship that can be launched with dad on a long voyage, if there is, of course, a reservoir nearby.

And look at some binoculars, you just need to cut off the bottom of 2 bottles and connect them with electrical tape and tie a rope:

But here you can build a helicopter like this:

To make such a helicopter, you need 1 PET bottle with a capacity of 0.5 liters. 1 ping pong ball, 3 straws, hairpin. stapler and scissors, here is the whole simple set:

I will not describe how to make such a helicopter, and everything is clearly visible in the picture.
Here you can make crafts with children and present them to dad and grandfather. They will be touched by such a gift, because they are made by little favorite hands.
We make a gift for dad from paper and cardboard
The easiest thing to make out of paper and cardboard is a postcard. But we will not dwell on this, but we will offer you to make such a tank.

We will need:
- a sheet of brown cardboard;
- colored double-sided paper: green and red;
- ruler;
- simple pencil;
- scissors;
- PVA glue.
Stages of work:
1. Cut out two strips of green paper. Size: length - 20 cm, width - 2 cm. Such strips will serve as tank tracks. Glue the ends of the strips. As a result, we get two rings.
2. For the main part of the tank, cut out a rectangle. Size: length - 12 cm, width - 7 cm. From the shorter sides we measure 5 mm and draw lines. Next, count another 2.5 cm from each edge. And also draw two lines.

3. Now we bend the paper along the lines. As it shown on the picture.

4. Let's start making the tank turret. It is similar to the main body, but smaller. Cut out a rectangle. Size: length - 8 cm, width - 6 cm. We also measure from the edges: 5 mm. - at both sides. We draw lines. And another 2 cm - draw lines. After that, we bend the lines exactly as we did it with the bends on the tank body.

5. Now let's make a muzzle. Cut out a small rectangle. Size: length - 8 cm, width - 4 cm. We bend the resulting figure in half. This must be done along the length of the rectangle. As a result, we get a paper quadrilateral, consisting of four parts. The width of each is 1 cm, respectively, the length is 8 cm.

6. We glue the two edges of this sheet to make a triangular barrel. Before that, we make three small incisions. They are shown as green lines in the picture. Slightly bend the strips. This will be needed so that we can glue the future barrel to the tower.
7. Now we connect all the details of the tank: glue the muzzle to the tank turret, as shown in the picture.

8. We install the tower on the hull. Glue will also help with this. Now glue all the details to the sheet and add a red star to its body.
The festive tank is ready.
It is worth noting that such a tank can also be made from non-hard cardboard.
- You can make a fake in the form of a typewriter and glue the face of dad and son, in my opinion very original:

- Frame

- Cap made of colored cardboard

Craft to school from plasticine for Defender of the Fatherland Day
This is not a complicated and, perfectly suited to the theme of the holiday, crafts. Of the materials, we only need plasticine. In our case: blue, red and green shades. But, you can take other, matching colors.

Stages of work:
We sculpt a sausage from blue plasticine. One side will be much thicker than the other. We attach the tail of the aircraft to the thin end of the sausage.

Now we sculpt the wings and attach them to the main part of our "flying machine".

We decorate the front of the aircraft with green plasticine. And the wings are red stars.
Our plane is ready.
You can also make a tank out of plasticine, here are a few options:


And here you can still blind a submarine, it’s not difficult at all:

Or fighter:

But what a beautiful photo frame turned out from plasticine:

Master class for making figurines from salt dough
Perhaps, modeling from salt dough will seem difficult to someone, but this is not at all the case. Try it at least once and see how easy it is to make.

We will need:
- frame;
- glue moment;
- salty dough;
- gouache or watercolor and brush;
- a rectangle of white paper (the size of the inside of the frame) and a file.
To start sculpting, we need to knead the dough. Mix a glass of flour and a tablespoon of salt. For elasticity, add a tablespoon of vegetable oil and hot water. Mix everything until a homogeneous plastic consistency.
If the dough came out a little liquid, add flour and mix the mass again.
Now send the dough for three hours in the refrigerator. After that, you can start making a cat soldier. We place a paper rectangle on the table, cover it with a file.
Let's start making the body of the cat. From a piece of suitable size, roll the ball.

Let's make a drop out of it. And flatten between the palms. We place the body of the cat on the file, in the right place. Press the top of the droplet with your finger. This is where we will place the bottom of our cat's head.

For the head, we need a slightly larger piece than we used on the torso. We roll the ball in the same way, but now we flatten it right away. The approximate thickness of the head is 7-8 mm. On the sides we make ears: slightly stretch the dough and press it with our fingers.

We remove the rest of the dough each time in a plastic bag, otherwise it will simply dry out. A plastic container with a lid will also work.
We moisten the pressed part of the droplet-torso with water. For this you need a brush. Glue the head to the body. Using a plasticine cutter, make indentations in the ears. We draw the cat's fur along the edges of the craft - with scratching movements.

Fingers determine the place of future eyes. We will get two recesses in the middle of the face.

We mark the nose with a knife.
We twist a small ball for the spout. Now we make a drop out of it and flatten it a little. This is exactly how we did the body. Next, flatten a drop from the bottom. We get a real cat's nose.
Wet with a brush, the place where we will have a spout. And glue it on.

For the mouth, visually divide the head into two equal parts - a horizontal line. We put two dashes, almost near the edges of the cheeks. And cut the dough from the bottom of the nose to each of the cheeks.

Open the mouth and draw the lower lip.

Now let's brighten up the cat.
Both watercolor and gouache are suitable for coloring. If you are using acrylic paints, it is best to wait until the work dries.
Completely color the cat in orange (do not touch only his nose). With white watercolor we draw the cheeks, the tips of the ears, the lower lip and the middle of the tummy. We tint the nose of the cat with a soft pink tint.

Roll a sausage out of a small piece of dough. With a knife, separate the edge and cut off two small (equal in size) pieces.

From each plate we form a ball (slightly oval). These will be the eyes.
If the paint is dry, moisten the recesses for the eyes with water. But usually, the watercolor does not have time to dry yet. Next, glue the eyes and slightly flatten them on top.
Let's start making the cat's eyebrows. To do this, take a small piece of salt dough. Roll into an oval ball and cut in the middle. We get two even halves. Roll each into small balls. We make elongated droplets out of them.
Glue the eyebrows just above the eyes. Wide side on the inside, narrow side on the outside.

Now let's make a pilot. To do this, we need to roll a ball from a small piece of dough. After that, we make a drop out of it and flatten it. Cut out a small triangle at the base of the droplet. With our fingers we give the shape of a cap and glue between the ears of our "mustachioed soldier". The narrow side of the drop will be between the eyebrows, and the cut out triangle will be on top.
From the top of the triangle with a knife we push a small groove in the form of a continuation of the top of the triangle.

Next, we make an army belt with a large buckle. We need a small piece of dough. We roll a ball out of it and flatten it in the form of a thin pancake (about 3 mm thick). We spread the resulting layer on the table and cut out a strip in the middle, 1 cm wide. We fit the belt to the cat's stomach. Cut off the excess edges of the strip.
Now coloring the new parts of the cat. Draw eyes in dark green. For the cap, mix green and yellow-brown colors. As a result, we get a marsh shade or khaki color. We paint their pilot. Paint the eyebrows white. Draw a belt with black paint.
We make a buckle from a small piece of dough. Roll into a ball and flatten with your fingers. We place the plastic on the table and cut out a rectangle. Glue the buckle to the belt and push through a small star.

Now color the buckle yellow.
Let's start making cat paws. We roll the sausage from the dough, as thick as the index finger. Cut off the rounded ends and divide it into two equal parts. Roll each piece into a ball. Then we bring it into an elongated teardrop shape. Using a knife, form three fingers. On each we squeeze one claw.

When one leg of the soldier cat is ready, try it on. If it turns out to be too large, separate a small part of the dough from it and roll up a new one.
To check if the paws are similar in size, you can roll a ball from each piece and visually compare them.
Wet the paw with water and glue it to the body. We do the same with the second leg. The only difference is their location. One lies on a belt, the second is raised to the head.
We make boots. Roll a ball out of a piece of dough. Then we bring it into an oval shape. Divide with a knife into two equal parts. From each we roll a ball. We bring it into the form of a droplet. We press the bottom of the drop - this will be the sole of the boot. Squeeze a little on the sides and glue to the right place. We are also making a second one. As a result, the boots are glued to the cat's stomach and to each other.

Press the boots well, otherwise they will simply fall off when the picture is in a vertical position.
Now let's start painting the new parts. The paws are orange, like the body, and the boots are black. We also draw black pupils and points for the mustache. We draw a star in red on the belt buckle and cap. With brown paint, we highlight the mouth, the inside of the ears, the folds between the fingers and the claws.
When the black paint dries on the pupils, we will draw small highlights on the eyes, the buckle and the middle of the cap. We will also draw two white stripes on the paws and white fur at the bottom of the face. Without removing the cat from the cardboard, place it on the battery and let it dry completely.
Optionally, you can decorate the main background of the picture. We are waiting for the paint to dry.
When everything is dry, insert the background into the frame (under the glass). And we will glue the cat to the glass with Moment glue. We spread glue on the back side of the "mustachioed protector". Gently press it against the glass. Mom can help with this so that the child does not smear his hands in glue.

At the beginning and end of the craft, we showed different backgrounds for our gift. Which is better? You decide.
Here are some more interesting ideas from this material:
- Painting

- Star

- figurines

- Portrait

Learning to make a gift from matches with our own hands
We can make a beautiful panel out of matches.

We will need:
- postcard in the theme of the holiday;
- matches - several boxes;
- thick cardboard;
- universal transparent glue "Moment-Gel";
- colorless nail polish;
- PVA glue;
- scissors.
Stages of work:
We make the basis of the gift panel. Apply PVA glue to cardboard. Now glue the matches vertically. Starting from the corner. The first will be located with the sulfur head up, and the second - down. Continue like this until you get a square. It will take about 17-18 matches.
Nearby we make the same square of horizontally arranged matches. So we alternate vertical and horizontal squares. As a result, we get an application, size: 3 by 3 squares. In order for the parquet made of matches to be dense, we lubricate it again with PVA glue. We are waiting for the base of the panel to dry completely.
Then we cover the matches with colorless nail polish. We also wait until everything is completely dry.
If there is excess cardboard left, carefully trim the edges.
Now let's start decorating. We cut out the necessary details of the old postcard for the Defender of the Fatherland Day. And glue them to the matches with universal glue "Moment".
Our holiday application is ready!
And how do you like this option for crafts?

Look at what a wonderful helicopter, for me - very original ...

Interesting ideas from napkins and cotton pads for kindergarten
From such simple materials you can make a good craft.
- in the younger group:
Let's make a card from napkin balls.

We will need:
- a sheet of colored cardboard A4;
- PVA glue;
- scissors;
- napkins in different colors.
Stages of work:
We draw a boat. All its details must be large.
We cut the napkins into small squares (about 2 by 2 cm.). We take a square and twist it into a ball with our fingers. I think all kids will love this activity. In addition, it develops hand motor skills well.
We smear the drawing with PVA glue and glue each ball.
Optionally, you can make the inscription "Beloved dad". Holiday card is ready.
And here are some more examples:


- in the senior group:
With older children, we will make such a bouquet.

We will need:
- three cotton pads;
- a sheet of green and blue paper;
- PVA glue;
- scissors;
- two cotton swabs;
- yellow marker.
Stages of work:
From a rectangular sheet of blue color we make a square. To do this, bend the sheet diagonally.

We get a triangle, an unnecessary rectangle, on the left side, cut off. Expand the triangle and we get a square.
We place the sheet on the surface of the table - in the form of a rhombus. And we make an envelope from the lower sides. First we bend the right edge, then the left. Bend the corners of the front side of the envelope.

Now we coat the left edge with PVA glue. The envelope is ready.
Let's start making flowers. To do this, paint three cotton heads with a yellow felt-tip pen. Cut the sticks in half. Half with a white cotton head - throw it away.
We bend the cotton pad, as well as the envelope for flowers. Insert a cotton swab into the middle. We glue the front of the flower. Do the same with the remaining discs and sticks.
Next, we make leaves. We cut out a rectangle from green paper (6 cm wide, about 5 cm long). Fold the rectangle in half and cut out the oval edge. We unfold the paper and get a leaf for the koala. We need three of these.
We attach all the details to the blue envelope. There we will see which arrangement of flowers and leaves will look better. Now glue everything with PVA glue.
You should not glue all the details completely, so the postcard will be voluminous and more beautiful.
What do you think of this greeting card idea?

A few more ideas:
- fish


Video on how to make a postcard for Defender of the Fatherland Day using quilling technique
I propose to master the basics of quilling and make a postcard for your beloved dads and grandfathers, even preschoolers can handle this technique, and the craft will come out beautiful and original.
Here are such interesting gift ideas for February 23 for fathers and grandfathers, choose crafts and craft with your children.
If you like the ideas, bookmark the article, share it on social networks and write in the comments which craft did you choose?
And I wish you creative inspiration and perseverance to your kids!