Crocheted vegetables and fruits: knitting patterns. Crocheted fruits and vegetables Crochet 3a apple glued to paper
You will learn how to crochet an apple to create decorative compositions in interior design from this publication. There are patterns for crocheting a leaf, a whole apple, a quarter and its halves, as well as a description of crocheting decorative fruits from yarn. See another option for crocheting an apple: Crochet an apple. Scheme
For work we will need:
- hook No. 1.5, filler,
- sewing threads,
- knitting threads - iris (Gamma), calculated in two additions.
1. Making an amigurumi ring (6)
2. Double (12)
3. (inc, sbn)*6 times (18)
4. (inc, 2sbn) * 6 times (24)
5. (inc, 3sc)*6 times (30)
6. in a circle (30)
7. (inc, 4sc)*6 times (36)
8. in a circle (36)
9. (inc, 5sbn) * 6 times (42)
10-14. in a circle (42)
15. (inc, 6sbn) * 6 times (48)
16. in a circle (48)
17. (dec, 6sc)*6 times (42)
18. in a circle (42)
19. (dec, 5sc)*6 times (36)
20. in a circle (36)
21. (dec, 4sc)*6 times (30)
22. in a circle (30)
23. (dec, 3sc)*6 times (24)
24. in a circle (24)
Having knitted the apple, fill the product with filler, tighten the core and decorate it with black thread (to do this, take floss in two or iris in four folds. Insert the needle from the side of the pulled core, leaving a 5mm tip, pull it through the entire filler and return it to the center of the apple. Thread cut, leaving a 5mm tip) Next:
25 (dec, 2sc)*6 times (18)
26. (dec, sc)*6 times (12)
27. Decrease 6 times (6)
Make a tightening on the side where the branch is attached.
For the twig, take a brown thread. Cast on 12 ch, insert the hook into the second loop from the hook and knit all the loops with connecting stitches.

Another option for crocheting an apple.
1st row: 6 sc in the ring (6); 2nd row: 6 inc. (12); 3 row: (1 RLS, inc.) * 6 times (18); 4 row: (2 RLS, inc.) * 6 times (24); 5 row: (3 RLS, inc.) * 6 times (30); 6th row: (4 RLS, inc.)*6 times (36); 7th row: (5 RLS, inc.)*6 times (42); 8th row: (6 RLS, inc.)*6 times (48); 9 -14 rows: 48 RLS (48); 15 row: (7 RLS, approx.) * 6 times (54); 16 – 23 rows: 54 RLS (54); 24 row: (7 RLS , dec.)* 6 times (48); 25 row: (6 RLS, dec.)* 6 times (42); 26 row: (5 RLS, dec.)* 6 times (36); 27 row: (4 RLS, dec.)* 6 times (30); 28 row: (3 RLS, dec.)* 6 times (24); 29 row: (2 RLS, dec.)* 6 times (18); 30 row: ( 1 RLS, dec.)* 6 times (12). We stuff the toy with synthetic padding. Row 31: 6 dec. (6).Leave a long thread so that you can pass it through the apple several times with a needle. Until you get the dimples of the required shape. Knitting leaves: Knitting 10 air loops (VP). In the fourth loop from the hook we knit three double crochets. In 5,6,7 loops of the chain we knit one stitch with one crochet. Yarn over the hook, insert the hook into the 8th loop, grab the thread and pass through all the loops on the hook. In the 9th loop of the chain there is one sc. In 10 - 1 half-column (PS). We make an air loop and in the last 10 loop of the chain we knit the PS again. Next we knit from the reverse side of the chain. 1 PS. In the second loop - 1 sc. In the third loop - yarn over the hook, insert the hook into the loop, grab the thread and pass through all the loops on the hook. Three double crochets in the next three stitches. Three double crochets in the last stitch. And connect with one sc to make a leaf. You can make a twig for a leaf, or you can make a meringue from it. Knit 5-6 chain stitches and return to the leaf, knitting the PS.

Knitting pattern for an apple quarter:

Knitting pattern for half an apple:

Knitting pattern for a whole apple:


And also, for apple lovers, I would like to suggest decorating a kitchen curtain with an insert crocheted with a pattern with apples.
You will learn how to crochet an apple to create decorative compositions in interior design from this publication. There are patterns for crocheting a leaf, a whole apple, a quarter and its halves, as well as a description of crocheting decorative fruits from yarn. See another option for knitting an apple:
For work we will need:
- hook No. 1.5, filler,
- sewing threads,
- knitting threads - iris (Gamma), calculated in two additions.
1. Making an amigurumi ring (6)
2. Double (12)
3. (inc, sbn)*6 times (18)
4. (inc, 2sbn) * 6 times (24)
5. (inc, 3sc)*6 times (30)
6. in a circle (30)
7. (inc, 4sc)*6 times (36)
8. in a circle (36)
9. (inc, 5sbn) * 6 times (42)
10-14. in a circle (42)
15. (inc, 6sbn) * 6 times (48)
16. in a circle (48)
17. (dec, 6sc)*6 times (42)
18. in a circle (42)
19. (dec, 5sc)*6 times (36)
20. in a circle (36)
21. (dec, 4sc)*6 times (30)
22. in a circle (30)
23. (dec, 3sc)*6 times (24)
24. in a circle (24)
Having knitted the apple, fill the product with filler, tighten the core and decorate it with black thread (to do this, take floss in two or iris in four folds. Insert the needle from the side of the pulled core, leaving a 5mm tip, pull it through the entire filler and return it to the center of the apple. Thread cut, leaving a 5mm tip) Next:
25 (dec, 2sc)*6 times (18)
26. (dec, sc)*6 times (12)
27. Decrease 6 times (6)
Make a tightening on the side where the branch is attached.
For the twig, take a brown thread. Cast on 12 ch, insert the hook into the second loop from the hook and knit all the loops with connecting stitches.

Another option for crocheting an apple.
1st row: 6 sc in the ring (6);
2nd row: 6 approx. (12);
3rd row: (1sc, approx.) * 6 times (18);
4th row: (2 sc, inc.) * 6 times (24);
5th row: (3 sc, inc.) * 6 times (30);
6th row: (4 sc, inc.) * 6 times (36);
7th row: (5 RLS, approx.) * 6 times (42);
Row 8: (6 sc, inc.) * 6 times (48);
9-14 rows: 48 RLS (48);
15th row: (7 sc, inc.) * 6 times (54);
16 – 23 rows: 54 RLS (54);
24 row: (7 RLS, dec.) * 6 times (48);
25 row: (6 RLS, dec.) * 6 times (42);
26 row: (5 RLS, dec.) * 6 times (36);
27 row: (4 RLS, dec.) * 6 times (30);
28 row: (3 RLS, dec.) * 6 times (24);
Row 29: (2 RLS, dec.)* 6 times (18);
Row 30: (1 sc, dec.)* 6 times (12).
We stuff the toy with padding polyester.
31 row: 6 kills. (6).
Leave a long thread so that you can pass it through the apple several times with a needle. Until you get the dimples of the required shape.
We knit leaves:
We knit 10 air loops (VP). In the fourth loop from the hook we knit three double crochets. In 5,6,7 loops of the chain we knit one stitch with one crochet. Yarn over the hook, insert the hook into the 8th loop, grab the thread and pass through all the loops on the hook. In the 9th loop of the chain there is one sc. In 10 - 1 half-column (PS). We make an air loop and in the last 10 loop of the chain we knit the PS again. Next we knit from the reverse side of the chain. 1 PS. In the second loop - 1 sc. In the third loop - yarn over the hook, insert the hook into the loop, grab the thread and pass through all the loops on the hook. Three double crochets in the next three stitches. Three double crochets in the last stitch. And connect with one sc to make a leaf. You can make a twig for a leaf, or you can make a meringue from it. Knit 5-6 chain stitches and return to the leaf, knitting the PS.

Knitting pattern for an apple quarter:

Knitting pattern for half an apple:

Knitting pattern for a whole apple:


And also, for apple lovers, I would like to suggest decorating a kitchen curtain with an insert crocheted with a pattern with apples.


Crocheted vegetables and fruits are perfect for the interior of any apartment. They will not only be an excellent decoration, but can also serve as beautiful toys for your children. Below are simple patterns for crocheting vegetables and fruits for beginners. You can keep yourself and your children busy by doing various knitting patterns for beautiful vegetables, fruits or even berries.
Crocheted vegetables and fruits knitting patterns
In order to knit fruits and vegetables we will need: a hook, threads, filling material (sintepon, cotton wool), a large gypsy needle and scissors. First of all, we will start our master class by completing a pattern for a knitted fruit - an apple.
Master class for beginners on fruit knitting
Below is a diagram of a knitted fruit - an apple. Before we start working with the fruit diagram, let’s familiarize ourselves with the nomenclature of our description:
- air loop - v.p.,
- single crochet - st.b.n.,
- double crochet - double crochet,
- connecting column - s.s.
At the end of each row, the total number of stitches is indicated in brackets, for example (20). For the knitted fruit, we will use red, green or yellow threads for the apple itself, cinnamon threads for the twig, and green threads for the leaves.
To begin with, take a yellow thread and wrap it around your finger, make a small ring, fasten it next to 4 air loops. Our fruit will consist of 26 rows.
Description of the pattern for knitted fruit in rows:
1st row - knit 6 single crochet stitches into a ring (6);
2nd r. - we double each loop, knitting 2 columns of single crochets into it, in total we get 12 loops (12);
3rd r. - in every second loop we knit 2 double stitches, that is, we increase through 1 loop, for a total of 18 loops (18);
4th r. - add a loop to every third loop (24);
5th r. - add a new loop to every fourth loop (30);
6th r. - crochet in a circle;
7th r. - add a loop to every 5 loops (36);
8th r. - crochet in a circle;
9th r. - add a loop to every 6 loops (42);
10th r. - crochet without any additions in the round;
11th r. - crochet without any additions in the round;
12th r. - crochet without any additions in the round;
13th r. - crochet without any additions in the round;
14th r. - crochet without any additions in the round;
15th r. - add a loop to every seventh loop (48);
16th r. - crochet in a circle;
17th r. - we knit 7 and 8 loops together, as a result, the decrease occurs through 6 loops (42);
18th r. - crochet in a circle;
19th r. - decrease every 6 loops (36);
20th r. - crochet in a circle;
21st r. - decrease every 5 loops (30);
22nd r. - crochet in a circle;
23rd r. - decrease every 4 loops (24);
After the 23rd row, we fill our fruit with cotton wool or synthetic padding (you can also use buckwheat, beans or peas).
24th r. - crochet in a circle;
25th r. - remove every 3 loops (18);
26th r. - remove every 2 loops (12);
We insert the tip of the thread into the needle and tighten our fruit thoroughly. We thread the needle and thread into the edge of the knitting and pull the thread across the entire surface. Return the thread to the center of the apple. In order to give the fruit a natural shape, we perform several more similar actions. Then we cut off the excess length of the thread, and hide the small remainder inside the apple.
Now we take a brown thread to create a twig. We cast on 12 air loops (ch), then draw the hook to the 3rd loop and tie all the loops with a half double crochet. We sew the finished twig to the apple.
Now let's look at another delicious pattern - strawberry knitting! For this we need threads of red, yellow and green colors.
First we will start knitting the berry itself, for this we take a hook and red threads. We act according to the scheme:
We make a ring and knit 2 VP (air loops).
1st row: starting from the 2nd loop from the hook, we knit 6 sc. (6);
2nd row: for each loop we make 6 increases (12);
3rd row: 1 p., 3 s.b.n * 3 times (15);
4th row: 1 p., 4 s.b.n * 3 times (18);
5th row: 1 p., 5 s.b.n * 3 times (21);
6th year: 21 s.b.n. (21);
7th row: 1 p., 6 s.b.n * 3 times (24);
8th year: 24 s.b.n. (24);
9th row: 1 p., 7 s.b.n * 3 times (27);
10th year: 27 s.b.n (27);
11th row: 1 p., 8 s.b.n * 3 times (30);
12, 13, 14th r.: 30 s.b.n (30);
15th row: 1 p., 4 s.b.n * 6 times (36);
16th, 17th r.: 36 s.b.n. (36);
18th row: 1 p, 11 s.b.n * 3 times (39);
19, 20, 21, 22nd rows: 39 s.b.n (39);
23rd r.: 1 u., 11 s.b.n * 3 times (36);
24th r.: 1 u., 4 s.b.n. * 6 times (30);
25th r.: 1 u., 3 s.b.n * 6 times (24);
Let's start filling the strawberries with filler!
26th r.: 1 u., 2 s.b.n * 6 times (18);
27th r.: 1 u., 1 s.b.n * 6 times (12);
28th r.: 6 y. (6);
We tighten the remaining loops and tie. Now we knit a leaf. Take a green thread and a hook, make a slip knot and add 2 chain loops.
Scheme:
1st row: starting from 2 ch. we knit 5 s.b.n. in total we should get 5 loops (5);
2, 3, 4, 5th rows: 5 s.b.n (5);
6th row: 5 p. (10);
7th row: 1 p., 1 s.b.n * 5 times (15);
We sew the seeds with ordinary yellow thread. We connect all the parts of the berry together. Strawberries are ready!
Now let's tie another fruit - plum.
Consider the laughter of knitting the main part of the fruit:
1st row: in the ring 6 st.b.n (6);
2nd r. : 6 p. (12);
3rd r. : 1 st.b.n. + p.* 6 times (18);
4th r. : 2 st.b.n., p. * 6 times (24);
5th r. : 3 st.b.n., p. * 6 times (30);
6th r. : 4 st.b.n., p. * 6 times (36);
7, 6th rows: 36 st.b.n.;
17th r. : 4 st.b.n., u. * 6 (30);
18th r. : 3 st.b.n., u. * 6 (24);
19th r. : 2 st.b.n., u. * 6 (18);
20th r. : 1 st.b.n., u. * 6 (12)
Fill the plum with filler.
21st row: 6 y. (6).
Leave a little thread and thread it into the needle. We pass the needle through the entire fruit. Pull the thread and fasten it. The plum should regain its natural shape. We knit 5-8 air loops from brown threads. We get a ready-made plum stick and sew it to the fruit.
How to crochet vegetables - step by step lessons
Now we will look at a knitting pattern for vegetables. We will knit garlic, an easy pattern for beginners.
The nomenclature of our description remains the same:
- air loop - v.p.,
- single crochet - st.b.n.,
- with a double crochet - senior s.n.,
- column - s.s.,
- increase - n.,
- decrease - y.
At the end of each row, the total number of stitches is indicated in brackets, for example (18). For knitted garlic we will use white and green threads.
We knit the main part of the garlic:
1st row: wrap a small ring around your finger and cast on 6 loops (6);
2nd row: to each loop we add one more loop, in total we get 12 (12);
3rd row: cast on a single crochet and add a loop 6 times, (18);
4th row: cast on 2 single crochets and add a loop also 6 times (24);
5th row: 3 s.b.n. + 1 p. * 6 times (30);
6th row: 4 s.b.n + 1 p. * 6 times (36);
7th row: 5 s.b.n + 1 p. * 6 times (42);
8th and 12th rows: dial 42 s.b.n. (42);
13th year: 12th birthday + 1 decreasing * 3 times (39)
14th year: 11th birthday + 1 cu. * 3 times (36)
15th R.: 10 S.B.N. + 1 cu. * 3 times (33);
16th R.: 9 S.B.N. + 1 cu. * 3 times (30);
17th year: 3rd s.b.s. + 1 cu. * 6 times (24);
18th R.: 2 S.B.N. + 1 cu. * 6 times (18);
19th year: 1st s.b.s. + 1 cu. * 6 times (12);
We knit the green leaves and fasten them separately. In order to knit the leaves, we cast on 6 green chain stitches, then we knit the chain in the opposite direction with single crochets, starting with 2 loops from the hook. We connect the resulting petal with 1 connecting stitch into the same loop with which we started knitting (with 2 loops). We connect the finished petal with garlic using a thread and a needle. The garlic is ready!
Now we will tie the carrots. To do this, we will prepare orange and green threads in advance. We start with the main important part, and as usual we make a ring of 6 air loops.
Further according to the scheme:
1st row: starting from the second loop, we make 6 increases (an increase is 2 dc from two loops knitted together) (12);
2nd row: 1 single crochet with addition 6 times (18);
Rows 3, 4, 5, 6: 18 single crochets (18);
7th year: 4 st.b.n. + u. * 3 times (15);
8th, 9th year: 15 senior biological sciences (15);
10th year: 3 st.b.n. + u. * 3 times (12);
11, 12th rows: 12 st.b.n (12);
13th year: 2 st.b.n. + u. * 3 times (9);
14th, 15th year: 9 senior biological sciences (9);
Fill the carrots with filler;
16th year: 1 st.b.n. + u. * 3 times (6);
17th – 18th year: 6 senior biological sciences (6);
19th r.: 3 u. (3);
20th row: Pull out 1 loop from each stitch of the previous row and knit it all together. Cut the thread and hide the extra piece in the carrot.
Now let's take care of the leaves. We make 10 air loops, starting from 2 ch. we knit a row of st.b.n. (9); in this way we repeat the steps until we get a leaf, we do the next leaf in the same way, starting from the 2nd chain loop of the first leaf we knit another 10 ch, then we knit a row of double stitches (9), the next leaves can be made in less than 8 v.p.
We tie the finished tops to the carrots. The carrots are ready!
Now let's look at a more complex knitting pattern.
We knit cabbage, but before we start knitting, let's familiarize ourselves with the notations:
- air loop - v.p.,
- single crochet - st.b.n.,
- double crochet - double crochet,
- connecting column - s.s.,
- increase - p., decrease - y,
- lifting loop - p.p.,
- half-column - p.st.,
- double crochet - D.Sc.
For cabbage we will need 2 green colors, one lighter for the head.
Let's start our knitting with a head of cabbage, make a ring, wind the thread around your finger, and begin to knit the first st.b.n.
Next, look at the diagram:
1st row: knit 6 st.b.n. (6);
We pull our knitting into a ring, pull out the remaining tail from the thread
2nd r.: we knit 2 st.b.n. into each loop (12);
3 to 20th row: we knit st.b.n., in each row we knit 6 st.b.n. (120);
21 to 41st row: knit st.b.n. (120);
42 to 53rd r.: we knit dc skipping 6 loops in a scattered order (42-46);
We fill our kochak with filler and tighten the thread. The head of cabbage is ready, let's move on to the leaves.
We are guided by the scheme:
1st row: dial 18 ch. + 2 ch (20);
2nd row: knit dc (27);
3rd row: continue to knit dc (40);
4th R.: Senior S.N. (40);
5th row: st.s.n. * 2 times (60);
6, 16th row: knit dc (60);
17th row: knit st.s.n. + d.st.n. (40);
18, 19th row: knit dc (40);
20th row: knit st.s.n. + d.st.n. (27);
21st row: knit dc (27);
22nd row: knit st.s.n. + d.st.n. (18);
23rd row: we knit Doctor of Science (9);
24th row: we knit Doctor of Science (5);
The first leaf is ready! We knit 5 more leaves using a similar pattern. Then we attach the leaves to the cabbage. The cabbage is ready!
Crochet vegetables and fruits video
Crocheting is an educational activity not only for children, but also for adults. First, let's understand what amigurumi is. Amigurumi is the Japanese art of knitting small animals or creatures that have human qualities. In this video we will look at how to make a watermelon slice using the Amigurumi technique.
PRODUCT 7
So, you can watch the video free master class on how to crochet a watermelon, armed with all the necessary materials (threads, hook, scissors, needle)
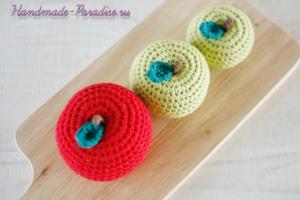
For example, such an apple looks very cute. It can be used as a toy, funny souvenir, keychain or phone pendant. Knitting it is easy - it will take a couple of hours and a little yarn (you can use leftovers). Master class on knitting amigurumi toys for beginners. Contains a list of necessary materials and tools.
We describe in detail how to crochet an amigurumi apple
Required materials and tools:
- crochet yarn in apple color (green, yellow or red), some brown and dark green yarn,
- stuffing for toys,
- thin hook,
- needle with a large eye,
- black and pink floss,
- black half beads for eyes,
- glue.
Legend:
- CA - amigurumi ring
- Art. - single crochet
- Psn - half double crochet
- Dc - double crochet
- Ub. - decrease
- Etc. - increase
Knitting an apple
Use primary color yarn.
1) 6 tbsp. in KA - 6
3) (1 treble, 1 treble) 6 times - 18
4) (1 rep., 2 tbsp.) 6 times - 24
5) (1 tbsp, 1 rep., 2 tbsp.) 6 times - 30
6-9) without changes - 30
10) (1 dec., 8 tbsp.) 3 times - 27
11) no changes - 27
12) (1 dec., 7 tbsp.) 3 times - 24
13) (1 dec., 2 tbsp.) 6 times - 18
14) (1 tbsp., 1 dec.) 6 times - 12


At the end, you should pull out a long thread - we will need it to close the knitting and form our apple. Cut the thread and insert the end into the needle. Now, alternately insert the needle into each front half-loop of the last row. Tighten the hole at the bottom of the apple properly. Now pass the needle all the way through the apple, so that its end comes out through the initial amigurumi ring. Lightly tighten and secure the thread - an indentation will appear on the bottom of the apple. Pass the thread back through the amigurumi ring and fasten it on the reverse side - you will get a second indentation for the petiole.
Knitting a petiole
Knit 5-6 chain stitches from brown yarn. Sew into the top recess.

Knitting a leaf

1) 6 air loops;
2) Starting from the second loop from the hook, knit a treble, hdc, dc, hdc, 3 sts. Continue along the reverse side: hdc, dc, hdc, dc, half-dc in the first st. Add 2 chain stitches, pull the thread and cut. Sew the leaf to the petiole.
Amigurumi design

Embroider the mouth with black thread. Glue black half-bead eyes. Embroider the cheeks with pink thread.
Your apple is ready!
With skillful hands, threads, crochet and a couple of hours of free time, you can make unique decorations for your home - knitted vegetables and fruits will look great in any interior.
There are a wide variety of diagrams and master classes that describe in detail the process of creating each individual berry or fruit.
Each diagram is accompanied by symbols:
- Dc – double crochet
- CC – connecting column
- St bn – single crochet
- VP - air loop.
The numbers at the end of the line indicate the number of loops that should be obtained at this stage.
Crochet apples

In order to tie an apple, you need to prepare the following materials:
- Hook
- Threads of green, yellow (red), brown
- Peas or padding polyester for filling
- Scissors
First of all, you should dial and connect a chain of 4 air loops into a ring.
1st row - knitted single crochet into a ring of 6 stitches;
2nd row - each loop must be doubled, knitting 2 single crochets into it, 12 loops;
3rd row - you need to knit 2 dc in every second loop, that is, make an increase through 1 loop of 18 loops;
4th – add to every third loop (24);
5th – increase to every fourth loop (30);
6, 8, 10-14, 16, 18, 20, 22, 24 rows should be crocheted in a circle;
7th – should be added to every fifth loop (36);
9 – add to every sixth loop (42);
From 10 to 14 rows should be knitted without increments in a circle;
15th – adding to every 7 loops (48);
17th – knit 7 and 8 loops together – decrease occurs through 6 loops (42);
19th – decrease every sixth loop (36);
21st – decrease every fifth loop (30);
23rd – you should decrease every 4 loops (24).

At this stage, you should fill the apple with filler. Knitted vegetables and fruits can be filled with a variety of materials. The simplest option is padding polyester, then the apple will turn out soft and round. If you fill the craft with dry peas or wheat, it will turn out to be angular in shape, but can be used as an educational toy or massage tool.
25th row – every third loop should be removed (18);
26th – every second loop is removed (12).
Similar steps should be repeated until only 5 loops remain. After this, you should unwind about 20 cm of the working thread and cut it. The tip of the thread should be inserted into the needle and carefully tighten the fruit, threading it through the edge of the knitting. Once the thread is pulled across the entire surface, it must be returned to the center of the apple. To give it a characteristic shape, such actions must be repeated several times. The remaining thread should be trimmed and hidden inside the apple.

To create a ponytail, you need to cast on 12 ch with brown threads, hook it to the third loop and knit all the loops with a half double crochet. The branch is sewn on separately.
Cherry
It's very easy to crochet a small cherry. In a similar way, you can knit similar berries - raspberries, blackberries, etc. The knitting pattern involves creating 10 rows.


You should start working by creating two air loops, from which 6 stitches are knitted. On the second row, 6 increases are made to make 12 loops. Row 3 – add 6 sc (18). Row 4 – 6 incs in two sc (24). Thus, you should get a pancake.
From rows 5 to 8, 24 loops are crocheted. On the 9th row, decrease stitches 6 times with two dc. There should be 18 loops. Row 10 – row 6 decrease stitches, 1 sc (12). At this stage you should fill the craft. Synthetic padding or cotton wool are suitable for this purpose.
After this, you need to decrease the loops until all are closed - you should get a neat ball. For a cherry twig you need two of these balls.
The leaves and tail are made with a crochet hook. With green threads you need to cast on 20 ch right from the middle of the cherry and knit 20 dc, 1 dc, 2 dc with one loop, another 2 dc in one loop, 1 dc, 2 dc. You need to turn the craft and similarly, on the other side, return to the stem in single crochet columns.
Next you need to make a loop of 4 ch, turn the knitting and knit 3 dc from the second loop. Then another 10 chains are cast on and a petal is knitted. The stem from the ch needs to be made a little longer than the previous one. The berry is sewn together with the stem - and the craft is ready.

Crochet pineapple

Tying a pineapple is a little more difficult than berries. It has a more complex form and execution technique. A pineapple knitting pattern will help simplify your workflow.
To knit a pineapple, you need to prepare yarn of dark green, yellow, light green and brown colors. It is best to knit with a crochet hook that matches the thickness of the threads.
Finished pineapples are about 30 centimeters in size.
Using yellow threads, cast on 5 ch. With the help of SS they are connected into a ring. The yellow thread is fixed here and breaks; a brown thread is tied instead. Scheme of work: 3 ch, 2 dc with ch of the previous row, 1 ch, 3 dc with ch of the previous row, ch, 3 dc under the loop, ch. These steps should be repeated 5 times. Next, work 3 dc under the next chain, ch and sl st. After this, the brown thread is secured and broken. You should end up with a small hexagon. You need to make about 18 of these - the exact number depends on the thickness of the threads.
All parts should be tied together with dark green threads. The resulting fabric should be rolled into a cylinder and connected with sc. It will look like a pineapple.
The next step is knitting the bottom. Using brown threads, you need to make a circle, in the last row consisting of 48 loops (their number depends on the thickness of the threads). You need to leave a long thread from the bottom and sew it into the cylinder, distributing the loops evenly. After this, you can fill the craft with filler. You can add a box of beads to it, turning the fruit into a rattle.
The upper part of the pineapple is knitted in the same way. The top should be sewn to the base. To create leaves, you need to cast on 20 loops with dark green threads. Next you need:
- Work a sc starting from the 2nd stitch, 18 sc;
- 1 ch, 16 dc, 1 ss;
- Skip 1 stitch, 16 sc;
- 1 ch, 14 sc, ss;
- Skip 1 stitch, 14 stitches.
- Next, you should knit 3 sc along the base and on the reverse side of the chain.
- 1 ch, 16 st bn;
- Skipping a loop, 16 sc;
- 1 ch, 14 sc, ss;
- Skipping a loop, 14 sc, securing the thread.
Light green pineapple leaves are knitted in the same way. The leaves are folded together and tied with dark green thread. Starting from the center, the leaves are sewn to the top of the product.

Using a regular hook, you can make not only pineapples, but also many other crafts - a variety of vegetables, fruits, berries.

Having learned to use basic techniques, you can knit an object of any shape.