Rooster from paper patterns for cutting. New Year's vytynanki: silhouette paper-cut for the New Year
New 2017 is the year of the Red (Fiery) Rooster, and its figurine or image will become the most sought-after present. The needlewomen of the "Cross" have a good tradition: to prepare thoroughly for the New Year's holiday. And this year will be no exception. Many of us will make or are already making a rooster with our own hands, or even not one, but several at once! After all, it is imperative to please relatives and friends with a handmade symbol of the year, and yourself with an exciting process of creating this same symbol using various hand-made techniques.
Creating a kind of GUIDE TO MASTER CLASSES from the Internet is also a tradition of our needlework site, which was born a year ago. For you, dear craftswomen, we have selected a lot of only the best master classes on the net. Admire, look closely, discuss and choose the most colorful rooster! And then sew/tie/draw/blind/weave it. So, in what technique can you work on the eve of the New Year holiday?
If you don't have time to work, don't worry. The article contains links to craftswomen who sell finished work.
Cockerels made of paper and on paper
Making cards with the kids
If you are not a professional card maker, then before you start creating postcards, be sure to read our article "Learning to make New Year's cards with your own hands using the Scrapbooking technique". In it you will find not only a lot of ideas, but also get acquainted with the basic rules for creating postcards.
Any cockerel drawn by your child can be placed on a postcard. If it’s difficult for the kid to figure out how to draw a rooster with his own hands, then show him this step-by-step instruction:

And then, a matter of technology. Cut out the cockerel and make it the central part of the composition. For example, your postcard can be so simple, but cute. In your work, use New Year's paper and bright red ribbon, add snowflakes, twigs and other holiday paraphernalia. When you have a basic idea, the process of creating a postcard becomes much easier!

Photo from http://itsapatchworklife.blogspot.ru
If your child likes to color in black and white pictures, give him the opportunity. Print out the rooster postcard template on thick cardboard and let the kid get to work. Further, by cutting out the blank-ball, you can supplement the card with voluminous snowflakes, glue half-beads imitating New Year's balls, etc., etc. Unleash your imagination with your baby))

YOU WILL USE
You will find 8 more coloring templates, as well as 2 step-by-step instructions for drawing more realistic roosters in the archive, which you can download quickly and for free!
Take note of the idea with a cockerel on a stick, as on a postcard by Elena Yurchenko. Her cockerels are cut out of felt, but you can cut them out of paper.

Colored paper roosters
Colored paper appliqué can also be placed on a greeting card. But such an application itself can act as a postcard. To draw and carefully cut out all the details, the children will need the help of their parents, but they can stick it themselves.

Olga-15 offers to make funny paper cockerels in her master class.
A Rooster blank is a rectangular sheet of flexible paper or thin cardboard folded in half lengthwise. Its size is 13.5 × 10 cm. We make 7-10 inclined cuts along the fold line (after about 1 cm). The angle of their inclination is 50-70 degrees, and the depth is ¾ of the height of the folded sheet.
Ekaterina Ivanova in her video tutorial shows how to make a red rooster using the Origami technique:
Roosters in quilling technique
A very interesting idea is to lay out only a luxurious rooster tail from quilling paper. It's not as confusing as laying out a whole cockerel, and it can turn out very effectively! Here is a rooster without a tail as a basis (how it looked in the original, see the photo below).

Print it on a color printer, and fantasize over the tail later. As an example - one such work (although the tail is modest here, but you will try, right?))

And if you are not afraid to make a whole rooster using the Quilling technique, then you can take this finished postcard as a basis:

Or this template:

A cheat sheet on the main elements of Quilling to help you:

Button appliqué
And here are absolutely stunning handsome roosters, lined with multi-colored buttons, half-beads, rhinestones and beads! As a basis, you can take the contours of cockerels from our archive (link just above).


Crochet Cockerels
Many needlewomen with a hook on “you” and will be happy to knit a cockerel from multi-colored threads. And "Cross" will help you decide on the model and offer several master classes on this type of needlework.

You can also buy cockerels knitted from Svetlana.


Roosters from felt
The fastest and most uncomplicated options for creating a symbol of 2017 are felt roosters. The material is easy to process, keeps the shape of the toy well, does not require seams. On the contrary, manual seams on the face of the product give it a special flavor and charm.


Photo from https://madeheart.com


Photo from the site http://ktototam.ru/
A figurine of a rooster neatly cut out of thick felt will be both a Christmas tree toy and a pendant.

Photo from the site http://ktototam.ru
And if you decorate felt cockerels with embroidery, flowers and other decorative elements, then it will turn out incredibly beautiful!

Photo from the site http://mmmcrafts.blogspot.ru

Roosters in Tilda style
Well, how can we do now in our life without the tilde-Rooster? The ToySew website has a master class on sewing this popular toy.

Master Vetic on her blog posted patterns of the Rooster and Hen Goroshkins based on the tilde pattern. An interesting couple will turn out if you make an effort and patience!

And for inspiration:

Cockerel Yurik from Orange Toys

A funny video clip about her tilde roosters was shot by Maria Fedorova (the link to the patterns is in the description of the video!):
Cockerel coffee toys
Aromatic or coffee toys compete with tildes in popularity. There are roosters in this technique.

The coffee cockerel can be like this:

Photo from the site http://zabavochka.com
You can easily sew it yourself using one of the patterns above. “Cross” talked about all the intricacies of creating coffee toys in this master class.
If you think that you can’t cope with such work yourself, contact the master. Julia Charikova has made enough branded coffee scented toys and put them up for sale at this address.

Fur interior toys
Oksana Svyatkovskaya will show her vision of a rooster and show how to sew it correctly according to ready-made patterns. Her Rooster is made of faux fur, but who's to say that it doesn't happen or that it's not good?)


In the workshop Everything for creativity (dljatvorchestva) there are a lot of blanks for painting and decoupage. Choose and create!

This is the beauty you can get:


If you do not want to make a souvenir in the form of a rooster, then you can decorate any wooden surface with the image of a rooster. There is just limitless scope for creativity! Here are just a few examples for inspiration:


Felted wool roosters
Other craftswomen make wool toys just like real ones! We love and are inspired! And if you really want to buy one of these beauties, then look for them at the Masters Fair (there is a link on each photo).


Elenia collected many different felted Roosters in one place and offered MK to create one of them. Turns out very cute!
Roosters embroidered with a cross, beads and ribbons
Perhaps you love embroidery more than other types of needlework. Then you can place the symbol of the year on a pillowcase, arrange it in the form of a panel, a picture in a frame or a brooch. The main thing is that the image of the Rooster warms your soul. And if you donate your work, find out the preferences of the recipient.
You will find more than 50 different patterns for embroidering roosters and cockerels in a special album
The Easter holiday is approaching and it's time to start preparing for it. Decorating a house or apartment will not be difficult if the children help you in the creative process. After all, who else but them, with a rich inner world and taking all their wild childhood imagination into service, will be able to create incredibly beautiful attributes for Easter. Cockerels - all this can be easily done from improvised materials that are in every home, especially where there are kids.
So, I propose to arm ourselves with all the materials necessary for the creative process and make, together with the children, with your own hands, a cheerful paper cockerel to decorate your home interior.
To create an Easter cockerel out of paper, we need:
- colored paper in yellow, pale yellow and red
- sheet of white paper
- scissors
- PVA glue
- black marker
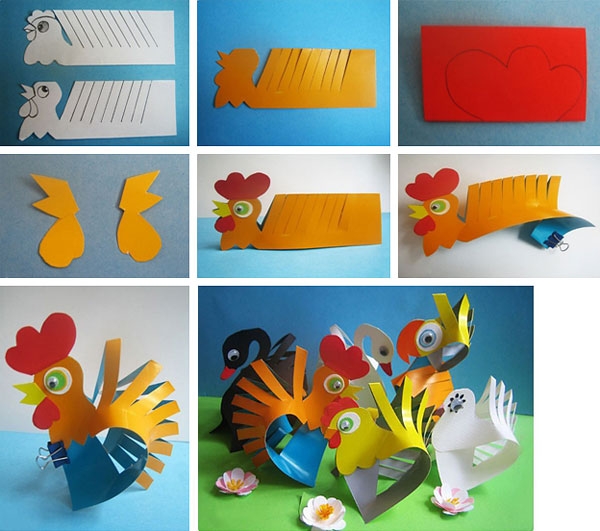
Do-it-yourself paper cockerel for children, step by step - template and photo:
1. Print or copy the pattern of some parts of the cockerel.

2. We will make a cone shape from yellow paper and fix the edge with PVA glue so that it does not fall apart.

3. For the cockerel's paws, we need to cut out two strips 30 cm long and two small circles from red paper.

4. We fold the strips into an accordion as suggested in the photo below.

5. We glue the circles from one edge of the accordion and get paws.

6. Cut out a scallop from paper of the same red color.

7. For the beak and beard, cut one strip longer and two shorter. We cut one short strip on both sides giving the shape of a triangle.

8. We glue the ends of the long and short strips together - we get these figures in the form of a droplet.

9. Glue a small drop onto a large one.


10. Glue the beak on top of them with PVA glue.
11. For the tail, we cut long strips 1 cm wide from yellow, pale yellow and red paper. Six strips are needed.

12. We glue the strips together on one side.

13. On the other side of the strip, curl it with scissors to make a curly tail.

14. Glue a comb on the top of the cone.

15. Glue the eyes cut out of white paper and the beard made earlier to the cone.

16. Cut out the wings according to the template from pale yellow paper.

17. Glue the wings on the sides of the body.

18. Glue the paws at the base of the cone.

19. A curly tail at the back.

20. With a black felt-tip pen, draw the pupils of the Easter cockerel.

22. Finished crafts - do-it-yourself paper cockerel for children.

Do-it-yourself paper cockerel for children - template and photo step by step
New Year is the most joyful, solemn and long-awaited holiday. Such a special day is celebrated by a lot of people. And each of them wants to beautifully decorate their home, giving it a fabulous touch. With the approach of the New Year, almost everyone is interested in which symbol will take over the reign this time. By the way, the Rooster stencil for cutting out of paper will just be at the meeting of 2017, because it is the Fire Cockerel that is the future predecessor, and it will not be difficult for each of us to print templates with his image today.
Traditions for New Year's Eve


Undoubtedly, no one canceled the traditions, and they are an invariable decoration for the New Year. For example, "lianas" from garlands, which are made of paper with their own hands. Or tinsel shimmering in different colors, with which you can create beautiful elements, as well as various Christmas decorations, by the way, will come in handy to create a festive mood.
The forest green beauty is also traditionally decorated with various toys, multi-colored LED lights, iridescent rain, and so on. But we must not forget about the most important task, that is, it is imperative to plant the predecessor of the approaching year on the Christmas tree. After all, as you know, this will really please Petushka, who will not remain indifferent to this act. 


According to tradition, it is known that those who please the ruler of the coming year should not be afraid of any difficulties in the New Year. The predecessor will be merciful and protect from problems and worries. Of course, with the approach of this holiday, it is not difficult to buy a figurine with the image of a rooster, but it would be better and more correct to make it yourself.
Today there is a fashion to decorate window glass with a symbol of the coming year. In this connection, a lot of people are trying to decorate their homes with beautiful cockerels. Moreover, many of which almost constantly make figures on their own with the help of auxiliary elements. 


Some use a rooster template, which is not difficult to print today through special devices. After that, it is not uncommon to create bright beautiful figures with the help of paints and sparkles. Moreover, it is very interesting to create such art with your children, who surprisingly help to turn real masterpieces into reality.
Creating your own paper cockerel is not at all difficult. To begin with, you can draw it on a sheet with a pencil. Or just print the templates, taking, for example, and then choose the appropriate stencil. Then use ordinary toothpicks, glue and a set of multi-colored sparkles. With the help of such auxiliary elements, it is necessary to decorate the predecessor of the year. 

To begin with, draw all the lines well. After that, apply glue to the area to be painted. Then, using a toothpick, apply glitter as if decorating with a felt-tip pen. The fact is that a shiny crumb will allow the drawing to shimmer with colored paints for a long time. For each shade, you should take a separate toothpick so as not to mix colors.
A New Year's composition can also be cut out of a conceived figure, but since the year of the Fire Cockerel is approaching, I want to please this symbol and fall into favor with it. Therefore, today the patterns of just such a bird are used.
Improvised tools for cutting patterns:


- a sheet of white paper, you can take a standard format - A 4;
- a wooden surface (plank) on which cutting will take place;
- pencil, ruler and eraser;
- scissors;
- stationery knife.
The creative process will not take much time, and the result will please everyone who wants to try their hand at this art. It just takes patience and a little effort.
The finished template or the drawn figure must be carefully cut out of paper with scissors. If the figurine requires delicate actions when cutting, it is better to use a clerical knife, then the product will be neat. Using sharp tools, work should be done on a wooden surface so as not to cut the table or other interior items. 


Then, when the product is ready, it is best to stick it on the window using a soapy solution. You can pre-pour warm water into the container and add pieces of soap there. While the figure is being cut out, the soap will dissolve and it will turn out, a ready-made product for gluing.
In order to create a fabulous composition on the window, the Fire Cockerel can be painted in bright colors and planted on a fluffy spruce branch, which, in turn, can be beautifully decorated with a toy and snow. To reproduce this, you need to show a little more patience than when creating one cockerel.
Beautiful Christmas composition


An auxiliary tool will need exactly the same as when creating a cockerel. Only now you need to draw or print a beautiful fluffy spruce branch. You should choose a stencil taking into account the fact that the symbol of the year itself will sit on top of it, and under it on the branch itself, depict a patterned ball that will be a New Year's decoration. Snow can be drawn.
After the spruce branch and the New Year's toy ball are picked up, they should be attached to the window with a soapy solution. After that, the compositions are allowed to dry, and then decorated with bright colors. You can add multi-colored sparkles. 

From white sparkles to depict snowflakes that will shimmer brightly. The cockerel needs to be painted in multi-colored colors of paints, then it will look like a real fairy-tale character. Draw a spruce branch with rich green paint, because the window is transparent and pale colors will not work here. A toy - a ball should also be dressed up in different shades of colors. Only then you get a real New Year's composition.
There are many options for how you can decorate your home for the long-awaited holiday. After all, I want to please all my relatives and friends, giving them a real holiday and good mood. The proposed options will just come in handy, by the way, and will help make all your dreams come true. You just need to try and then everything will work out.
We noticed that before the new year, the windows in the houses become different, festive and bright. They want to look endlessly and enjoy the moment. And all because these windows are decorated with New Year's stencils. Do you want your windows to turn into a fairy tale and “come to life”? New stencils for the new year 2017 for cutting on windows will help you with this. We have collected the largest collection of stencils, and with their help you can decorate not only your windows, but also the windows of your neighbors and friends. See examples of templates and download for free for yourself and friends.
Since 2017 is coming to us, it is logical that these numbers adorn the windows. Of course, you can draw the numbers on paper yourself and cut them out. And you can use our option. For example, like this, where each number has a New Year's hat with snow:


And there is another option: a beautiful New Year's snowman, and on the largest coma he has numbers. The snowman smiles and rejoices that winter has come and snow has fallen. Such windows will be looked upon with envy!


And what about without a beautiful Christmas tree? You can't do without it. Therefore, in our selection there are Christmas trees, and not just Christmas trees, but Christmas trees with toys, forest trees with snow and others:


To cheer up, watch the New Year's video congratulations 2017!
Yes, we almost forgot about the main thing - about the symbol of the year. See what beautiful rooster stencils there are:


In the New Year and Christmas, everything should be saturated with magic, and magic must be present in every detail.
The Christmas tree is strewn with lights, the New Year's table is replete with culinary masterpieces, spruce wreaths are hung on the doors, multi-colored rain flows down the curtains. Don't forget to decorate the window! After all, how pleasant it is to start the morning with a cup of coffee in front of a window covered with frosty drawings, watching pedestrians in warm jackets and hats rushing to work or school.
Vytynanka - what is it?
What is this strange word - "vytynanka"? Everything is very simple. This is a kind of creativity, which consists in cutting out patterns from paper. Such products decorate windows, postcards, gifts and much more.The history of vytynanok originates from the distant Old Slavonic times, they came to our region from China. Then, with the help of creating "silhouettes" of plants, people, animals, they decorated the facades and walls of houses, windows, clothes. Also, vytynanki found in people's lives not only domestic use, but also widely used for religious purposes - in church traditions and on holidays.

Masters for their manufacture took not only paper, but also wood, birch bark and even metal.
For New Year-themed vytynankas, white paper is most often used. To reproduce all the small patterns from the templates, you will need nail scissors or a clerical knife. For larger patterns or when a child is working on protrusions, ordinary large scissors will suffice.
We decorate the window with New Year's vytynanki
To begin with, the window space must be divided into zones. At the bottom, it is best to place protrusions that require completion, “earths”: for example, snow, houses, snowdrifts, Christmas trees, snowmen, children playing. In the center, it is best to place snowflakes, Christmas decorations, angels, fir branches.Above - the stars, the moon.
Here are a few examples of windows that, with the help of skillful hands, turned into New Year's masterpieces.


How to cut a New Year's vytynanka?
Let's start simple. You can draw them yourself, but it will be more convenient to use ours - we have prepared beautiful schemes for you.Prepare in advance: 
We make do-it-yourself vytynanki-snowflakes on the windows
Get ready - the work will be filigree, because, as you know, the pattern of each snowflake is unique. For snowflake-shaped protrusions, you will need nail scissors with sharp tips. Just look what you can do with your own hands!
To make your paper snowflake the most beautiful, follow the instructions:
- Take thin white sheets of paper that are commonly used for printing in offices;
- Fold each sheet in half diagonally - corner to corner - and cut off the excess paper with scissors to make a square;
- Now bend the paper a few times, you should end up with a small triangle. Make sure that after these manipulations the paper is easy to cut;
- Repeat patterns from templates or show your own creativity;
- Expand the snowflake and see what happens.

Here are the templates we promised and brief instructions. You can print them if you like:


As we mentioned at the beginning of the article, a variety of drawings and patterns can be depicted from paper using the vytynanka technique - from the simplest to the very complex. 


We make a New Year's card-vytynanka with our own hands
A New Year's gift to family and friends can be supplemented with a holiday card. And we also recommend making it using the vytynanka method.To do this, you will need all the same materials, only paper can be taken in a variety of colors and textures, and you will need thick cardboard for the base of the postcard.
Moreover, the finished postcard can be supplemented with ribbons, stickers for decor, drawings or sparkles.


Christmas holidays are the time for creativity. Try to take some time to create something special with your own hands. Believe me, this will help not only to have fun, but also to think about everything that you would like to leave in the past year. All problems, hardships, anxieties will disappear with each curl of your festive vytynanka.
Follow us on Facebook