Technology for performing classic manicure. The procedure for performing a classic manicure
And now let's talk about the simplest actions that will help make your nails well-groomed and beautiful. These actions are called by one well-known word - manicure.
To do it right manicure you will need the following items:
Nail file (avoid metal files, they are too rough);
Sharp nail scissors;
Towel;
Nail polish remover (without acetone);
A bowl of warm water;
Soft brush for cleaning nails;
Wooden or plastic stick to push back the cuticle;
Moisturizer, oil or nail balm;
Base for varnish, nail polish, protective coating for varnish (the last item is optional).
To do the right manicure, we will follow a certain procedure.
Procedure.
If the nails were varnished, then you need to carefully remove it;
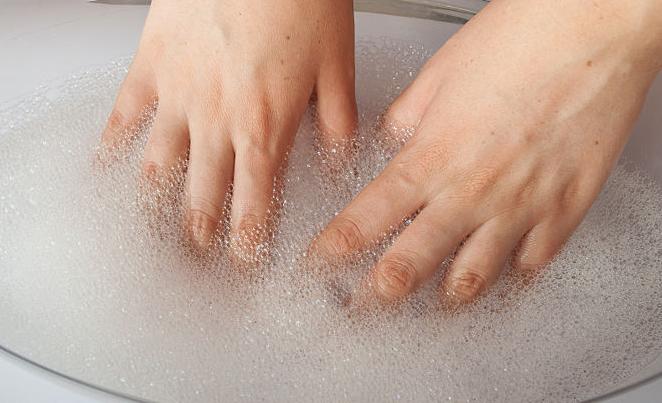
Wash your hands and brush your nails with a soft brush. Then dry your hands;
 - take a nail file and give them the desired shape. File your nails carefully at the corners. By cutting too much, you thereby weaken the nail. If the nails are too long, it is better to cut them first. This should be done while the nails are wet. Movements when filing nails should be from the edges to the middle. After giving the desired shape to the nails, you can check their smoothness. To do this, run each fingernail along the old tights - there should be no puffs;
Now we will make a warm bath (you can add a decoction of chamomile to it) and immerse your fingers there for 10-15 minutes;
After taking the bath, the skin on the fingers around the nails softened and everything superfluous can be removed. But not the cuticle! This thin skin is needed to protect the root of the nail from dirt and bacteria. Just push back the cuticles with a wooden or plastic stick. Manicure is a pleasant procedure, no need to be zealous in the process of removing rough and excess skin;
Lubricate the skin of the hands and nails with cream, oil or balm. Massage your hands and each finger for several minutes; 
In fact, the manicure is finished. But if you want to varnish your nails, then proceed to the next step. Remove any remaining cream from your nails and pat them dry. (If you oiled your hands, you will have to wipe your nails with nail polish remover). Apply base coat, nail polish and top coat in sequence.
Little tricks:
You can cut only wet nails, and file with a nail file, on the contrary, only dry ones;
Products containing acetone degrease nails. As a result of the use of such products, the nails cease to shine. Therefore, try not to use such means;
Often the lacquer cap dries to the bottle. To prevent this from happening, lubricate the thread with a thin layer of petroleum jelly or carefully wipe the neck of the bottle before closing;
To keep the varnish longer, apply not one, but 2-3 layers; 
The problem of premature drying of varnish can spoil the entire process of painting nails. To keep the varnish longer in its liquid form, it is recommended to store it in the refrigerator;
Mixing varnish is best done by rolling the bottle between the palms. When we shake the varnish, bubbles form;
Some varnishes contain substances toluene and formaldehyde, which cause allergies. When buying varnish, it is advisable to pay attention to this.
Beautiful and well-groomed nails incredibly adorn the hands, so a manicure is a necessary and mandatory procedure not only for women, but also for men. After all, systematic nail care is not only their beauty, but also health.
Classic edged manicure - differs from other types in that it is necessarily “wet”, that is, it is performed with steaming brushes in a warm bath with water and useful additives.
And also necessarily performed with the cutting of the cuticle and rough skin around the perimeter of the nail.
Its alternatives are unedged manicure (with the removal of the cuticle using cosmetics) and hardware. However, these types of processing in our country are not as popular as classic manicure.
The popularity of trimmed manicure
Residents of Western Europe generally prefer. In Russia, it has not received much distribution. Our women do not want to give up the benefits of a classic manicure, and these are:
- Speed of execution. An unedged manicure, especially at first, until the cuticle becomes thinner under the influence of special cosmetics, takes a lot of time. A classic manicure by an experienced specialist is always performed quite quickly.
- A minimum of tools and traditional means. To perform a trim manicure, the master needs professional and high-quality, but quite ordinary manicure tools and cosmetics.
- Always a great effect. This is the main advantage. Even with very neglected hands, a specialist can immediately achieve an impressive result. It is no secret that many women neglect constant care, and for them a classic manicure is the only way to put their nails in order.
disadvantages
There is only one drawback: lack of skill or an unpleasant accident that can cause minor injury. An unsuccessfully cut cuticle is a gateway for infection, it is painful and unaesthetic, it can completely ruin the appearance of nails and mood.
Is it possible to insure yourself against such accidents? Act in two directions at once: gain experience in performing a classic manicure and use the services of a good master.
For those who wish to study the intricacies of performing trimmed manicure, a video is offered:
Tools for performing a classic manicure
When performing an unedged manicure, a minimum of tools is used, and the emphasis is on high-quality cosmetics that suppress the growth of the cuticle and soften it. Would need:
- Nailfile. Use a glass file: it is the most gentle on the nail plate.
- Antibacterial gel or liquid.
- Steaming container.
- Polishing buff for 220 - 240 grit abrasiveness.
- Scissors, manicure scissors with rounded and straight ends, manicure hatchet.
- softener for softening.
- Cuticle pushers: metal, wooden.
- Nourishing cuticle oil (gel, cream).
- Hand cream.
Step by step instructions
- Hand sanitizer treatment. The master carefully wipes his hands and the hands of the client with an antiseptic: antibacterial gel, lotion, effective against fungus, viruses, bacteria: Sterillium, Cutasept, Dezamin or others. This tool must be kept on hand in case of a cut, microtrauma.
- Removing the old cover. This is an optional item. If you have a long-lasting coating on your hands: for example, shellac, and removing it is not included in the plans, then you should not do this. A cut manicure can also be performed while maintaining the coating, but in this case, nails, of course, should not be filed.
- Sawing. Before doing it, decide on the desired length and shape. Next, you need to form each nail with scissors, and then file it first from the end, and then from the sides. With constant and frequent care, scissors are not required at all: just sawing to the desired length and shape is enough.
- Grinding. It must be produced with a buff with a delicate, finely abrasive surface. The buff should be held across the growth of the nail and with light movements in one direction to achieve shine and smoothness on each nail. Also, this procedure removes small irregularities, grooves on the nail plate. After polishing, brush off small particles with a brush.
- Apply cuticle softener. There are many cuticle preparations available. Cuticle Away from CND is considered a classic. Means are applied with a brush or squeezed out (if the product is gel-like). When performing a cut manicure, apply a softener for a short time.
- Pushing back the cuticle with a pusher. Use a wooden or metal stick to lift the cuticle and push it back towards the skin. In no case do not press hard on the nail and cuticle, so as not to injure the nail matrix. Perform this operation carefully.
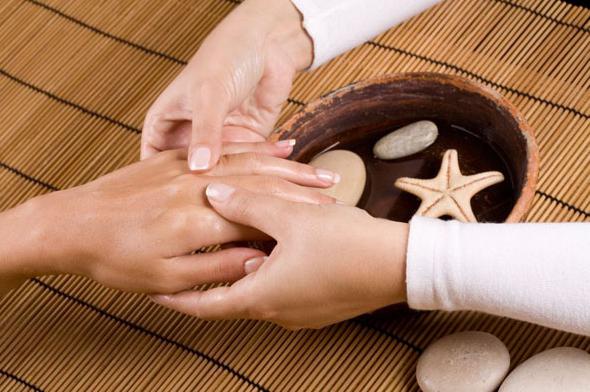
- Softening bath. Dip your hand in a bath of warm water. You can add a little lemon juice, sea salt, as well as means to strengthen the plates to the water.
- Cuticle cutting. Before this operation, once again slightly lift the cuticle with a pusher, and then cut it in a circle, holding the manicure scissors at an angle of 90 degrees to the nail. Then cut off what protrudes around the perimeter with a cuticle, starting from the side rollers. In no case should the skin be torn off, but only easily cut off, which is possible. To avoid injury at this important stage, the manicure tool must be perfectly sharpened. Here is a video on the topic for professionals and advanced amateurs:
- Disinfection and hydration. Hands should be treated immediately after a trimmed manicure, first with a caring cream, and then only nails and cuticles with a disinfectant. It is best if it is an alcohol-containing product. It will not only prevent infections, but also degrease the nail plates before applying the varnish.
- Lacquer application, nail decoration. After a properly executed edged manicure, it's time to give free rein to your imagination, and perfectly decorate your nails.
- Applying cuticle oil. Use a skin care oil such as Orly's CND Solar Oil or Orly's Cuticle Oil Gel to soothe irritated skin. The best cuticle oils contain vitamin complexes and valuable natural ingredients. They promote the growth of healthy nails and slow down the growth of the cuticle itself.
When to Call a Master
- makes you hard and tired,
- manicure is done for an important occasion, and must be perfect,
- nails are too neglected,
Don't tempt fate. Entrust your hands to a high-class nail technician who will take care of your nails with the best cosmetics, a steady hand, a trained eye and professional tools. And then your nails will always be well-groomed.
Hands are the second face of a person. Well-groomed beautiful nails always attract the attention of strangers and have a conversation. Recently, even men began to use the services of specialists who help to give their hands a good look. In this article we will talk about what there are and the technique for performing them. You will learn the basic nuances and details of the work. Be sure to say about the technique of performing a manicure. The master class will be described below.
What is a manicure? General description of the procedure
Before finding out what types of manicure and technique are, it is worth saying a few words about the general understanding of the process. involves not only applying decor and cutting the plate. Manicure is primarily skin care around the bed (cuticle). The procedure also involves healing, improving the appearance of the nail.
Types of manicure and technique may be different. Currently, masters and specialized salons offer to choose what is right for you. Let's try to learn everything about manicure. Types of manicure will be described below.

Hardware processing of nails and skin
Recently, this type has become very popular. In order to make such a manicure, you need to have a special device (machine). It comes with a lot of attachments. Some of them are needed for grinding the nail plate. Others are used directly on the skin.
Before work, you can not wet your hands and soften the cuticle. Immediately you need to start processing it with a machine. The machine can do all the hard work for you. It remains only to trim the nail and, if necessary, cover it with varnish.
Spa manicure and its types
Several categories can be included here. Spa manicure has two subspecies of nail treatment: cold and hot method. In addition, there are Japanese and Brazilian equipment. Paraffin therapy (manicure) is also gaining popularity.
- Manicure techniques (hot and cold types of spa) involve exposure of the hands to special therapeutic solutions. Most often, salt, herbs, various oils are used for their preparation. All these substances heal the nail bed and add shine to the plate. After such processing, the handles look well-groomed and beautiful.
- Paraffin therapy is another popular way of treating hands and nails these days. During the procedure, oil or cream is applied to the skin, after which the brushes are immersed in hot paraffin. The temperature of the composition can reach 50-60 degrees. Next, the hands are removed, and the product seals the skin. It is this manipulation that allows the most effective effect of the cream or oils on the skin of the hands and nails.
- Japanese manicure. The processing technique in this case will be as follows. The skin is processed in special baths, for which only natural ingredients are used. Moreover, all the tools that the master uses are also of natural origin. After such treatment, the nails become stronger and shiny.
- The Brazilian type of processing involves the use of individual sets for each visitor. So, in the salon you will be provided with gloves, a few sticks and some other accessories. All of them will be disposed of immediately upon completion of work.

European type of processing (manicure)
Manicure techniques (the types described above) can be combined in this variant. involves the use of special gels, solutions and pencils that soften the cuticle and allow it to be easily removed. First, the master uses such solutions, after which he removes excess skin. In this case, piercing or cutting objects are never used. After careful processing of the roller, the nail is filed and polished. Then you can use oils, creams or medicinal formulations for the plate.

Classic manicure
The classic manicure technique involves the use of files, scissors, cuticle nippers and many other items. It should be noted that this method of processing is the most dangerous. That is why all items and tools must be sterilized after each client. Consider a master class on the implementation of this manicure.
The first stage: softening of the skin and cuticles
To influence the nails and fingers, the master most often uses an ordinary soap solution. You can add salt, herbs or oils if you like. Dip your fingers in the prepared heated composition for about 15-20 minutes. The drier your skin, the longer the exposure time should be.
After the specified range, you need to wet the skin of the hands with a soft cloth, leaving moisture on the area of the nail zone.
Second step: trimming the cuticle
After thorough softening, excess skin from the periungual roller is removed easily and without much effort. Push back with a stick the part that has grown onto the plate. After that, use scissors or sharp tweezers to remove the excess cuticle.
Be sure to pay attention to the resulting burrs. They need to be carefully cut off without damaging the deeper layers of the skin.

Third stage: nail treatment
When the skin of each finger is processed, you need to cut the length of the plate. This should be done with sharp scissors or tongs. After that, carefully file the edge of the nail and give it the desired shape. Remember that sawing is best done from the edges to the middle. In this case, the plate will not exfoliate and crumble.
Fourth step: application of design or emollient composition
When the nail is shaped, you need to apply the final design to it. It can be varnish, stickers or any other decoration. If you want to leave the plate clean, then you can use wax or aromatic oils that are rubbed into the bed and soften the cuticle. After such a manicure, the hands look natural and beautiful.

Summing up and a small conclusion
So, now you know the main types of manicure and technique. Previously, only the classical method was used. In the modern world, there are more and more opportunities to bring pens and nails into proper shape. Choose the technique you like the most and use it consistently.
Remember that when applying nail extensions, it is worth doing a manicure about one or two weeks before the next correction. Otherwise, your cuticles may become thinner, and cracks and abrasions will begin to appear on it.
It is also not worth building up nails after paraffin therapy. In this case, the plate is impregnated with oils and nourishing creams, and is also saturated with moisture. After such treatment, the gel or acrylic may simply not lie on the nail.
The classic look of a manicure should not be done on dry skin. Before such processing, it is necessary to moisten the cuticle and soften the roller. Otherwise, injury will be inevitable.
Take care of the health and beauty of your nails. Do manicure regularly and always be beautiful!
Manicure is a cosmetic procedure for the treatment of nails on the fingers and the fingers themselves, or even the entire hand. Manicure is performed as in beauty salons or beauty parlors by qualified specialists. manicure pedicure make-up tattoo
Manicure may include:
- Hand massage
- Baths for the skin of hands and nails
- Nail care, polishing, shaping
- Decoration of nails with varnish, rhinestones, etc.
- Nail extension
From the point of view of processing the cuticle, there are two types of manicure - edged and unedged. When trimming a manicure, a special tool is used to cut the cuticles - cuticles (they are also sometimes called cuticle nippers; tweezers, tweezers are their incorrect name and refer to the tweezers tool for plucking hair on the eyebrows), when not trimmed, wooden sticks are used or polished with a special electric manicure device. In public manicure, increased hygiene requirements are necessary to avoid instrumental infection with fungal diseases.
There are more than 16 types of manicure, for example:
- 1. Classic or cut manicure: the cuticle is trimmed with special tweezers or burr scissors.
- 2. European or unedged manicure: the cuticle is not cut off, as with the classic one, but is pushed back with orange sticks; gentle manicure.
- 3. French manicure: differs in the way varnishes are applied - soft (pale pink or beige) on the finger plate, white on the outer tip.
- 1. American manicure: the color of the varnish and lipstick are the same.
- 2. Spa manicure: with related spa treatments - soaking, massage, etc.
- 3. Hardware manicure: the cuticle is polished with a special machine.
- 4. Hot manicure: at the beginning of the procedure, the hands are placed in an electric bath with warm cream or oil. During the procedure, nourishing and softening compounds are rubbed into the skin of the hands. The skin after a hot manicure becomes tender, smooth, the nails are strengthened, their appearance improves.
- 5. Japanese manicure: a kind of "cover" is created around the nail plate, protecting it from external influences. A distinctive feature of Japanese manicure is the use of only natural compounds and tools. First, the cuticle is softened, and a special preparation is rubbed into the nails, which is identical in composition to the nail plate. Then the nails are polished and polished with a special powder.
- 6. Spanish manicure: differs in depth and color saturation, layering. Several layers of varnish are applied to the nail, each of a different color. Each layer can cover both the entire surface of the nail, and only a part. This creates multi-colored stripes that visually lengthen the nail.
- 2. Nail extension technologies: acrylic, silk, gel
Acrylic (some cunning craftsmen came up with the name "porcelain", but it's the same thing) nails can be extended in two ways: - on forms - special flexible plates on which an artificial nail is formed; -and on tips (from the English tip) - plastic nails that are glued to yours, and material is already applied to them. (I prefer to work only on forms). The type of acrylic nails is less beautiful than others, but more durable. Nails have greater elasticity, resilience, do not crack with strong bends. They are suitable for those women who lead an active lifestyle and the likelihood of damage to the nails is quite high.
SILK (synonymous with FIBERGLASS) The technology of silk nail extension is as follows: the nails are shortened, tips are glued to them, then shreds are cut out of silk or other similar material (fiberglass, linen) according to the shape of the nails. They are impregnated with a special composition and superimposed on the nails. After hardening, the procedure is repeated, that is, several layers are applied. Then the nails are processed, they are shaped, they are polished.
Extension technologies using different gels differ slightly. The bottom line is that the gel is a material that hardens under the influence of ultraviolet rays. Gel nails have a more festive look - they shine, they are transparent. But, in my opinion, gel nails have two main disadvantages compared to acrylic:
- - they are more fragile;
- - they are afraid of a significant temperature difference (in winter - from the street to a warm room, for example), from which they crack; - they are beyond repair, i.e. if the gel nail is cracked, then it must be removed and a new one made, and the acrylic nail can be repaired.
The process of nail extension can be divided into five main stages:
- 1. After examining the hands, the nail plates are processed with a file or a special machine - the fat layer is removed, the surface is leveled
- 2. A special “form” is put on the finger. After the acrylic hardens, the mold is removed. When working with tips, tips are glued instead.
- 3. Using a special brush, a two-component polymer - acrylic is applied to the nail plate. A nail of the chosen length and shape is formed.
- 4. When all the nails are formed and the acrylic has hardened, the final shape and length is given with a special file, the surface is processed.
- 4. Grinding, polishing, varnishing.
A pedicure is a therapeutic practice, as necessary as any other element of personal hygiene, and requires a serious approach.
With a pedicure, you can use the tools that make a manicure.
There are different types of pedicure: classic (edged), European (dry), hardware, nail pedicure, SPA pedicure, Japanese, French and fish peeling.
Classic pedicure.
The classic cut or wet pedicure is the most common nail care procedure due to its affordability. The age of the procedure is more than a hundred years old, and the history of professional foot care began with this type of pedicure.
During the procedure, piercing and cutting tools are used: scissors, tweezers, etc., which is why the classic pedicure is called edged.
European pedicure.
This type of pedicure has several names: dry pedicure, unedged pedicure. During the procedure, baths and piercing-cutting instruments are not used. This is its main advantage over other types of pedicure.
Hardware pedicure.
Foot care procedure, during which a special device is used. Instead of water, special softening creams are used, which reduces the risk of fungal infection. They affect only the coarsened layer of the skin, while the healthy one is not damaged by scalpels and files.
Hardware pedicure, being sparing, has practically no contraindications and is recommended for persons of any gender. The only contraindication is a thin nail plate. But it is worth consulting with a specialist: this is not a strict ban for everyone.
Nail pedicure.
Tight shoes, high heels, nylon tights are just a few of the reasons that affect the condition of toenails. Under the weight of the body, they deform, exfoliate, acquire a yellowish tint.
Pedicure is aimed at removing these defects and includes the following types of procedures: cleaning the skin of the feet from calluses and rough skin; removal of the upper layers of the epithelium; correction of ingrown and deformed nails, giving them the correct shape; removal of calluses; antifungal treatment of nails; cuticle treatment; foot massage.
SPA pedicure.
This is an elite treatment that allows you to achieve excellent results in any condition of the skin of the legs. Especially for this procedure, quite a few preparations have been created that contain high-quality natural ingredients to soften and moisturize the skin of the legs. The presence in the complex of products containing fruit acids and sea salts allows you to painlessly remove calluses and dry skin. Mineral-rich algae, aromatherapy oils and plant extracts nourish the skin of the feet and give them a truly childlike softness. The composition of the preparations, as a rule, includes fruit extracts, as well as essential oils of citrus fruits, extracts of medicinal plants. But paraffin foot wraps (paraffin therapy) can return truly childish softness to the soles.
Japanese pedicure.
This procedure is becoming very popular, as it allows not only to give the legs and nails an attractive appearance, but also to prevent many diseases. Japanese pedicure is a comprehensive foot care session that includes classic and hardware types of pedicure. Such a session begins with a diagnosis of the condition of the feet and nails, as a result of which the master determines the correct sequence of cosmetic procedures. Depending on what kind of care is required for the feet and nail plates, the master chooses special cosmetics. All materials and preparations used in Japanese manicure are made exclusively on a natural basis and are rich in nutrients and vitamins.
French pedicure.
This is not just a nail care technique, but also a special design style, known throughout the world, which came from manicure. The procedure is painless and completely safe, as the cuticle is removed without damage.
Usually French pedicure is performed according to European technology, but there are other options. Perhaps the initial combination with the classical technique, which after 5-6 procedures can be completely eliminated.
Fish Pedicure.
This procedure consists in the fact that small fish take care of the client's feet. The fish pedicure is recommended for those who wish to make traditional foot care procedures more gentle. Doctor fish can cure skin conditions such as eczema, dermatitis, and psoriasis. To do this, not only the client's legs, but also his entire body are immersed in the aquarium.
Despite the growing popularity of European unedged technology, classic manicure is used in practice by many masters both in salons and at home. It solves the problem of a too rough cuticle, which is simply impossible to soften with a remover at a time, so you have to carefully cut it with scissors or nippers. Classic cut manicure can be optionally combined with spa treatments, Brazilian manicure method and other types of professional nail treatment before applying gel polish. Mastering a classic manicure is not difficult, no special expensive tools, like with a hardware manicure, are required, so this technique is great for home use, including by beginners.
Features of trimmed manicure
The difference between a classic edged manicure and other techniques lies in its name. In the European technique, the cuticle is softened with a remover, and then pushed back with an orange stick. Classical manicure uses metal tools (scissors, wire cutters, spatulas, etc.). The cuticle is first softened, and then carefully trimmed. The main disadvantage of this type of cuticle treatment is the possibility of damage to the delicate skin around the nail. There is also a small, but the likelihood of infection. However, experienced craftsmen masterfully cope with this technique, and it does not cause any complaints from customers. In addition, as mentioned above, the European technique is not suitable for all girls due to too rough cuticles. Masters recommend starting with a classic manicure, and then gradually moving on to a European unedged manicure when the cuticle becomes softer.

Also a distinctive feature of the classic manicure is the use of water. Before starting to manipulate the client's hands, the master prepares a hand bath to soften the cuticles.
The main advantages of classical technology :
- Available for home use;
- Suitable for working with rough cuticles;
- Does not require large expenses;
Disadvantages of edging :
- Careless handling of the instrument may cause injury to the cuticle or nail plate;
- After the procedure, burrs often form.
In general, the technique is simple to perform a manicure at home and is quite popular.
The list of necessary tools for manicure

For a classic manicure, you will need the following set of tools and cosmetics:
- Nippers, scissors, shovels, pusher;
- Liquid for disinfection of hands;
- Disinfector for tools;
- Disposable nail files and buff for nails;
- Dust brush;
- Hand bath and saline solutions to strengthen nails;
- Remover for too rough cuticles, nail and cuticle care oil.
Classic manicure technology: a step-by-step lesson with a photo
The technology for performing a classic edged manicure will be easiest to show with the help of a step-by-step photo lesson. Each master in the process of work can carry out some additional manipulations, use a variety of tools and cosmetics. Now you don’t often see classical technology in its pure form anymore, everyone in the learning process brings some of their own chips to it. Beginners, having gained experience, combine techniques and select the optimal manicure process for themselves. Classical technology consists of 5 main stages. Let's see how to do a classic manicure for beginners.
STAGE 1 OF ANY MANICURE - ANTISEPTIC TREATMENT
Preparing the client's hands with a skin antiseptic. The master at the same time works in disposable gloves.

STAGE 2 OF CLASSIC MANICURE - NAIL BATH
The first step is to soften the rough skin around the nails and this can be done with a bath of warm water. The time is calculated individually, approximately the process takes from 5 to 15 minutes. Additionally, you can use sea salt to strengthen nails, aromatic oils and special cosmetic care supplements. If the cuticle is very dense, then you can additionally use a remover (apply it before the bath).

STAGE 3: REMOVAL OF CUTICLE AND PTERIGIA
With the help of a pusher, you need to carefully clean the softened pterygium from the side rollers and under the cuticle. Movement should be from the bottom up. Next, you need to remove the cuticle with forceps, you need to start from the free edge and try to cut the cuticle in the form of a single strip (thus eliminating the possibility of further formation of a burr). Forceps in relation to the nail plate (when cutting the cuticle) should be at an angle of 90 degrees so that there are no cuts. If necessary, you need to walk with a pusher in the area under the cuticle. Skin residue and dust can be removed with a soft brush.


Pay attention to how to hold the tongs correctly and to their position in the hands.


STAGE 5: CARE
If gel polish is not required, then you can treat the cuticle and nail with a special oil enriched with vitamins and minerals.

Classic manicure with gel polish
If gel polish is required after a classic manicure, then a number of additional nail manipulations must be performed to prepare them for gel polish application.
STAGE 6: ROUGHING
In order to improve the quality of adhesion of the base coat to the nail plate, it is necessary to set a slight roughness, namely, to walk over the entire surface of the nail with a buff, slightly pressing on it. Also, after the procedure, it is necessary to clean off all the dust with a brush.


STEP 7: DEFAT
Using lint-free manicure wipes soaked in natural nail degreaser, we remove dust, moisture and cosmetic residues from nails.

STEP 8: DEHYDRATOR AND PRIMER
Many manufacturers recommend using a dehydrator and a primer as additional means for preparing the nail plate. They are applied before the base (first dehydrator then primer). The dehydrator removes excess moisture from the nail, and the primer creates a sticky layer on the surface for better adhesion of the coating to the nail. Many masters do without them. It depends on what brand of gel polish you use (usually the manufacturer indicates all the necessary steps for performing a manicure).

The dehydrator dries quickly enough in the air, it is not necessary to send it to the lamp.

The primer has a liquid consistency and is applied in a thin layer. The coating dries in the air. Drying time 30 seconds.
STEP 9: BASE COAT
Manufacturers of UV coatings for nails produce single-phase and three-phase gel polishes. Single-phase do not require the application of a base and finish coat (these are 3 in 1 coatings). But when using three-phase gel polishes, it is necessary to apply a base coat, followed by its polymerization in a lamp. The standard drying time for gel coatings in LED lamp is 30 seconds, in UV lamp 2-3 minutes, unless otherwise specified by the manufacturer.

The base is applied in a thin layer. For additional strengthening of the client's nails, it is better to use rubber coatings, they have a thicker consistency and level the surface well. Also remember sealing the butt.
STAGE 10: APPLICATION OF GEL POLISH (SHELLAC)
2 layers of colored gel polish are applied to the base with interlayer drying.

The main drop must be placed in the center, and then gently stretch it with a brush.

To make a manicure under the cuticle, during the application of the second layer of gel polish, you need to take a thin brush, push the cuticle as far as possible and gently walk the brush along the entire edge of the nail.

STAGE 11: FINAL COATING
The final step is to apply the top coat (top) in one or, if necessary, two layers. After polymerization, you need to remove the sticky layer with a cloth moistened with a nail degreaser.

STAGE 12: CARE
After completing the classic manicure with gel polish, the cuticle area is covered with a special care oil.

Video tutorial on applying the correct application of gel polish in a classic manicure
French manicure classic
Classic French manicure (French) is performed using different technologies: a smile line is drawn with a brush by hand, special stencils are used, the tip of the nail is dipped in acrylic powder or sparkles, a special French brush is used. Whichever method you choose, the technique for preparing the nail plate will be approximately the same. The exception is the stage of creating the substrate: you can use the base and the subsequent application of light gel polish, or you can use special colored translucent bases for the jacket in your work. Different materials can also be used to draw a smile line: thick gel polish or thicker gel paint.

Step-by-step instructions for performing a classic jacket

Photo with options for a simple nail design
At the end of this review, we posted a selection of photos of a classic manicure with gel polish for long and short nails of various shapes. Perhaps looking at these photos of beautiful nails, you will get fresh ideas for your work. Beginners tend to use the classic colors of manicure: red, pink, beige, blue, gray, white and black.